Ligand-Based Core Hopping Panel
Find alternative scaffolds for a template ligand by defining a scaffold, replacing the scaffold with a set of alternatives, and scoring the ligands based on their shape similarity to the template and optional matching of designated hydrogen bonds.
To open this panel, click the Tasks button and browse to Lead Optimization → Ligand-Based.
- Overview
- Using
- Features
- Additional Resources
Overview of Ligand-Based Core Hopping
The alignment of the attachment bonds to find new cores works as follows. For each candidate replacement core, the program first determines which sets of attachments bonds align reasonably well with those in the template molecule. This is done using a spatial sampling method that allows for automatic addition of linkers. For any position, the linker that best matches in length, geometry, and pharmacophoric feature type of the linker atom on the old core is taken from a library of linkers. The R groups from the original template are then attached to the newly identified attachment bonds in the replacement core, and bond torsions between the new core and the R groups are adjusted to optimize the superposition of the R-group atoms upon their original positions.
Using the Ligand-Based Core Hopping Panel
As the alignment is based only on the attachment bonds, this method is most suitable for scaffold-hopping applications where keeping the R-groups in place is the most important goal. It generally provides better alignments of the R groups than shape-based core hopping, because that is the criterion applied when assessing the new core-containing molecules. You can also insert linker groups between the core and the side chains to allow a smaller replacement core to substitute for the original core.
A receptor can be used to enforce hydrogen bonding patterns and to eliminate cores that have too many steric clashes with the receptor.
To write out the input file and a script for running the job from the command line, click the arrow next to the Settings button  and choose Write.
Ligand-Based Core Hopping Panel Features
- Set Up Job tab
- Visualize Results tab
- Job toolbar
- Status bar
Set Up Job tab
Set up the input for the job in this tab. Once the input is set up, you can use the Job toolbar to start the job.
- Specify Template section
-
Specify the template to which the cores will be matched. The basic task in this section is to identify the side chains (R groups) that you want to keep on the template molecule, while substituting the rest of the template with scaffolds from other molecules. The bonds to these side chains are called attachment bonds.
- Input Structure button
-
Import a structure into Maestro and display it in the Workspace. Opens the Import Structure file selector, in which you can choose a Maestro file or a combinatorial definition file (from CombiGlide). You can choose a template that was exported from a previous run, for example.
- Define Template option
-
When you have a structure in the Workspace, select this option to design the template for core hopping.
Click the bonds to the side chains that you want to keep as part of the new structures. The bonds are marked with an arrow pointing towards the side chain. Multiple clicks on the first bond change the direction of the arrow, then clear the bond selection, then select it again. For the subsequent bonds, multiple clicks select and deselect the bond.
If the structure already has attachment bonds marked, you can select this option to change them; if it does not, you must select this option to mark bonds before you can find new cores.
When you have finished selecting bonds, deselect this option to exit template definition.
- Export Template button
-
Export the template to a Maestro file. The file includes the core definition information.
- Require H-bond donor/acceptor atoms on template option and section
-
Require that new cores have donors or acceptors within 0.75 Å of the positions in the template core. When you select this option, the possible locations of donors and acceptors are marked in the Workspace with yellow spheres, and the options below are activated.
- Select Donor/Acceptor option
-
Select donor and acceptor sites that new cores are required to match. After selecting this option, you can pick spheres in the Workspace. The first click marks the site as an optional match (blue), the second marks it as a required match (red), and the third returns it to the unmarked state (yellow). When you have finished selecting sites, deselect this option. The count of required and optional matches is updated.
- Require all N critical (red) matches text box
-
This noneditable text box displays the number of "critical" matches.
- Require M of N optional (blue) matches option and boxes
-
Require a minimum number of matches to any of the optional matching sites. The total number of such sites that you selected is displayed in the noneditable text box. You can set the minimum number in the other box.
- Specify Cores section
-
Specify the candidate core molecules to use for the job.
- Use structures from option menu
-
Choose the source of the cores for the job.
- Project Table (selected entries)—Use the entries that are currently selected in the Project Table.
- File—Use the structures from the specified file. When this option is selected, the Input file text box and Browse button are activated. Click Browse and navigate to the file you want to use. The file name is displayed in the text box when you click Open in the file selector. You can also enter the file name in the text box.
- Input file text box and Browse button
-
Specify the file containing the structures for the potential new cores. Click Browse to navigate to the file, which can be a Maestro file (
.mae*) or an SQLite database (.sqlite). The file name is displayed in the Input file text box.In the file selector, under Look in, there is an item for the standard core libraries in the installation, labeled Schrodinger Cores. The libraries are SQLite databases. You can also use the
corefinder Command Helputility to generate a database from your own structures.
- Job Options section
-
Set options for input to the job in this section.
- Use receptor option
-
Use a receptor to guide the selection of cores, by requiring hydrogen bonds to the receptor and preventing steric clashes.
- Specify Receptor button
-
Choose the receptor and select hydrogen bonds and make settings for clashes with the receptor. Opens the Specify Receptor Dialog Box.
- Minimum core overlap score text box
-
Enter the minimum acceptable core overlap score for a core pose to be retained in the output. Cores with lower scores are discarded. The score ranges from 0 to 1. You can use this option to enforce a minimum similarity on the accepted cores.
- Maximum output ligands text box
-
Specify the maximum number of output structures resulting from core substitution. There may be more than one structure per core.
- Database Filters button
-
Open the Database Filters Dialog Box, in which you can filter the cores. The dialog box allows you to set the minimum and maximum numbers of heavy atoms, hydrogen-bond acceptors, hydrogen-bond donors, nitrogen and oxygen atoms, chiral centers, and number of occurrences, and also specify the element, charge, and number of attachments for the attachment atoms on the new cores.
- Advanced button
-
Open the Ligand-Based Advanced Options Dialog Box to control the parameters of the search.
Visualize Results tab
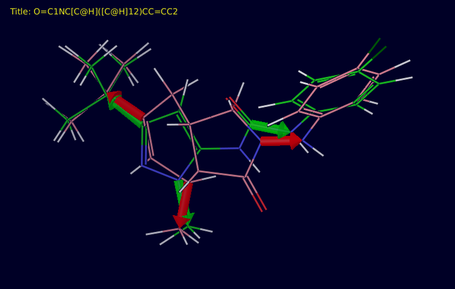
In this tab you can visualize the results of a core hopping run. The run can be any run - it is not restricted to the run just done. The template is fixed in the Workspace and the new cores are selected in the Project Table so you can step through them and see how they align to the template. The attachment bonds are marked with arrows for the template and the new structures. The arrows and the carbon atoms are colored green for the template, and red for the new structure.
- Import section
-
Import or identify the template and set up the Workspace for visualization. The setup involves fixing the template
- Obtain data from option menu
-
Choose the source of the results. The choices are Run just done, Earlier run (file), and Earlier run (Project Table). The choice determines which button is displayed to the right for loading the template and applying the style.
- Select Template in Job Directory button
-
This button is available if you choose Earlier run (file) from the Obtain data from option menu. Click this button to navigate to the directory that contains the run, and choose the template structure file.
- Set Up Workspace button
-
This button is available if you choose Run just done from the Obtain data from option menu. Click this button to fix the template in the Workspace, select the new entries in the Project Table, show the first result, and apply the color schemes.
- Select Entries in Project Table button
-
This button is available if you choose Earlier run (Project Table) from the Obtain data from option menu. If you do not have the template selected in the Project Table, you are prompted to select an entry when you click this button.
- Visualize section
-
Select options for visualization of the results in this section.
- Show in Workspace options
-
Select the structures that you want to show in the Workspace. The choices are the Template, and the Receptor.
- Show only core-hopping properties in the Project Table option
-
Select this option to hide all properties in the Project Table other than those that are relevant to core hopping.These properties include the sidechain rmsd, the number of linkers (nlinkers), and the largest number of linkers used in any side chain (linker sc max).
- Show H-bonds using core-hopping criteria option
-
Display the receptor-ligand hydrogen bonds that satisfied the requirements placed on hydrogen bonds to the receptor. Hydrogen bonds are defined with less restrictive criteria than either Glide or Maestro. There are no limits on the angles, and a maximum distance of 3.5 Å between the acceptor and donor heavy atoms.
- Substitutability Analysis button
-
Show information on what other known drug-like molecules have the same substitutions as a result from a core hopping run. Opens the Substitutability Score Analysis Panel.
Job toolbar
Manage job submission and settings. See Job Toolbar for a description of this toolbar.
The Job Settings button opens the Ligand-Based Core Hopping - Job Settings Dialog Box, where you can make settings for running the job.
Status bar
The status bar displays information about the current job settings and status for the panel. The settings includes the job name, task name and task settings (if any), number of subjobs (if any) and the host name and job incorporation setting. The job status can include messages about job start, job completion and incorporation.
Use the Reset button  to reset the panel to its default settings and clear any data from the panel.
The status bar also contains the Help button  , which opens the help topic for the panel in your browser. If the panel is used by one or more tutorials, hovering over the Help button displays a
  button, which you can click to display a list of tutorials (or you can right-click the Help button instead). Choosing a tutorial opens the tutorial topic.