Customize Mouse Actions Panel
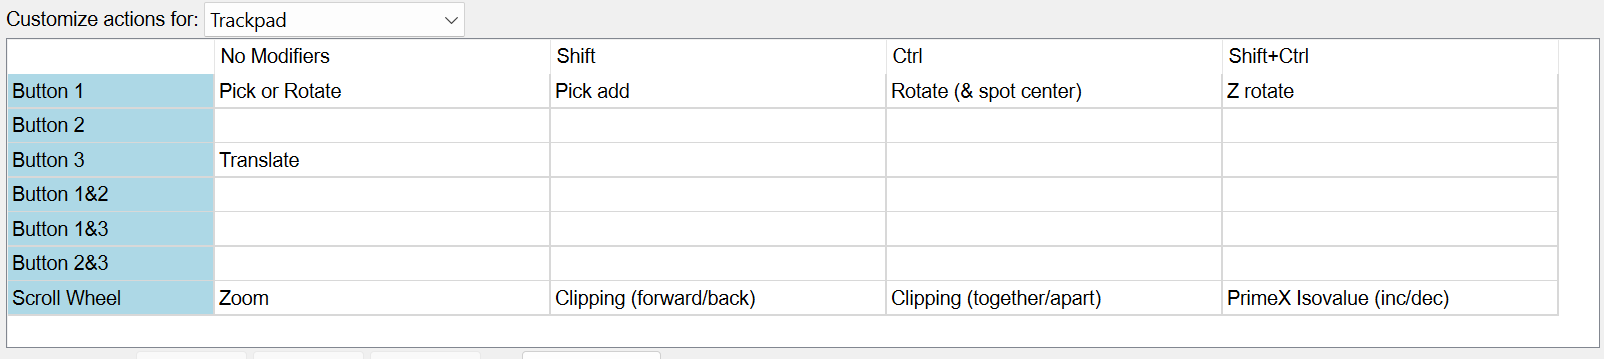
In this panel you can customize the actions performed by the mouse buttons and wheel with or without modifier keys (SHIFT, CTRL). There is also support for a touchpad.
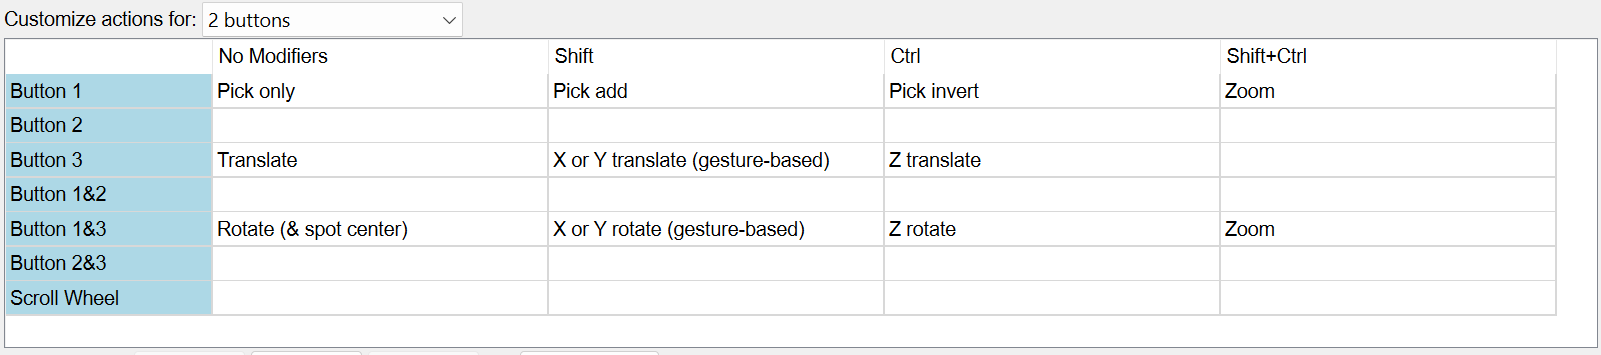
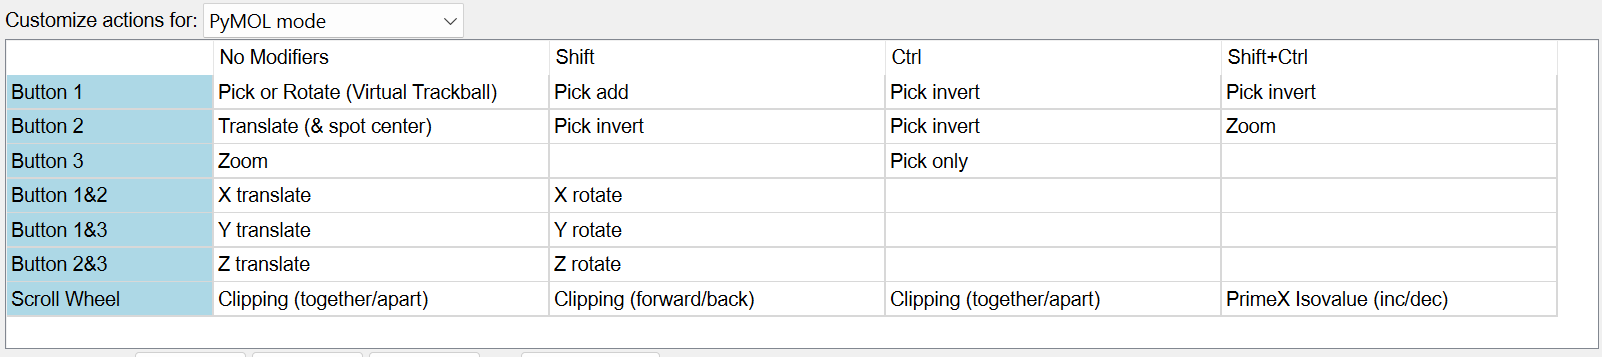
Note that button 1 is the left button, button 2 is the middle button (if present), button 3 is the right button; so a 2-button mouse has button 1 and button 3 but not button 2.
To open this panel, choose Workspace → Customize Mouse Actions.
- Using
- Features
- Additional Resources
Using the Customize Mouse Actions Panel
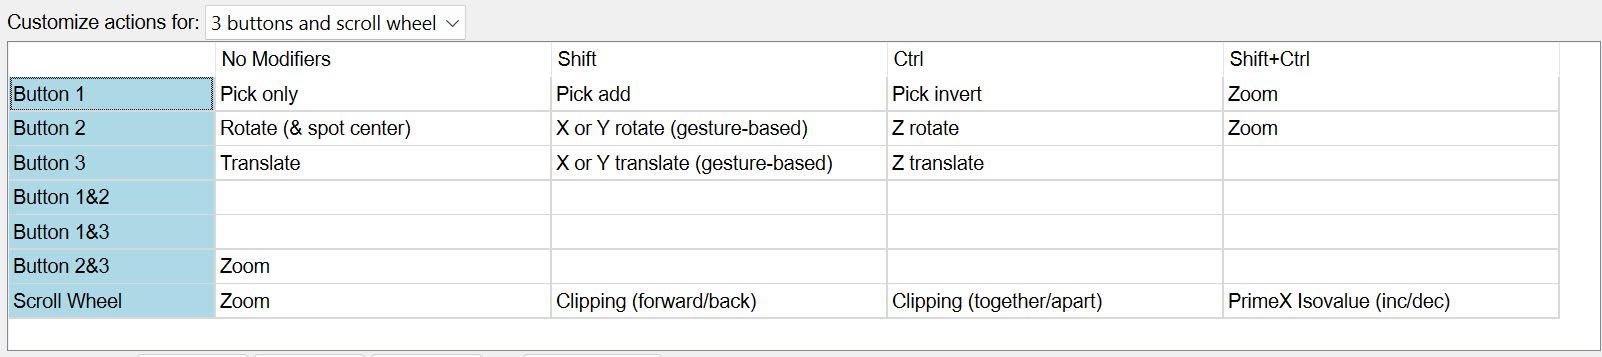
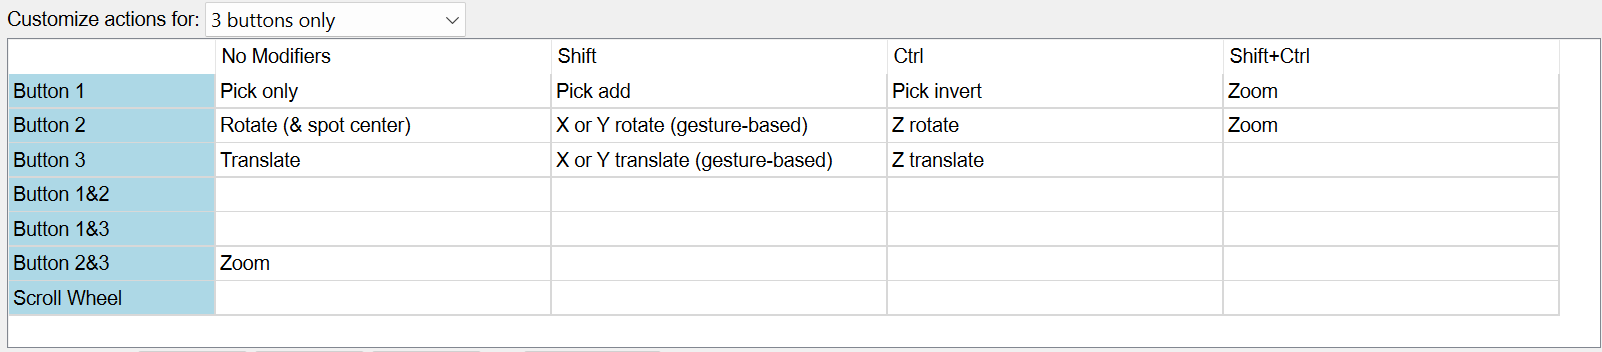
To customize the mouse or trackpad actions that are mapped to Workspace actions, select the appropriate device or style from the Customize actions for option menu. You can make separate customizations for each kind of device, and Maestro detects the kind of device that you have and uses the appropriate settings.
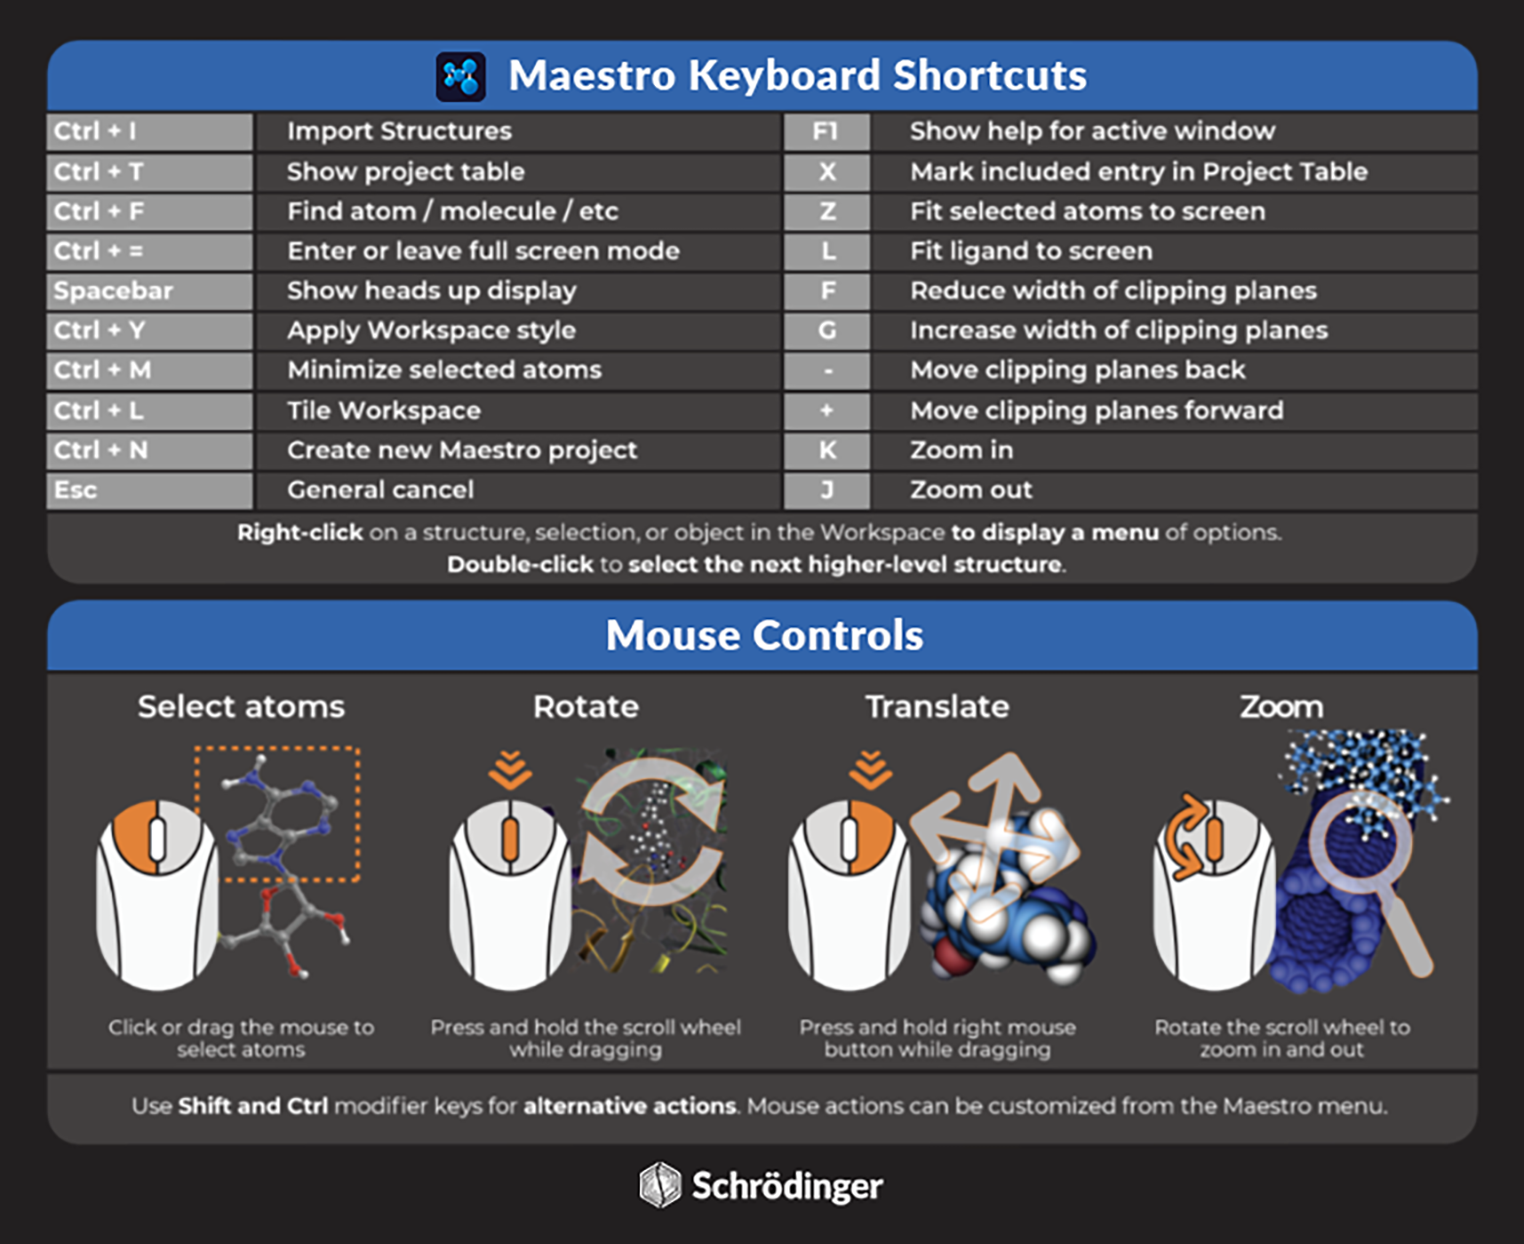
Common mouse actions for interacting with structures in the Workspace

Maestro keyboard shortcuts and mouse controls
Customize Mouse Actions Panel Features
- Customize actions for option menu
-
Choose the mouse type from this option menu. The table is filled in with the values defined for this mouse type.
-
-
-
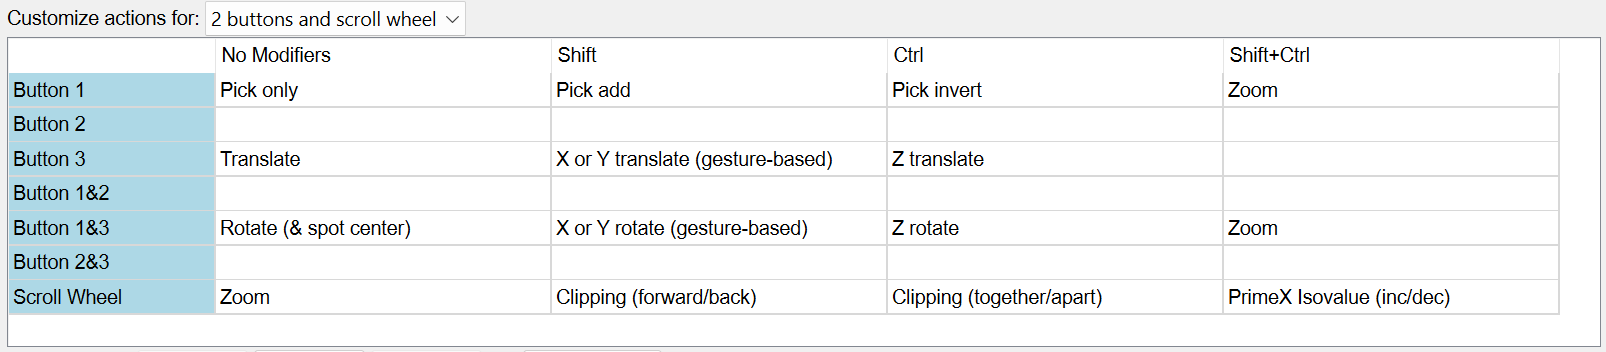
- Mouse action table
-
This table lists the actions assigned to each combination of modifier keys and mouse controls. Empty cells have no action assigned to the combination.
Clicking in a table cell displays an option menu from which you can select the action to use for that particular combination. You can assign the same action to multiple key/mouse combinations. The available actions are listed below.
- No action—The mouse gesture is not assigned any Maestro action.
- Rotate (& spot center)—Rotate around the axis that is perpendicular to the direction of movement of the pointer. Click to center the Workspace on the location clicked.
- Translate (& spot center)—Translate in the direction of movement of the pointer. Click to center the Workspace on the location clicked.
- X or Y rotate (gesture-based)—Rotate around the x axis or the y axis, depending on the direction of the initial pointer movement (perpendicular to the rotation axis).
- X rotate—Rotate around the x axis.
- Y rotate—Rotate around the y axis.
- Z rotate—Rotate around the z axis.
- Translate—Translate in the xy plane in the direction of the pointer movement.
- X or Y translate (gesture-based)—Translate in the x or the y direction, depending on the direction of the initial pointer movement.
- X translate—Translate in the x direction.
- Y translate—Translate in the y direction.
- Z translate—Translate in the z direction
- Zoom—Zoom in or out.
- Clipping (forward/back)—Move the clipping planes forward (out of the screen) or back (into the screen).
- Clipping (together/apart)—Move the clipping planes closer together or further apart.
- PrimeX Isovalue (inc/dec)—Increase or decrease the isovale on PrimeX maps.
- Pick only—Pick atoms to create a new Workspace selection. Each pick clears the previous Workspace selection.
- Pick add—Pick atoms to add to the Workspace selection. Does not affect other selected atoms.
- Pick invert—Pick atoms to change their selection state. Does not affect other selected atoms.
- Pick or Rotate—Pick atoms with click; rotate the Workspace with click and hold.
- Rotate (Virtual Trackball)—Rotate around the x or y axis if the pointer is in a circle (virtual trackball) in the center of the Workspace, rotate around the z axis if the pointer is outside this circle, with a smooth change in behavior over the boundary. The circle diameter is about 80% of the shortest Workspace dimension. The cursor text changes between XY and Z as the curor crosses the boundary.
- Pick or Rotate (Virtual Trackball)—Pick atoms with click; rotate the Workspace with click and hold using a virtual trackball (see previous item).
-
- Swap buttons buttons
-
Click the appropriate combination of buttons to swap the actions in the table to use different mouse buttons. For example, clicking 1 & 2 would swap the assignments for Button 1 with those for Button 2, and swap the assignments for Button 1&3 with those for Button 2&3.
-
- Reset Defaults button
-
Click this button to restore the defaults for the chosen mouse type. The table is updated with the default values.