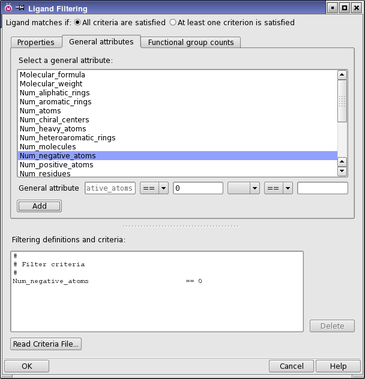
Ligand Filtering Panel
In this panel you can set up filtering criteria for a set of structures, which are represented as a set of conditions on Maestro properties, certain predefined feature counts, or counts of SMARTS patterns for functional groups. When you have set up the criteria, you can run a job to apply the criteria to the structures and return those that match or that do not match.
Although this panel is entitled Ligand Filtering and is primarily intended for filtering ligands, you can also use it to filter protein structures, for example by the percent_strand, percent_helix, and percent_loop attributes.
This panel can also be opened as a dialog box from some applications, where it is used to create a filter file.
To open this panel, do one of the following:
- Click the Tasks button and browse to Structure Analysis → Ligand Filtering
- Click the Tasks button and browse to Ligand Preparation and Library Design → Ligand Filtering
- Click the Tasks button and browse to Materials → Tools → More Tools → Structure Filtering
- Using
- Features
- Additional Resources
Using the Ligand Filtering Panel
To filter a set of structures by various structural attributes:
-
Select a structure source from the Use structures from option menu. If you choose a file, specify the file name or browse to locate it. (Not available for Phase, VSW, LigPrep.)
-
Choose how matching is defined under Ligand matches if. (Not available for LigPrep).
-
Choose what to do with the ligands that match, using the Matching ligands options. If you want to mark the ligands that match in the output, select Set boolean property and provide a property name. (Not available for Phase, VSW, LigPrep.)
-
Select a property, general attribute, or functional group from the lists in one of the tabs, and construct a criterion using the text boxes and option menus.
You can define upper and lower limits on a property value by using both text boxes and option menus and a boolean operator to connect the two limits.
-
Click Add to add the criterion to the Filtering definitions and criteria list.
-
Repeat the last two steps to add as many criteria as you like.
-
Click Run to start the ligand filtering job; or for Phase, VSW, or LigPrep, click OK.
Ligand Filtering Panel Features
In addition to its use from the Tools menu, this panel is used in the following applications:
- Phase database generation
- Virtual Screening Workflow
- LigPrep
In these applications, some of the controls are not present.
- Structure source controls
- Ligand matches if options
- Matching ligands options
- Properties, General Attributes, and Functional Group Counts tabs
- Filtering definitions and criteria text area
- Read criteria file button
- Job toolbar
- Status bar
Structure source controls
The Use structures from option menu allows you to choose from three sources:
- Workspace
-
Filter the structures that are included in the Workspace. These structures are written to an input file, by entry.
- Project Table
-
Filter the structures that are selected in the Project Table. These structures are written to an input file, by entry.
- File
-
Filter the structures in the file specified in the Input file text box. You can click Browse to navigate to the desired file. When you have selected or entered a file, the file is scanned for properties to list in the Properties tab. If you want to stop this scan, click Stop scanning.
These options are not available when opened from the Create Phase Database Panel, the Virtual Screening Workflow Panel, or the LigPrep Panel, because the structures are defined by the parent application.
Ligand matches if options
These two options allow you to determine how the criteria are applied to the ligands.
-
All criteria are satisfied—the ligand must match all criteria. This choice corresponds to connecting each criterion by a logical AND operator.
-
At least one criterion is satisfied—the ligand must match one of the criteria. This choice corresponds to connecting each criterion by a logical OR operator.
These options are not available when opened from the LigPrep Panel, because the use of the criteria is defined by the parent application.
Matching ligands options
For ligands that match the criteria according to the Ligand matches if options, you can choose one of three actions:
- Retain
-
Write the ligands that match to the output structure file. Ligands that do not match are not written out.
- Remove
-
Write the ligands that do not match to the output structure file. Ligands that match are not written out.
- Set boolean property
-
Write all ligands to the output structure file, and for each ligand, set a Boolean property that indicates whether it matched or not. You can name the Boolean property in the Property name text box.
These options are not available when opened from the Generate Phase Database panel, the Virtual Screening Workflow panel, or the LigPrep panel, because the action is defined by the parent application.
Properties, General Attributes, and Functional Group Counts tabs
The center section of the panel has three tabs, for setting up criteria using different classes of structural attributes. General attributes are predefined functions of the composition or connectivity that are computed as needed; properties are the properties of the entries as listed in the Entry List or Project Table, and functional group counts are occurrences of various functional groups in a structure, defined by SMARTS patterns. Each tab has the following common features:
- List of structural attributes
-
This list contains the available structural attributes (properties, general attributes, or functional groups). You can select a single item from this list. The selected item is displayed in the first text box below the list, which is labeled with the structural attribute class.
In the Properties tab, there is a Show family option menu below the list. You can use this menu to limit what is shown in the list to a single property family (e.g. QikProp).
- Criterion specification text boxes and option menus
-
Below the list is a set of text boxes and option menus that you use to construct a criterion. The first text box lists the structural attribute selected from the list. To define a condition on the structural attribute, choose a relational operator from the leftmost option menu and enter a value in the text box immediately to the right of it. If you want to define two conditions, choose a Boolean operator (AND or OR) from the next option menu, then choose a relational operator from the option menu and enter a value in the text box that are to the right of the Boolean operator.
- Add button
-
This button adds the criterion to the filter. The criterion is displayed in the Filtering definitions and criteria text area.
Some tabs have additional features:
-
The Properties tab has a Show family option menu, which can be used to restrict the list of available properties to those from a particular family (or source, such as Glide or QikProp).
-
The Functional Group Counts tab has two buttons to the right of the list, New, which opens the Add Definition Dialog Box so that you can add a new functional group definition, and View, which displays the definition of the selected functional group.
The properties tab is not available when the panel is opened from the LigPrep Panel.
Filtering definitions and criteria text area
Lists the criteria that make up the filter, one per line. You can select a line in the list and click Delete to delete it.
Read criteria file button
Click this button to read a criteria file. The contents of this file replaces the contents of the Filtering definitions and criteria text area. Opens a file chooser, in which you can navigate to and select a ligfilter file (.lff).
Job toolbar
Manage job submission and settings. See Job Toolbar for a description of this toolbar.
The Job Settings button opens the Ligand Filtering - Job Settings Dialog Box, where you can make settings for running the job.
This toolbar is not present when the panel is opened from the Create Phase Database Panel, the Virtual Screening Workflow Panel, or the LigPrep Panel.
Status bar
The status bar displays information about the current job settings and status for the panel. The settings includes the job name, task name and task settings (if any), number of subjobs (if any) and the host name and job incorporation setting. The job status can include messages about job start, job completion and incorporation.
Use the Reset button  to reset the panel to its default settings and clear any data from the panel.
The status bar also contains the Help button  , which opens the help topic for the panel in your browser. If the panel is used by one or more tutorials, hovering over the Help button displays a
  button, which you can click to display a list of tutorials (or you can right-click the Help button instead). Choosing a tutorial opens the tutorial topic.
This toolbar is not present when the panel is opened from the Create Phase Database Panel, the Virtual Screening Workflow Panel, or the LigPrep Panel.