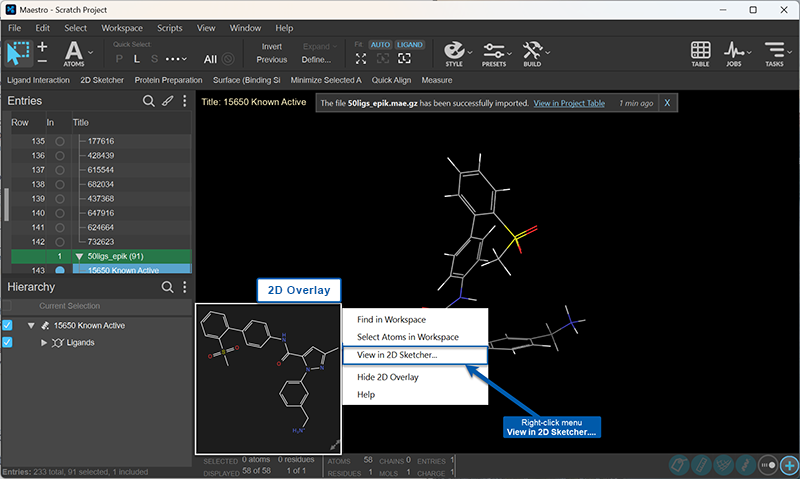
2D Overlay
The 2D Viewer is a pane in the lower left of the Workspace that shows the 2D structure of any ligand-sized molecule or other small molecules in the Workspace. It also shows monomers from a polymer in square brackets. It is displayed when these structures are in the Workspace.
To open the 2D Overlay, To :In the Maestro main window, choose Window → 2D Overlay
The tooltip for a ligand gives residue and chain information for the ligand and the entry title, if the ligand is displayed (visible). If the ligand is not displayed, the 2D structure is dimmed, and the tooltip informs you that the ligand is not displayed.
The button in the lower right allows you display a larger version of the 2D overlay and return it to the default size. This is useful for larger molecules, whose 2D structure may be too small at the default size.
![]()
![]()
If there is more than one ligand-sized molecule in the Workspace, they are all available in the 2D overlay. A bar is shown at the bottom of the pane that contains arrows for stepping through the ligands, and shows the number of ligands and the index (arbitrary) of the ligand that is displayed. The following apply for multiple ligands:
-
When including multiple new entries containing ligands, the first ligand of first entry is shown.
- When including new entries not containing ligands, the currently displayed ligand remains.
- When removing an entry that has the ligand in the viewer, the next entry ligand is shown. If there are no other entries after the one removed, the first ligand is shown.
- When changing the atoms selection in the Workspace or selecting ligands from the Structure Hierarchy, the ligand with the selected atoms is shown. If more than one ligand has been selected, the first one is shown.
- When one or more ligands are undisplayed (hidden), you can step through the displayed ligands but not the undisplayed ligands.
- When you select a ligand in the Workspace, it is shown in the 2D overlay. If you select multiple ligands, the first one is shown in the 2D overlay.
- If you zoom to a particular ligand in the Workspace with the L key, the ligand that you zoomed to is displayed in the 2D overlay.
When the Workspace is tiled, the 2D overlay is hidden until tiling is turned off.
The 2D overlay has a shortcut menu with the following items:
- Find in Workspace—zoom the Workspace view to the ligand. You can also double-click on the overlay to zoom to the ligand. This is useful if the ligands are in different parts of the Workspace.
- Select Atoms in Workspace—Select the current ligand atoms in the Workspace, and deselect all other atoms. This is useful when you want to act on the ligand, or to identify it when the ligands are in the same part of the Workspace.
- View in 2D Sketcher—Open the 2D Sketcher Panel with the ligand entry displayed. If there are multiple ligands, the ligand that is selected is displayed. This item is present on the menu if there is no protein in the Workspace.
- View in Ligand Interaction Diagram—Open the Ligand Interaction Diagram Panel with the ligand and the protein displayed. If there are multiple ligands in the Workspace, the first ligand is displayed in the diagram. This item is present on the menu if there is a protein in the Workspace.
- Show Next, Show Previous—show the next ligand or the previous ligand in the 2D overlay. Equivalent to using the arrow buttons.
- Hide 2D Overlay—Hide the 2D overlay. You can redisplay it from the Workspace Configuration panel or by choosing Window → 2D Overlay.
- Help—Display this help topic.
The 2D overlay is not available in Maestro Materials Science. It is not displayed by default in Maestro BioLuminate.
- Additional Resources