Hit Expansion Panel
Extract ligands from a file or Phase database that are similar to a small set of ligands (hits), using fingerprint similarity and substructure searches.
To open this panel: click the Tasks button and browse to Ligand-Based Virtual Screening → Hit Expansion.
To write out the input file and a script for running the job from the command line, click the arrow next to the Settings button  and choose Write.
- Overview
- Features
- Additional Resources
Hit Expansion Panel Overview
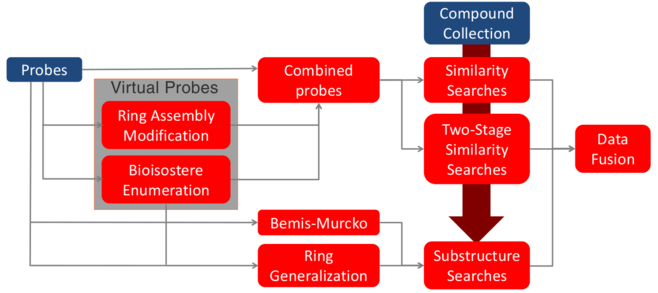
Hit expansion is essentially a combination of similarity and substructure searches that facilitates core hopping or other structure variations, with the help of isosteric transformations and other substitutions. The expansion returns structures from the search set (the query structures, taken from a compound collection) that are in some way similar to the template ligands, or probes (the small set of hits that is being expanded on). Several similarity and substructure searches are performed, and the results are collated to produce an expanded set of hits. This expanded set of hits may be used for ideas.
Ideally, a set of roughly 10 to 50 diverse actives should be used as templates. Too few input structures will undermine consensus, too many will overwhelm consensus and is likely to return a larger fraction of decoys. As an example of the number of structures, some tests with10 hits as input structures returned about 1000 to 3000 analogs from a pool of 500,000 structures.
The method is based on that of Bergner and Parel (J. Chem. Inf. Model. 2013, 53, 1057), but some of the details are different. MACCS, dendritic, and functional dendritic fingerprints were used for the similarity searches (the latter two give similar results to the ECFC4 and FCFP6 fingerprints used in the original work). The pharmacophore-based step in the original workflow is not used here.
A schematic diagram of the process is given below.
Hit Expansion Panel Features
- Use structures from option menu
- Open Project Table button
- File name text box and Browse button
- Query structures in option menu
- Remote database option
- File name text box and Browse button
- Fingerprints section
- Job toolbar
- Status bar
- Use template ligands from option menu
-
Choose the structure source for the template ligands.
- Project Table (n selected entries)—Use the entries that are currently selected in the Project Table or Entry List. The number of entries selected is shown on the menu item.
- Workspace (n included entries)—Use the entries that are currently included in the Workspace, treated as separate structures. The number of entries in the Workspace is shown on the menu item.
- File—Use the specified file. When this option is selected, the File name text box and Browse button are displayed.
- Project Table (n selected entries)—Use the entries that are currently selected in the Project Table or Entry List. The number of entries selected is shown on the menu item.
- Open Project Table button
-
Open the Project Table panel, so you can

- Template ligand file text box and Browse button
-
Enter the file name in this text box, or click Browse and navigate to the file. The name of the file you selected is displayed in the text box.
- Query structures in option menu
-
Choose the structure source for the query ligands. If the template ligands are taken from the Project Table, you cannot also take the query ligands from the Project Table.
- Project Table (selected entries)—Use the entries that are currently selected in the Project Table.
- File—Use the specified file. When this option is selected, the File name text box and Browse button are displayed.
- Phase Database—Use the structures in the specified Phase database. When this option is selected, the File name text box and Browse button are displayed. Click Browse and navigate to the database you want to use. The database name is displayed in the text box when you click Open in the file selector. You can also enter the database name in the text box. You will need to do this if the database is not available on the file system, and also select Remote database.
- Remote database option
-
Select this option if the Phase database is on a remote file system. This option bypasses checking on the validity of the path to the database, so that you can specify a path that is accessible on the host on which the job is run but is not necessarily accessible on the local host.
- File name text box and Browse button
-
Enter the database or file name in this text box, or click Browse and navigate to the database or file. The name of the database or file you selected is displayed in the text box.
-
For a Phase database, you can specify the full path on the host on which the job will be run. If you do, you should select the Remote database option, to bypass checking of the path.
- Fingerprints section
-
Specify the source of the fingerprints when the query structures do not come from a Phase database.
- Job toolbar
-
Manage job submission and settings. See Job Toolbar for a description of this toolbar.
The Job Settings button opens the Hit Expansion - Job Settings Dialog Box, where you can make settings for running the job.
- Status bar
-
The status bar displays information about the current job settings and status for the panel. The settings includes the job name, task name and task settings (if any), number of subjobs (if any) and the host name and job incorporation setting. The job status can include messages about job start, job completion and incorporation.
Use the Reset button
 to reset the panel to its default settings and clear any data from the panel.
 The status bar also contains the Help button
 , which opens the help topic for the panel in your browser. If the panel is used by one or more tutorials, hovering over the Help button displays a
  button, which you can click to display a list of tutorials (or you can right-click the Help button instead). Choosing a tutorial opens the tutorial topic.