Partial Occupancy Refinement
PrimeX can perform refinements on systems with partial occupancies—for example, where only a fraction of the proteins in the crystal have bound ligands, or where ligands (and the nearby active site residues) occupy different conformations. The refinement of the occupancy values can be set up as a minimization calculation in the Reciprocal-Space Refinement Panel. The alternate conformations themselves must be set up using the Change Atom Properties Panel. PrimeX supports multiple sites that have partial occupancy, but for each site there must be only two occupancies, which are labeled A and B.
To open the Change Atom Properties Panel, open the 3D Builder Panel and choose Other Edits → Change Atom Properties.
To set partial occupancies to a given value for a set of atoms:
| 1. | Select the atoms in the Workspace for which you want to assign partial occupancy. |
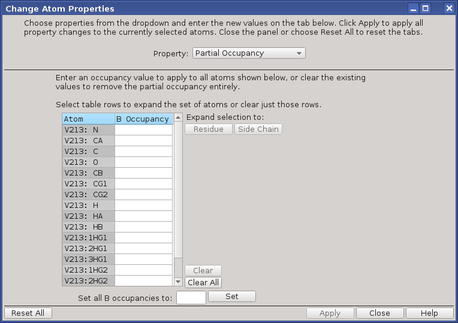
You can fill the selection out to complete residues or side chains in the dialog box.
| 2. | Open the Change Atom Properties dialog box. |
| 3. | Choose Partial Occupancy from the Property option menu. |
The atoms you selected are listed in the occupancy table.
| 4. | (Optional) Select rows in the occupancy table and click Residue or Side Chain to expand the atom list to the residues or side chains containing the selected atoms. |
| 5. | Enter an occupancy value in the Set all B occupancies to text box, and click Set. |
| 6. | Click Apply. |
You can repeat this procedure for as many sets of atoms as you like. If you have multiple sites where there are partial occupancies, you can select all the atoms at one time, and set the occupancies. You can also change the B occupancy value for individual atoms by editing the table cells. (The A occupancy is 1 minus the B occupancy.)
You can clear the occupancies for multiple atoms by selecting the atoms and clicking Clear, or you can clear all occupancies by clicking Clear All. When you close the dialog box, these atoms no longer have partial occupancy.
Once you have set the partial occupancies for a set of atoms, Maestro creates a duplicate set of coordinates for the B state for these atoms. Initially, these coordinates are the same as for the A state. By default, the A state is displayed (or “active”) in the Workspace. To switch between the two states, select the atoms, then right-click and choose Additional Edits → Switch Alternate Positions from the shortcut menu. You can then select atoms in the B state and adjust their positions.
For example, if the atoms are part of a side chain and you want to select a particular rotamer state, you can choose Other Edits → Select Rotamer in the 3D Builder panel to use the Select Rotamer tool (see Selecting Rotamers and Torsions), or choose Edit → Rotamers to use the Rotamers Dialog Box. If you have a density map and are using the Rotamers Dialog Box, you can click Choose Best Fit to select the rotamer that has the best fit to the density.
To display both positions at the same time, click the Alternate Positions button in the Workspace Configuration toolbox.
Both states are displayed, but only one can be selected. The other is displayed as a “ghost”.
If you want to move a set of atoms for which you already have alternate coordinates, you can either change both sets of coordinates, or change only the “main” set, by selecting or deselecting Include alternate positions in local transformations in theTransformation settings under Workspace in the Preferences Panel.