Setting Up a PrimeX Refinement
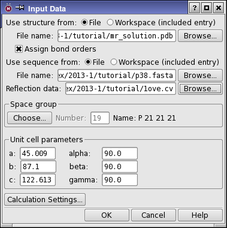
The first step in the PrimeX refinement process is to specify the source of the model structure, the sequence, the reflection data, optional maps, and set the space group and unit cell parameters. These tasks are performed in the Input Data Dialog Box.
To open the Input Data dialog box, click the Input Data button in the PrimeX panel.
There are some preparation steps that are necessary before a structure can be used in PrimeX. In particular, bond orders must be assigned for the ligand and other nonstandard groups, bonds to metals must be broken and formal charges changed to reflect a formally ionic metal. The treatment of metals is performed automatically. Assignment of bond orders is performed when the structure is read if you select Assign bond orders. You should also ensure that the residue names in the initial structure are properly assigned—see PrimeX Reserved Residue Names for more information. You can also prepare the structure in the Protein Preparation Workflow Panel
When you click OK in the Input Data dialog box, the initial structure is displayed in the Workspace. If you have the sequence viewer displayed in the main window, the sequence of the initial structure is displayed in the sequence viewer. The Project Table panel opens with the initial structure selected.
The reference sequence is not displayed by default. To view the reference sequence, click the Reference Sequence button in the PrimeX panel. The Reference Sequence panel opens, and displays the sequence. Each chain is listed separately, and the number of residues in the chain is given. You can find a residue or a sequence of residues by entering the sequence in the Find text box and clicking Previous or Next.