Labeling Atoms and Bonds
It can be useful to label atoms and bonds with their properties, for identification and comparison purposes. Atom labels are constructed from atom-level properties, which include things like element, charges, stereeochemical labels, PDB atom names, as well as calculated properties such as pKa values, B factors, NMR shielding constants. Several properties can be included in a single label.
Labeling of atoms can be done from the Changing Structure Styles, which you can open with the Style button on the toolbar, from the Structure Hierarchy, or from the selection shortcut menu. (See Changing Structure Styles for general information.)
To apply the current choice of label to the selection, click the Apply Labels button.
Any existing labels are replaced by the new labels. The current label choice is not shown on the button, but on the menu that opens when you click the arrow next to it.
To remove labels from the selection, click the Delete labels button.
To show or hide all labels, click the Annotations button on the Workspace Configuration toolbar.
This button also hides other kinds of Workspace text, such as Phase hypothesis labels and captions.
To choose the label to apply, click the arrow to the right of the Apply Labels button. You can then choose one of a set of standard labels from the menu, or create a custom label.

The current choice is checked in the list.
If you choose Residue Information, the label is added to the selected atom if there is only one atom selected in the residue (regardless of whether atoms in other residues are selected). If there are multiple atoms selected within a residue (or the whole residue is selected), the label is added to the Cα atom. If atoms in multiple residues are selected, a label is applied using these rules to each residue.
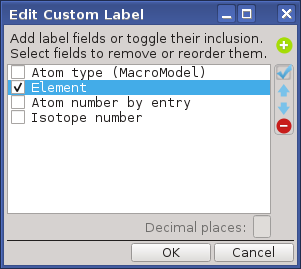
To create a custom label, choose Edit Custom Label. You can then select the properties you want in the label, and their order, using the Edit Custom Label Panel.
The appearance and positioning of the labels can be set in the Preferences Panel, in the Atom / Bond Label Preferences.
If you add a custom text label field to the label, you can edit the text later by double-clicking the label (or right-clicking and choosing Edit Custom Text). The Edit Custom Text Dialog Box opens, where you can replace the text with new text.
Labels can also be displayed for bonds, if the structure has bond properties. Bond properties are created by some application programs, such as Glide. To display bond properties, choose Workspace → Bond Labels, and set up and apply the label using the Bond Labels Panel.