Free Volume Analysis Panel
Determine the location and sizes of voids (free volume) in a set of structures, which can then be analyzed and displayed.
To open this panel: click the Tasks button and browse to Materials → Tools → Free Volume Calculations.
The following licenses are required to use this panel: MS Maestro
- Using
- Features
- Additional Resources
Using the Free Volume Analysis Panel
The location and sizes of the voids in the structures are determined by a grid-based method. A regular grid is set up in the box that contains the structures, with a given grid spacing. The box is defined by the periodic boundary conditions, if they are present, or by the maximum extent of the structure out to the van der Waals radii in all three Cartesian directions. Grid points are in a void if they do not fall within the van der Waals radius plus a probe radius of any atom. Grid points that are adjacent are grouped into the same void, and the volume of the void is set to the number of grid points times the cube of the grid spacing. The void determination is run at several grid spacings, to assess convergence of the void sizes.
The analysis job is run for all input structures as a single job. A typical analysis on a structure takes a few minutes. The overall result of the analysis is returned as two entry properties: Free Volume, in Å3, and Free Volume %, the percentage of free volume (empty space) in the structure . For structures that do not have periodic boundary conditions, the free volume includes the volume surrounding the structure that is inside the grid box. Details of the void sizes and distributions can be displayed in the Free Volume Analysis Viewer Panel (click the Tasks button and browse to Materials → Tools → Free Volume Results). To open this panel from the entry group for the results of a job .
.
To write out the input file and a script for running the job from the command line, click the arrow next to the Settings button  and choose Write.
Free Volume Analysis Panel Features
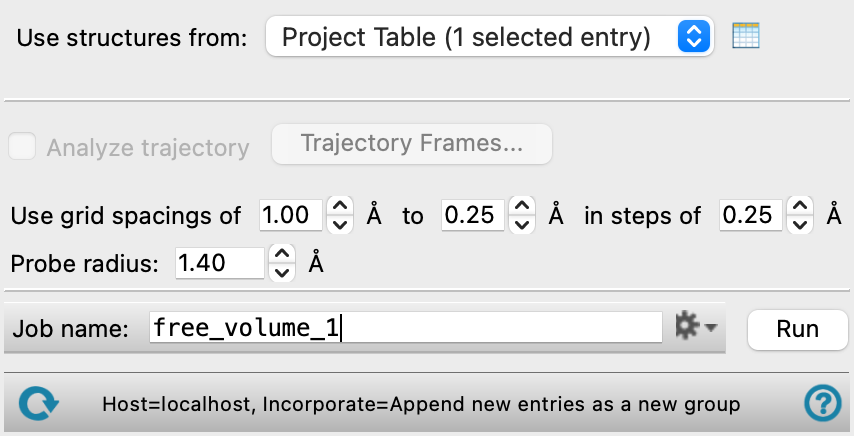
- Use structures from option menu
-
Choose the structure source for the free volume analysis. If you select multiple structures, the analysis depends on whether the first structure has a trajectory. If it does, each selected structure must have a trajectory, and the analysis is performed on the trajectory for each. If the first structure does not have a trajectory, only the structure is analyzed.
- Project Table (n selected entries)—Use the entries that are currently selected in the Project Table or Entry List. The number of entries selected is shown on the menu item.
- Workspace (n included entries)—Use the entries that are currently included in the Workspace, treated as separate structures. The number of entries in the Workspace is shown on the menu item.
- File—Use the specified file. When this option is selected, the File name text box and Browse button are displayed.
- Project Table (n selected entries)—Use the entries that are currently selected in the Project Table or Entry List. The number of entries selected is shown on the menu item.
- Open Project Table button
-
Open the Project Table panel, so you can

- File name text box and Browse button
-
Enter the file name in this text box, or click Browse and navigate to the file. The name of the file you selected is displayed in the text box.
- Analyze trajectory option
-
Analyze the frames in one or more trajectories for free volume. Only available if the first structure selected for the analysis has a trajectory. Each structure in the selection must have a trajectory.
- Use grid spacings of N to M in steps of K Å text boxes
-
Set the range of grid spacings and the step to take when decreasing the grid size from the maximum to the minimum. The calculations are run at each step, which allows you to assess the convergence of the sizes of the voids with the grid spacing. The actual spacing used for each side of the grid box is adjusted so that the length of the side is an integer multiple of the spacing and the spacing is the closest to the specified spacing. This adjustment ensures that each cell of the grid has the same volume.
- Probe radius text box
-
Set the probe radius used to determine whether a grid point is in a void or not.
If you want to use multiple probe radii, you can use the output of one analysis job to run another with a different probe radius. The probe radius and the analysis data for that radius are added to the output. You can then select the desired probe radius in the Free Volume Analysis Viewer Panel when you view the results.
- Job toolbar
-
Manage job submission and settings. See Job Toolbar for a description of this toolbar.
The Job Settings button opens the Free Volume Analysis - Job Settings Dialog Box, where you can make settings for running the job.
- Status bar
-
The status bar displays information about the current job settings and status for the panel. The settings includes the job name, task name and task settings (if any), number of subjobs (if any) and the host name and job incorporation setting. The job status can include messages about job start, job completion and incorporation.
Use the Reset button
 to reset the panel to its default settings and clear any data from the panel.
 The status bar also contains the Help button
 , which opens the help topic for the panel in your browser. If the panel is used by one or more tutorials, hovering over the Help button displays a
  button, which you can click to display a list of tutorials (or you can right-click the Help button instead). Choosing a tutorial opens the tutorial topic.