Probe Grid Scan Panel
Explore the potential energy surface of a molecule with respect to a probe molecule, by calculating QM energies of the probe-target system at a set of probe grid points. The grid is a set of points on one or more surfaces surrounding the target.
To open this panel, click the Tasks button and browse to Quantum Mechanics → Probe Grid Scan.
The following licenses are required to use this panel: MS Maestro, Jaguar, MS Force Field Applications (optional)
- Using
- Features
- Additional Resources
Using the Probe Grid Scan Panel
This panel is useful for determining low-energy adsorption sites of a molecule on some substrate, which might be another molecule, a nanoparticle, a catalytic oxide, for example. For molecule-molecule interactions it can be useful for finding the pre-positioned reactant and product complexes on either side of the barrier in a transition state search.
The scan is designed to produce a potential energy map around a target molecule for a specified probe. The probe can be a point charge, an atom, or a molecule with a designated "probe atom". The probe atom is placed at points on a grid, and the QM energy of the system is evaluated, with optional optimization. The grid points are computed to lie on one or more surfaces, which are placed at a specified distance from the van der Waals surface of the target.
When the probe atom is placed, it is considered to be bonded to the nearest target atom. You can optimize the target molecule geometry in the target probe system, the probe molecule geometry, the distance between the target atom and the probe atom, and the orientation of the probe with respect to the target atom. These options all allow optimization to a local minimum near the target atom: more optimization gives higher accuracy but with higher cost. You can also do a full optimization of the system, with no restraints.
The result is a set of structures at each grid point with an energy, indices of target and probe atoms, grid coordinates, and probe-target atom direction vector. You can choose to return all the results, or you can choose to group the results by the target atom that the probe atom is closest to, and return only the lowest-energy structure per target atom.
The structures are written to a Maestro file. In addition to the usual Jaguar properties, several entry properties related to the scan are added, and one atom property. These properties are described in Table 1.
|
Property |
Description |
|
point initial atom |
Index of the target atom that is initially closest to the probe atom |
|
point final atom |
Index of the target atom that is closest to the probe at the end of the job |
|
atom source |
Atom-level property that indicates whether an atom is a target atom or a probe atom (value |
|
probe tip atom |
Index of the probe atom that is placed at the grid point |
|
probe vector |
Vector from the probe tip atom to the nearest target atom |
|
grid pointq |
Grid point x, y, and z coordinates |
To write out the input file and a script for running the job from the command line, click the arrow next to the Settings button  and choose Write.
Probe Grid Scan Panel Features
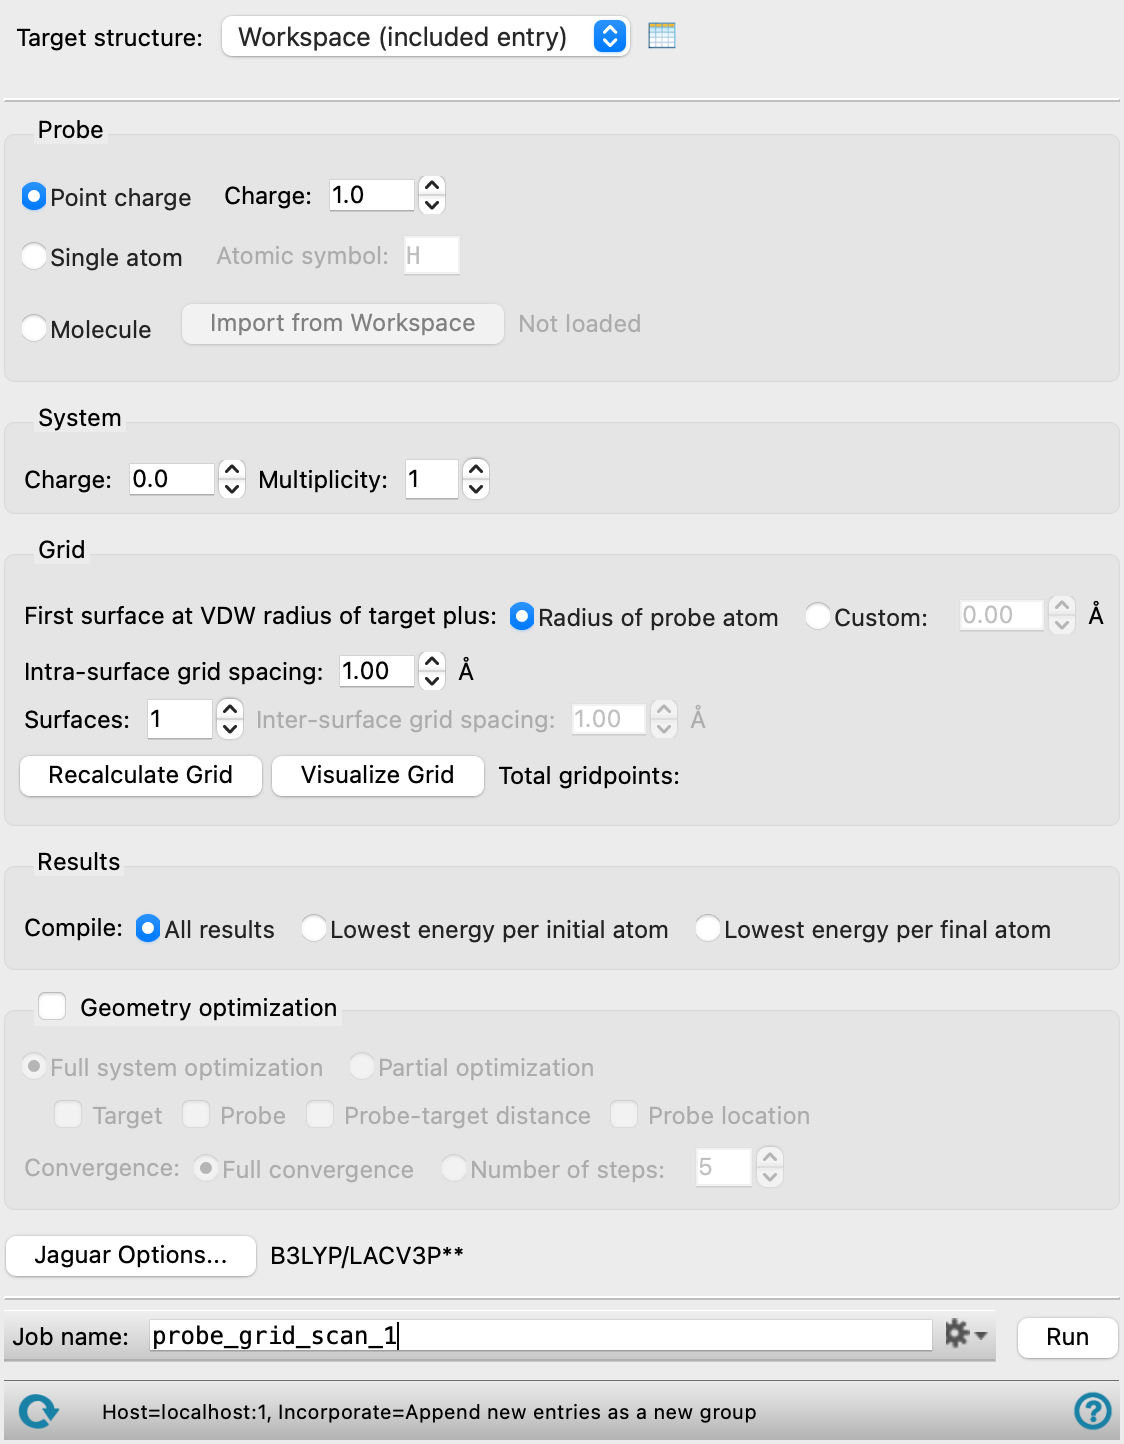
- Target specification
-
These controls allow you to specify the target molecule, around which the probe is moved.
- Target structure option menu
-
Choose the structure source for the target molecule.
- Workspace (included entry)—Use the entry that is currently included in the Workspace. Only one entry must be included in the Workspace.
- File—Use the specified file. When this option is selected, the File name text box and Browse button are displayed.
- File name text box and Browse button
-
Enter the file name in this text box, or click Browse and navigate to the file. The name of the file you selected is displayed in the text box. Only the first structure in the file is used.
If you want to use the Workspace structure for the target, and also use a molecular probe, you should display the probe first and import it, then display the target structure.
- Probe options
-
Specify the probe to use. There are three choices:
- Point charge—Use a point charge as the probe, and specify the charge value in the Charge text box. Point charge cannot be used with machine learning force fields.
- Single atom—Use a single atom as the probe, and specify the atomic symbol in the Atomic symbol text box.
- Molecule—Use the molecule that is in the Workspace as the probe. Click Import from Workspace when the desired molecule (and no other) is displayed in the Workspace. The Import Probe Dialog Box opens, which you use to pick the probe atom, and specify the orientation of the probe with respect to the nearest target atom when the probe is placed on the grid. The arrow that is displayed represents the vector from the grid point to the target atom.
The choice of probe affects which geometry optimization options are available.
- System section
-
Specify the charge and spin of the system.
- Charge box
-
Specify the total charge on the system of target plus probe. If you chose a point charge or a charged molecule as a probe, the target charge is the value given in this box minus the probe charge.
- Multiplicity box
-
Specify the spin multiplicity of the system of target plus probe. If the multiplicity is greater than 1, a spin-unrestricted calculation is performed by default. Point charges are considered spinless, so they do not contribute to the multiplicity.
- Grid section
-
Specify the grid on which the probe atom is placed. The grid is constructed at a specified distance from the van der Waals surface of the target.
- First surface at VDW radius of target plus options
-
Choose an option for the distance at which the first surface of grid points is placed, with respect to the van der Waals radius surface of the target. The default is the van der Waals radius of the probe atom (Radius of probe atom), which is zero for a point charge. You can set the value in angstroms by choosing Custom and specifying the distance in the text box.
- Intra-surface grid spacing box
-
Specify the distance between grid points on the surface.
- Surfaces box
-
Specify the number of surfaces in the grid. Setting this value greater than 1 produces a volume rather than a surface. If you do specify multiple surfaces, you should avoid optimizing the probe-target distance (or location), as it could easily collapse onto a point from another shell, and the volume generated might not be very useful.
- Inter-surface grid spacing box
-
Specify the distance between surfaces, if multiple surface grids are generated.
- Recalculate Grid button
-
Recalculate the grid points. This is useful if you have made changes to the grid parameters and want to visualize the grid again. It has no effect on the calculation, as the current set of parameters is always used when you run the job.
- Visualize Grid button
-
Show the grid in a 3D plot. The target atoms are represented as red spheres, and the grid points as spheres in another color. A different color is used for each surface if you choose to generate multiple surfaces. The 3D plot can be zoomed using the right mouse button and rotated using the left mouse button.
- Results section
-
Specify which of the resulting structures you want to return as the results of the scan.
- Compile options
-
Choose an option for the structures to return.
- All results—return all structures.
- Lowest energy per initial atom—Group the results by the atom in the target that is initially nearest to the probe atom, and return only the lowest-energy structure.
- Lowest energy per final atom—Group the results by the atom in the target that is nearest to the probe atom at the end of any optimization, and return only the lowest-energy structure. This is the same as the initial atom option, if no optimization of the probe-target distance or location is performed.
- Geometry optimization option and section
-
Select the Geometry optimization option if you want to optimize the geometry of the target or the probe (or both) at each grid point. For each grid point, the target and probe geometries are set to their input geometries, and then optimized.
- Full system optimization option
-
Optimize the target and the probe fully at each grid point. This option gives a set of structures at local minima around the target, and is probably best combined with the choice to return the lowest energy per final atom.
- Partial optimization option
-
Optimize only selected parts of the system. This is useful if you want to examine the surface as a function of the probe location, with or without relaxation. The options for selecting the parts of the system are:
- Target—Optimize the target structure.
- Probe—Optimize the probe structure. Only available if the probe is a molecule.
- Probe-target distance—Optimize the distance between the probe atom and the nearest target atom, along the vector connecting the two.
- Probe location—Optimize the orientation of the probe molecule around the probe atom–target atom vector as well as the distance.
- Convergence options
-
Specify the extent to which the geometry optimization is required to converge.
- Full convergence—Converge to the default accuracy specifications.
- Number of steps—Run the optimization for the specified number of steps. This option is useful for a faster calculation, with a lower accuracy.
- Options button
-
Set Jaguar options for the Jaguar (QM) calculations. Machine learning force fields can be used in place of the quantum mechanics calculations. Opens the Jaguar Options - Probe Grid Scan Dialog Box. This dialog box also allows you to specify additional Jaguar keywords. The solvent (if any), level of theory, and basis set are shown to the right of the button.
- Job toolbar
-
Manage job submission and settings. See Job Toolbar for a description of this toolbar.
The Job Settings button opens the Probe Grid Scan - Job Settings Dialog Box, where you can make settings for running the job.
- Status bar
-
The status bar displays information about the current job settings and status for the panel. The settings includes the job name, task name and task settings (if any), number of subjobs (if any) and the host name and job incorporation setting. The job status can include messages about job start, job completion and incorporation.
Use the Reset button
 to reset the panel to its default settings and clear any data from the panel.
 The status bar also contains the Help button
 , which opens the help topic for the panel in your browser. If the panel is used by one or more tutorials, hovering over the Help button displays a
  button, which you can click to display a list of tutorials (or you can right-click the Help button instead). Choosing a tutorial opens the tutorial topic.