Structure Factor Calculation Panel
Calculate structure factors for a specified set of atoms from the structure in the Workspace.
To open this panel: click the Tasks button and browse to Materials → Classical Mechanics → Trajectory Analysis → Structure Factor Calculation.
The following licenses are required to use this panel: MS Maestro
- Using
- Features
- Additional Resources
Using the Structure Factor Calculation Panel
To write out the input file and a script for running the job from the command line, click the arrow next to the Settings button  and choose Write.
To visualize the results, you can use the Structure Factor Viewer Panel (click the Tasks button and browse to Materials → Classical Mechanics → Trajectory Analysis → Structure Factor Results). To open this panel from the entry group for the results of a job .
.
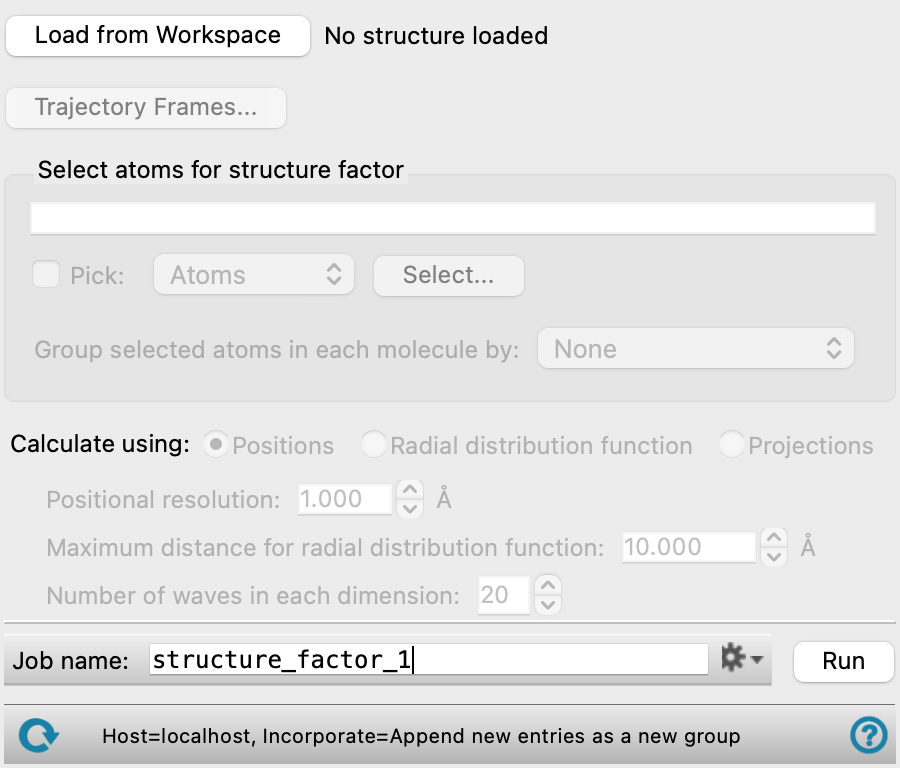
Structure Factor Calculation Panel Features
- Load from Workspace button
- Trajectory Frames button
- Select atoms for structure factor picking tools
- Group selected atoms in each molecule by option menu
- Calculate using options
- Positional resolution option
- Maximum distance for radial distribution function option
- Number of waves in each dimension option
- Job toolbar
- Status bar
- Load from Workspace button
-
Load the Workspace structure into the workflow. The structure must have a trajectory from an MD simulation.
- Trajectory Frames button
-
Set the range and interval of the trajectory over which the structure factor is evaluated. The total number of frames to be used and the time range (in ns) corresponding to the selected frames are shown to the right of the button. Opens the Trajectory Frames dialog box, in which you can set the following:
-
- Frame range text boxes—Set the range of frames to use. You can also use the slider to select the range.
- Step size text box—Set the interval at which trajectory frames are taken. For a step size of n, every nth frame is taken within the selected range. The first and last frames are always included. Increasing the step size decreases the number of frames to be used and the computational time needed.
- Frames text—Lists the corresponding frame numbers of the selected frame range and step size.
- Time text—Lists the corresponding time range and interval (in ns) of the selected frame range and step size.
- OK button—Apply the selected trajectory frame range and step size and close the dialog box.
- Select atoms for structure factor picking tools
-
Select the atoms to include in the structure factor calculation using the standard Picking Tools.
- Group selected atoms in each molecule by option menu
-
Group the atom selection within each molecule to create a single point that is used in the calculation of the structure factor. Grouping is more suited to shorter polymer chains, such as the oligomers in liquid crystals.
- None—do not group the atom selection at all. Each individual atom is used for the structure factor calculation.
- Center of Mass—group the selected atoms in each molecule by their center of mass.
- Center of Geometry—group the selected atoms in each molecule by their centroid (i.e. without mass weighting).
- Calculate using options
-
Calculate the structure factor using the selected method. The options available below depend on the choice of method.
-
Positions—calculate the structure factor using the Fourier transform of all positional coordinates of the selected group. This is the most accurate of the three methods for the1D structure factor, but the 2D structure factor is less accurate.
-
Radial distribution function—calculate the structure factor using the Fourier transform of the radial distribution function. This is the fastest method of the three, but produces less accurate results for anisotropic morphologies due to the assumptions used in the method. This method can only calculate the 1D structure factor, not the 2D structure factor.
This method can use a lot of memory, particularly if you do not group atoms. With no grouping, the number of frames analyzed should be no more than 10, and you should adjust the trajectory range if needed. The bin width for the radial distribution function can be set in the Positional resolution text box.
-
Projections—calculate the structure factor using the Fourier transform of the projection of positional coordinates onto the 2D planes. These planes are perpendicular to the coordinate axes and are spaced at a distance specified in the Positional resolution text box.
This is the most accurate of the three methods for the 2D structure factor. It does not calculate the 1D structure factor.
You can only use this method for structures with orthogonal crystal axes.
-
- Positional resolution text box
-
Specify the positional resolution for the structure factor calculation.
For the projections method, a grid is set up at this spacing and atoms are moved to grid points by rounding up the coordinate values to the next highest multiple of the positional resolution. This is used for the projection method. The default is 1.0 Å; smaller values give more accurate results but might also give more noise.
For the radial distribution function, this value sets the bin width for accumulating distance values (see Plot Radial Distribution Function Panel).
This option is not available if you choose Positions for the method.
- Maximum distance for radial distribution function option
-
Specify the maximum distance to use for the evaluation of the radial distribution function.
This option is only available if you choose Radial distribution function for the method.
- Number of waves in each dimension option
-
Number of waves in the Fourier transform in each dimension (i.e. 3 dimensions for the positional method, 1 for the radial distribution function).
This option is not available if you choose Projections for the method.
- Job toolbar
-
Manage job submission and settings. See Job Toolbar for a description of this toolbar.
The Job Settings button opens the Structure Factor Calculation - Job Settings Dialog Box, where you can make settings for running the job.
- Status bar
-
The status bar displays information about the current job settings and status for the panel. The settings includes the job name, task name and task settings (if any), number of subjobs (if any) and the host name and job incorporation setting. The job status can include messages about job start, job completion and incorporation.
Use the Reset button
 to reset the panel to its default settings and clear any data from the panel.
 The status bar also contains the Help button
 , which opens the help topic for the panel in your browser. If the panel is used by one or more tutorials, hovering over the Help button displays a
  button, which you can click to display a list of tutorials (or you can right-click the Help button instead). Choosing a tutorial opens the tutorial topic.