Thermophysical Properties Panel
Tg
Calculate the density of a model system using MD simulations at a single temperature, or as a function of temperature to generate data for evaluation of the coefficient of thermal expansion and the glass transition temperature (Tg).
To open this panel, click the Tasks button and browse to Materials → Classical Mechanics → Thermophysical Properties → Thermophysical Properties Calculations.
The following licenses are required to use this panel: MS Maestro, Desmond, OPLS (optional), MS Force Field Applications (optional)
- Using
- Features
- Additional Resources
Using the Thermophysical Properties Panel
Thermophysical properties are generated from a set of molecular dynamics simulations on a model system over a range of temperatures. The simulations involve a relaxation stage for the input system, then a set of simulations in the NPT ensemble to obtain a converged density for the system. You must prepare the model systems for Desmond in order to run these simulations, for example using the System Builder Panel or the Disordered System Builder Panel. You can run simulations for several systems concurrently.
You can run the simulations for the temperatures simultaneously, starting each by running the relaxation protocol at the given temperature then the simulations to converge the density, or you can run the simulations sequentially, using the converged system for one temperature as input for the next temperature. The former choice may result in faster throughput, though it involves extra time for relaxation. In either case, the individual simulations can be run on a GPU host, which you can choose in the Job Settings Dialog Box.
When the job finishes, the density and its standard deviation from each simulation are written as properties to the output Maestro file along with the input structure. The density properties are named Density(g/cm3) @ T and stdev Density(g/cm3) @ T, where T is the temperature value in kelvin. The results of the individual simulations are also returned but are not incorporated into the Maestro project.
You can run calculations on multiple systems simultaneously, by using multiple project entries as input. Each system is run as a separate job, and you can specify the number of processors or GPUs to use for each job in the Job Settings Dialog Box, as well as the host for the driver job and the GPU subhost.
To write out the input file and a script for running the job from the command line, click the arrow next to the Settings button  and choose Write.
If you choose to compute the density over a range of temperatures, you can calculate the coefficient of thermal expansion and the glass transition temperature, using the Thermophysical Properties Analysis Panel (click the Tasks button and browse to Materials → Classical Mechanics → Thermophysical Properties → Thermophysical Properties Results). To open this panel from the entry group for the results of a job .
.
Thermophysical Properties Panel Features
- Use structures from option menu
- Open Project Table button
- File name text box and Browse button
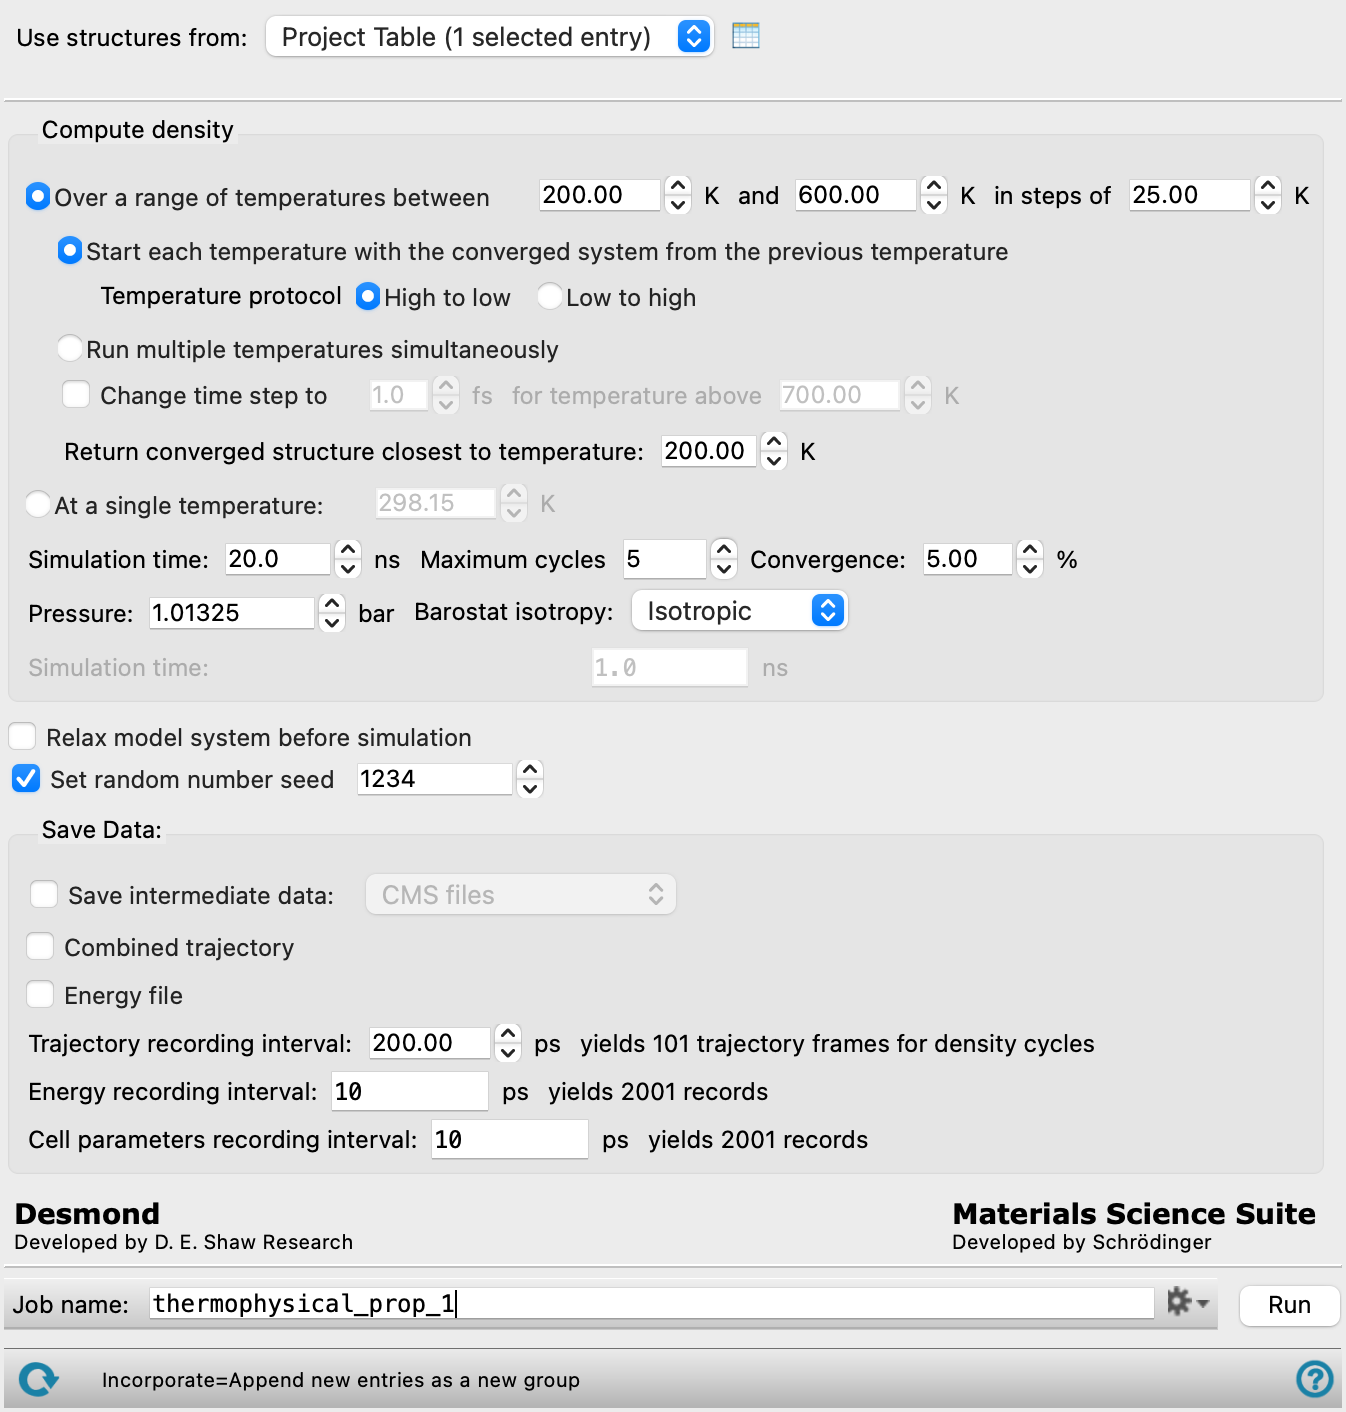
- Compute density section
- Over a range of temperatures between T1 K and T2 K in steps of T K option and text boxes
- At a single temperature option
- Simulation time text box
- Maximum cycles text box
- Convergence text box
- Pressure text box
- Barostat isotropy option menu
- Relax model system before simulation option
- Set random number seed option and text box
- Save data section
- Job toolbar
- Status bar
- Use structures from option menu
-
Choose the structure source for the simulations. The structures must be Desmond model systems. Simulations for multiple structures are run concurrently.
- Project Table (n selected entries)—Use the entries that are currently selected in the Project Table or Entry List. The number of entries selected is shown on the menu item.
- Workspace (n included entries)—Use the entries that are currently included in the Workspace, treated as separate structures. The number of entries in the Workspace is shown on the menu item.
- File—Use the specified file. When this option is selected, the File name text box and Browse button are displayed.
- Project Table (n selected entries)—Use the entries that are currently selected in the Project Table or Entry List. The number of entries selected is shown on the menu item.
- Open Project Table button
-
Open the Project Table panel, so you can

- File name text box and Browse button
-
Enter the Desmond CMS file name in this text box, or click Browse and navigate to the Desmond CMS file. The name of the Desmond CMS file you selected is displayed in the text box.
- Compute density section
-
Specify the temperatures for which to calculate the density, and the settings to make for each choice.
- Over a range of temperatures between T1 K and T2 K in steps of T K option and text boxes
-
Select this option to calculate the density over a range of temperatures. You can set the lowest and highest temperatures and the increment in temperature in the text boxes. The actual temperatures are generated by incrementing the lowest temperature. The highest temperature used is the one given in the text box (even if it is not in the series formed by incrementing the lowest temperature). This choice allows you to calculate the coefficient of thermal expansion and the glass transition temperature, using the Thermophysical Properties Analysis Panel.
- Start each temperature with the converged system from the previous temperature option
-
Select this option to run the simulations sequentially, starting from the highest or the lowest temperature. The relaxation protocol is run on the model system at the first temperature in the sequence, followed by the simulation to converge the density at that temperature. The results are then used to start the simulation to converge the density at the next temperature, and so on. You can use a GPU to speed up the individual simulations.
- Temperature protocol options
-
Specify the direction in which the sequential calculations are run:
-
High to low—start at the highest temperature and decrease the temperature for each subsequent step, using the converged output from the previous step. Normal protocol for calculating Tg.
-
Low to high—start at the lowest temperature and increase the temperature for each subsequent step, using the converged output from the previous step. Useful for examining melting behavior or other behavior on heating.
-
- Run multiple temperatures simultaneously option
-
Select this option to run the simulation for each temperature at the same time. For each temperature, the relaxation protocol is run on the initial model system at that temperature prior to the simulation to converge the density. Select this option if you have multiple CPUs or GPUs available over which to distribute the simulations.
- Change time step to n fs for temperatures above T K option and text boxes
-
Select this option to change the time step for simulations at temperatures above the specified temperature. Simulations at higher temperatures may require a shorter time step to obtain convergence.
- Return converged structure closest to temperature text box
-
Specify the temperature for the simulation from which the output structure returned to Maestro is taken. The structure is the last frame from the converged simulation at the temperature closest to the one specified in the text box. Convergence is important: the output structure will not be taken from an unconverged simulation, so the nearest converged simulation is used to determine the output structure.
- At a single temperature option and text box
-
Select this option to calculate the density at a single temperature, and specify the temperature in the text box. This choice gives you the density at the specified temperature, but no other properties.
- Simulation time text box
-
Specify the desired simulation time in ps. This value is used for each simulation at each temperature. The time should be sufficient to converge the density, but may not exceed 200 ns.
- Maximum cycles text box
-
Specify the maximum number of density simulations to perform to obtain a converged density. If the density does not converge in a simulation, another simulation is started from the output of the unconverged simulation, and this process is repeated until the density converges or the maximum number of density simulations specified here is reached. The total simulation time over all simulation cycles (product of the density simulation time and the maximum cycles) must not exceed 200ns.
- Convergence text box
-
Density convergence criterion, as a percentage. The density convergence is calculated as the standard deviation of the density divided by the mean density, evaluated over the last 20% of the simulation cycle. If the percent density convergence is less than the value given, it is considered converged. The default is 5%.
- Pressure text box
-
Specify the pressure to be used, in bar.
- Barostat isotropy option menu
-
Choose the type of coupling for the barostat, from Isotropic or Anisotropic.
- Relax model system before simulation option
-
When selected, a series of minimizations and short molecular dynamics simulations are performed to relax the initial model system before performing the simulation:
-
- 20 ps NVT Brownian minimization at 10 K,
- 20 ps NPT MD stage at 100 K,
- 100 ps NPT MD stage at temperature T
-
When the Start each temperature with the converged system from the previous temperature option is selected, T is the first temperature in the sequence. When the Run multiple temperatures simultaneously option is selected, T is every temperature step in the simulation to converge the density.
-
Normally, this option is needed only for model systems that have just been prepared (for example with the Disordered System Builder Panel) and have not been relaxed. This option is off by default.
- Set random number seed option and text box
-
Select this option to specify a random seed to be used in the simulations. Specifying the seed allows you to reproduce the results, unless other factors affect them. If this option is not selected, a seed is chosen at random.
- Save data section
-
Specify the data to save from the simulations.
- Save intermediate data option and menu
-
Select this option to save data from the Desmond MD simulations.
- CMS files—save the CMS files from each of the Desmond simulations. These are the files that contain the structure and force field information.
- CMS and trajectory—save the CMS files and the trajectories from each of the Desmond simulations. Note that trajectory files can be large and may take up a lot of disk space.
- Combined trajectory option
-
Return a combined trajectory, which is generated by concatenating the trajectories from each run, in the order specified by the Temperature protocol option.
- Energy file option
-
Return a energy file (
.ene) which contains information on various energies at each time step of a simulation. - Trajectory recording interval text box
-
Set the recording interval for saving points on the trajectory, in ps. This is the amount of time between frames in the trajectory. The entered value is rounded to an integer multiple of the far time step size. The resultant number of records to be written is reported to the right.
- Energy recording interval text box
-
Set the recording interval for saving energies, in ps. The resultant number of records to be written is reported to the right.
- Cell parameters recording interval text box
-
Set the recording interval for saving the cell parameters, in Å. The resultant number of records to be written is reported to the right.
- Job toolbar
-
Manage job submission and settings. See Job Toolbar for a description of this toolbar.
The Job Settings button opens the Thermophysical Properties - Job Settings Dialog Box, where you can make settings for running the job.
- Status bar
-
The status bar displays information about the current job settings and status for the panel. The settings includes the job name, task name and task settings (if any), number of subjobs (if any) and the host name and job incorporation setting. The job status can include messages about job start, job completion and incorporation.
Use the Reset button
 to reset the panel to its default settings and clear any data from the panel.
 The status bar also contains the Help button
 , which opens the help topic for the panel in your browser. If the panel is used by one or more tutorials, hovering over the Help button displays a
  button, which you can click to display a list of tutorials (or you can right-click the Help button instead). Choosing a tutorial opens the tutorial topic.