Workspace Tools for Periodic Structures
crystal mates, crystal planes, unit cell
In the Materials Science profile, Maestro has additional tools for working with periodic structures. The Status bar is customized to provide information on periodic structures and access to tools for display of periodic structures, with a section to the right side of the Status bar.


-
Cell and space group information. When a periodic structure is detected, cell information is displayed in the Status bar.
- If a cell has not been built, the cell information shows ASU at the top.
- If a cell has been built, the cell information shows the dimensions of the supercell in terms of the unit cell.
- The space group from the PDB CRYST1 Space Group property is shown underneath the cell information.
-
Periodic structure button. When a periodic structure is detected, the Periodic structure button is enabled.

This button opens a menu with a number of actions that can be performed for periodic structures:- Build Cell—Create and display a supercell in the Workspace, which can be extended in all three directions. This item opens the the Periodicity toolbox: see below for details.
- Revert to ASU—Revert the structure to the asymmetric unit. Extents are discarded as well as symmetry-related atoms in the first unit cell.
- Make P1 Cell—Create a new project entry from the supercell built on the extents, with P1 crystal symmetry. Information on extents and asymmetric unit are discarded in the new entry, as the entire entry is the new asymmetric unit.
- Create Nonperiodic System—Create a new project entry from the Workspace structure that is just an isolated structure, without periodic boundaries or properties.
- Update Space Group—Update the space group from the structure. Choosing this item opens the Assign Space Group Panel, so you can reassign the space group after any edits.
-
Build Cell toolbox.
This toolbox is opened by choosing Build Cell from the Periodic structure button menu.
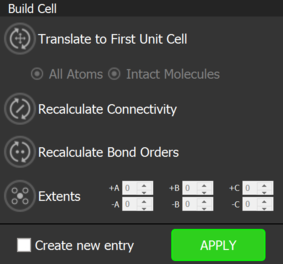
The toolbox provides tools for building periodic structures from a displayed asymmetric unit, including supercells.
The four buttons are described below. The settings made with these buttons are stored with the entry in the project as properties. Thus, when you display an entry in the Workspace, the button settings stored in the entry are shown in the toolbox.

Translate to First Unit Cell—translate atoms in the system so that they are inside the first unit cell. This cell has one corner at the origin with the sides extending from this corner along the positive a, b, and c axes (and may be represented by the box in the Workspace, if shown); the fractional coordinates are all in the range (0,1).
- All Atoms—translate atoms so that all atoms are inside the first unit cell. This option is selected by default, and may spatially separate parts of molecules that span the cell boundaries.
- Intact Molecules—translate molecules, so that their centroids are in the first unit cell, leaving the molecules intact, but potentially spanning the cell boundaries.

Recalculate Connectivity—Recalculate the connectivity between the atoms after Workspace changes. The default for this button and whether to ignore atomic valence when calculating connectivity can be set in the Materials Science settings section of the Preferences Panel. 
Recalculate Bond Orders—Recalculate the bond orders between the atoms after Workspace changes. Bond orders are assigned if the asymmetric unit has less than 50 atoms, and is not for an atomic solid. 
Extents—Create replicas of the unit cell along the lattice vectors. You can set the number of replicas in the positive and negative directions for each lattice vector, in the text boxes. The replicas are not displayed until you click BUILD CELL. If there are multiple entries displayed in the Workspace, the default setting is displayed for any button whose setting differs between the entries, and the actions are applied to each entry separately.
If you want to create a new entry for the cell, select Create new entry. Otherwise, the cell replaces the entry it was built from.
Click Apply to create the new cell. To exit without creating a cell, click outside the toolbox.
-
Select Objects pane.
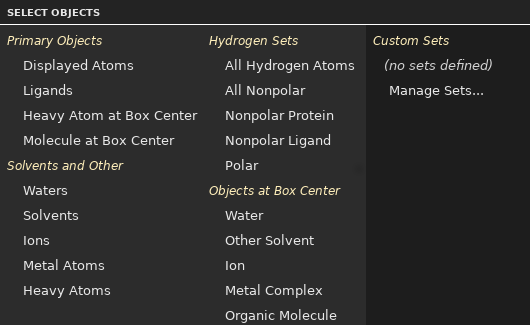
The predefined items available for selection in the Select Objects pane include items for objects at the center of the periodic box. An object is considered "at" the box center if it has a non-hydrogen atom that is within 5 Å of the center of the box and this atom is the closest to the box center.
You can also do the following:
-
align the Workspace view (camera view) to the periodic box — for more information, see Aligning the View to the Structure.
-
center the periodic box on an atom, by right-clicking the atom and choosing Center Cell on Atom.