Preparing Structures for Covalent Docking
The receptor structure and the ligand structures should be prepared for use with Glide and Prime. The recommended procedure is to use the Protein Preparation Workflow Panel for preparing the receptor, and the LigPrep Panel for preparing the ligands. Details of these tools and their use can be found in the Protein Preparation Guide — Contents and the LigPrep User Manual — Contents. An overview of the preparation needed for Glide is given in Protein and Ligand Preparation for Glide. Preparation for Prime refinement is described in Preparing Protein Structures for Refinement.
In addition to preparation with LigPrep, the ligand structures should contain the reactive functional group for the reaction by which the covalent bond is formed. This functional group is defined by a SMARTS pattern, which is displayed in the Covalent Docking Panel. The default SMARTS patterns are listed under Reaction type option menu in the Covalent Docking Panel. Ligands that don’t match are skipped with a warning. However, you might want to filter the ligands so that your input file only contains ligands with the desired functional group. You can filter the ligands in the Ligand Filtering panel, as follows.
-
Click the Tasks button and browse to Structure Analysis → Ligand Filtering to open the Ligand Filtering panel.
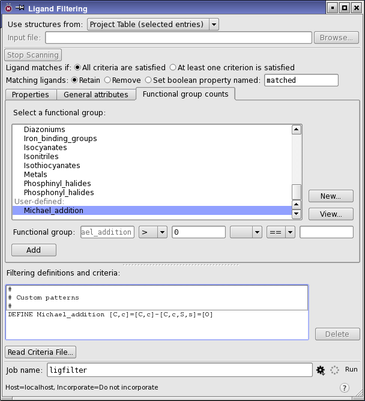
Figure 1:The Ligand Filtering panel.
-
Select the source of ligands from the Use structures from option menu.
-
If you choose File, click Browse and select the file in the file selector that opens.
-
If you choose Project Table, select the ligands in the Project Table.
-
-
For Matching ligands, ensure that Retain is selected.
It doesn’t matter what is selected for Ligand matches if, as you will only use one criterion.
-
In the Functional Group Counts tab, click New.
The Ligand Filtering - Add Definition dialog box opens. As the functional group for the reaction is not likely to be included in the predefined list, you will have to add the definition for this functional group.
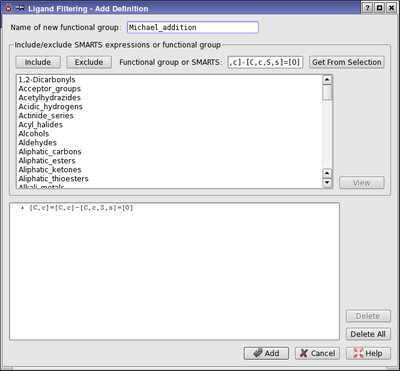
Figure 2:The Add Definition dialog box.
-
Enter a name for the functional group in the Name of new functional group text box.
For example, use the reaction type. There must be no spaces in the name.
-
Copy or type the SMARTS pattern for the ligand reactive group into the SMARTS expression or selected functional group text box.
-
If you intend to use the default pattern, you can copy it from the table in the Covalent Docking Panel topic. If you intend to modify the default pattern, to make it more specific, you should instead use the Get From Selection button, as this is the same procedure as is used in the Covalent Docking Panel. Display a ligand in the Workspace, select the atoms that you want to include in the SMARTS pattern, then click Get From Selection.
-
Click Include.
The SMARTS pattern is listed in the lower text area. You can add more SMARTS patterns to the group by repeating the last two steps. You might want to do this if you intend to modify the default pattern.
-
Click Add.
The functional group is added under the User-defined heading, at the bottom of the functional group list.
-
Select the functional group you just created.
The name is displayed in the Functional group text box.
-
Choose > from the option menu to the right, then enter 0 in the text box.
-
Click Add.
A new line is added in the Filtering definitions and criteria. This line shows that the number of occurrences of the functional group in any ligand must be greater than zero for the ligand to be retained in the output.
-
If you want to add the filtered ligand set to the Project Table, click the Job Settings (gear) button, and choose Append new entries as a new group from the option menu in the Output section.
-
Enter a job name in the Job name text box, and click Run.
The job name is used to name the output file.
You can also run ligand filtering from the command line—see Filtering Structures by Property: ligfilter.