Nanoparticle Builder Panel
In this panel you can build a nanoparticle of a particular shape and size from the structure in the Workspace.
To open this panel, click the Tasks button and browse to Materials → Structure Builders → Nanoparticles.
The following licenses are required to use this panel: MS Maestro
- Using
- Features
- Additional Resources
Using the Nanoparticle Builder Panel
Nanoparticles are built from a larger structure by imposing a particular shape on the particle, and removing atoms from the larger structure that are outside the surface of the shape.
Possibly the easiest way to create the larger structure from a crystal structure is to use the Build Cell toolbox, which you open by choosing Build Cell from this button menu,
to extend the unit cell with as many replicas as are needed to create a structure of the required size. Click the Extents button and use the boxes to extend the unit cell with as many replicas as needed to create a structure of the required size.

There is no restriction on the structure from which you create the nanoparticle—it does not have to be a crystal. If you use organic molecules (even if in a molecular crystal), these molecules will be cut at the boundaries and the dangling bonds will be terminated with the fragment you choose.
As the shape used to create the nanoparticle is symmetrically placed about the origin, you might want to align the parent structure to obtain the desired symmetry of the nanoparticle. Maestro provides a tool for aligning structures on the coordinate axes or planes, and updating the coordinates of the aligned structure. In the Maestro main window, choose View → Align Axis to open the alignment banner, in which you can perform an alignment (see Aligning the View to the Structure).
To build a nanoparticle:
-
Choose the shape of the nanoparticle.
Text boxes for specifying the shape parameters are displayed below this option menu that are appropriate for the shape.
-
Specify the size of the nanoparticle in the text boxes, by specifying the edge lengths, angles, radius, as appropriate.
Lengths are specified in angstroms, angles in degrees.
-
Choose a fragment to terminate dangling bonds on the surface of the nanoparticle.
Each neighboring atom that is removed from an atom at the surface of the nanoparticle is replaced with the terminating fragment.
-
(Optional) Specify the percentage of vacancies to create in the nanoparticle.
The number of vacancies is determined from the percentage by rounding to the nearest integer. This number of atoms (or molecules, if the structure has more than one molecule) is removed from the nanoparticle at random.
-
Specify the name of the entry group in the project that contains the output entries.
The entries themselves are also named with this name as a stem (see under Group name text box).
-
Click Build.
An entry group is created for the structures (see under Build button).
Nanoparticle Builder Panel Features
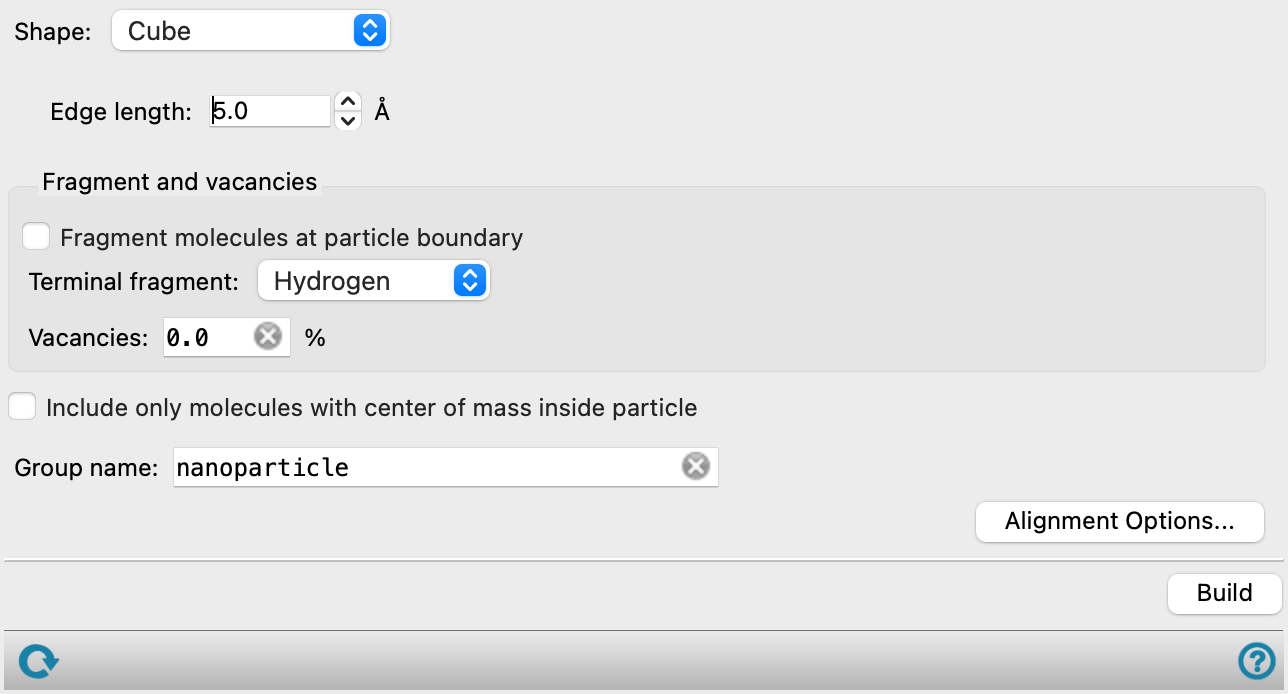
- Shape option menu
-
Choose the shape of the nanoparticle. Text boxes for specifying the shape parameters are displayed below this option menu that are appropriate for the shape.
- Shape parameter text boxes
-
Specify the size of the nanoparticle, by specifying the edge lengths, angles, radius, as appropriate. Lengths are specified in angstroms, angles in degrees.
- Fragment molecules at particle boundary option
-
Allow molecules to be cut at the particle boundary. The fragments outside the boundary are discarded and the dangling bonds are terminated with the fragment chosen from the Terminal fragment option menu.
- Terminal fragment option menu
-
Choose a fragment to terminate dangling bonds on the surface of the nanoparticle. Each neighboring atom that is removed from an atom at the surface of the nanoparticle is replaced with the terminating fragment.
- Vacancies text box
-
Specify the percentage of vacancies to create in the nanoparticle. The number of vacancies is determined from the percentage by rounding to the nearest integer. This number of atoms (or molecules, if the structure has more than one molecule) is removed from the nanoparticle at random.
- Include only molecules with center of mass inside particle option
-
Select this option to only include molecules with a center of mass inside the particle boundary in the nanoparticle. Molecules with centers of mass outside the particle boundary are not included in the output.
- Group name text box
-
Specify the name of the entry group in the project that contains the output entries. The entries themselves are also named with this name. The nanoparticle has the name
groupname-shape. If you also build a nanoparticle with vacancies, this entry is namedgroupname-shape-X% vacancies. - Alignment Options button
-
Set options for the alignment of the nanoparticle boundaries to crystal planes or edges. Opens the Alignment Options Dialog Box.
- Build button
-
Build the nanoparticle. An entry group is created for the structures, containing an entry for the nanoparticle itself (without vacancies), an entry for the shape of the nanoparticle (if it is a polyhedron), and an entry for the nanoparticle with vacancies if a vacancy percentage was set.
- Status bar
-
 to reset the panel to its default settings and clear any data from the panel.
If you can submit a job from the panel, the status bar displays information about the current job settings and status for the panel. The settings include the job name, task name and task settings (if any), number of subjobs (if any) and the host name and job incorporation setting. The job status can include messages about job start, job completion and incorporation.
The status bar also contains the Help button
 , which opens an option menu with choices to open the help topic for the panel (Documentation), launch Maestro Assistant, or if available, choose from an option menu of Tutorials. If the panel is used by one or more tutorials, hover over the Tutorials option to display a list of tutorials. Choosing a tutorial opens the tutorial topic.