Nanostructure Builder Panel
Build nanotubes or nanosheets from a specified asymmetric unit, composition, and geometry to a given size. Multi-walled nanotubes and multi-layer nanosheets can be constructed as well as single-walled nanotubes and single nanosheets, and nanotubes with a range of chiral indices can be generated.
To open this panel, click the Tasks button and browse to Materials → Structure Builders → Nanostructures.
The following licenses are required to use this panel: MS Maestro
- Using
- Features
- Additional Resources
Using the Nanostructure Builder Panel
The nanostructure builder can produce single- or multi-walled nanotubes, and single- or multi-layer nanosheets. All structures are based on the usual honeycomb pattern of connectivity, with three neighbors for each atom. The edges can be terminated with a single bond to a chosen terminating group, or left with no terminating group.
A formal assignment of bonding is made between the atoms. On this basis, the atoms in the nanostructure can be trivalent, so that each atom has three single bonds (as in BN), or tetravalent, so that each atom has two single bonds and one double bond (as for carbon). Other than this, no attempt is made to assign bond orders or formal charges based on valence, and no checking is done on the validity of this assignment, as nanostructures can be built with this panel out of any elements.
If you plan to use the nanostructures in modeling with force fields (such as molecular dynamics), you will have to choose atoms that are supported by the force field, and have appropriate sp2 atom types. If the atoms you choose are not trivalent or tetravalent, you will have to assign bond orders and formal charges before using the structure for modeling. You might also have to assign formal charges for trivalent elements.
For quantum mechanical modeling, connectivity and atom typing is not relevant. You could, for example, generate PbO nanosheets, and ignore the bonding.
The first step in building nanosheets or nanotubes is to define the basic building block and choose how to terminate the sheets or tubes. This task is common to both types of nanostructure.
-
Specify the composition of the unit cell, by entering the element symbols in the Elemental composition text boxes.
-
Define the length of the bond between the two atoms in the unit cell, by entering a value in the Bond length text box.
-
Choose an organic fragment to terminate the bonds on the ends of the tubes or the edges of the sheet, from the Terminated with option and menu. If the fragment is polyatomic, you can also perform a minimization of the fragments when they are attached, by selecting Minimize terminating fragments.
You can switch between nanosheet and nanotube creation with the Create options. The controls below are updated according to your choice.
Nanosheets:
-
Choose the edge types for the two edges of the sheet, from armchair and zigzag.
-
Set the dimensions of the sheet in terms of the unit cell size.
-
If you want a multi-sheet structure, choose the number of bilayers, set the layer separation, shift, and stacking geometry.
Nanotubes:
-
Set the chiral indices (n,m) for the tube (or the innermost tube).
-
Specify the length in terms of the number of repeating units.
-
If you want a multi-walled nanotube, set the number of walls and the wall separation.
-
If you want to generate nanotubes with a range of chiral indices, select Enumeration and choose an enumeration option.
When you have finished setting options, set the job name and click Run to run the job. The structures are written to a Maestro structure file, and by default are incorporated into the current Maestro project. If you want to change any of the job options, click the Settings (gear) button.
To write out the input file and a script for running the job from the command line, click the arrow next to the Settings button  and choose Write.
Nanostructure Builder Panel Features
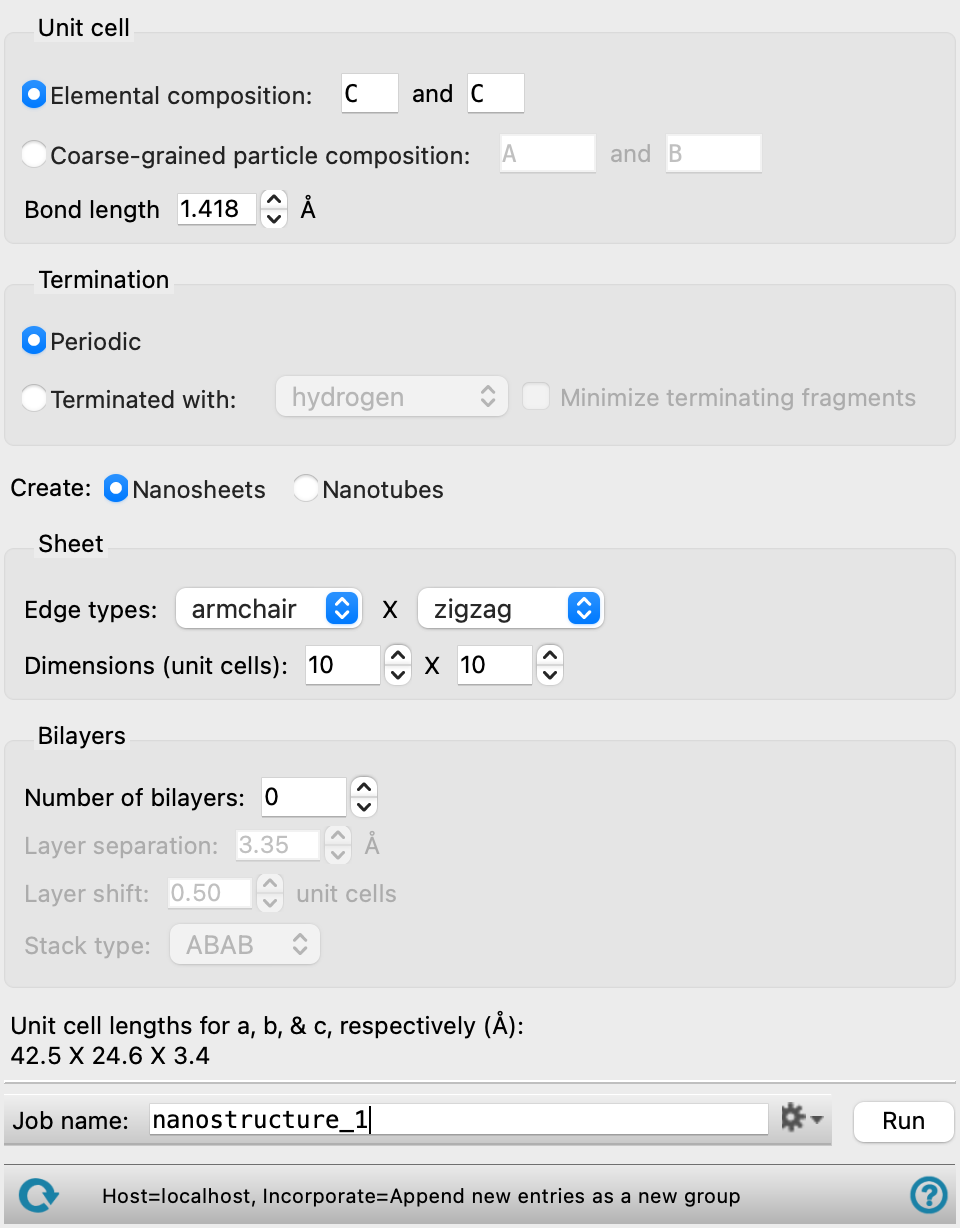
Unit cell section
Specify the unit cell composition in terms of the two atoms or particles of the asymmetric unit. There are no limitations imposed on the composition, and no imposition of valence rules or assignment of formal charges in the construction of the nanostructure. All atoms or particles have bonds to three neighboring atoms within each sheet or tube (including the terminating groups).
Specify the elemental composition for the unit cell. Enter the element symbol in each text box for the element you want to use.
If you intend to use these structures for studies with force fields (such as MD), you will have to choose atoms that are supported by the force field and have suitable sp2 atom types. For quantum mechanical studies, issues of bond order, connectivity, and formal charge are not important.
Specify the composition for the unit cell in terms of coarse-grained particles. Enter the particle names in the two text boxes. You can use the names of particles that you have defined previously, or you can enter new names to create new particles.
If you intend to use these structures for studies with force fields (such as MD), you will have to assign force field parameters to the particles in the Coarse-Grained Force Field Assignment Panel if they are not already assigned (i.e. for new particles). If you already have force field parameters for the particles, you can use them when you prepare the structures in the Prepare for MD Panel.
Specify the length of the bond between the two atoms in the unit cell, in angstroms.
Termination section
Specify how the ends of the nanotubes or the edges of the nanosheets are to be terminated, to satisfy the valence. Single bonds are formed to a fragment.
- Periodic option
-
Periodic boundary conditions are applied to the nanotube or nanosheet. The unit cell dimensions are dynamically calculated based on the parameters given and displayed at the bottom of the panel.
- Terminated with option and menu
-
Choose the fragment to add to the ends or edges from the list on this menu.
- Minimize terminating fragments option
-
Perform a minimization of the terminating fragments, to relieve any steric crowding. All atoms in the fragment, including the atom that is attached to the nanostructure, are free to move, while the nanostructure is held fixed. The minimization of the fragment is done with a force field (with backup general atom typing for unrecognized atom types in the nanostructure). This option is only available if Terminated with is selected and the terminating fragment is polyatomic.
Create options
Select an option for the kind of structure to build, from Nanosheets or Nanotubes. The relevant controls for the structure type are displayed below these options when you change your selection.
Sheet section
This section is displayed if Nanosheets is selected for the Create option.
- Edge types option menus
-
Specify the edge type for each of the edges in the nanosheet. The choices are armchair and zigzag.
- Dimensions (unit cells) text boxes
-
Specify the size of the nanosheet in terms of the number of unit cells (hexagons) along each edge. The actual number of atoms depends on the edge type. For the zigzag edge, the symmetry operations to add the next unit place some atoms over atoms in an existing unit, and only the unique atoms are added, whereas for the armchair edge, all of the added atoms are unique.
Bilayers section
This section is displayed if Nanosheets is selected for the Create option.
- Number of bilayers text box
-
Specify the number of bilayers to build. A value of 0 produces a single nanosheet, whereas a positive integer produces the specified number of bilayers, and the number of layers is twice this number.
- Layer separation text box
-
Specify the layer separation in angstroms. The same separation is used between all layers (there is no distinction between intra-bilayer and inter-bilayer separation).
- Layer shift text box
-
Specify the amount by which each layer is shifted relative to the layer below it. The shift is applied to both directions in the plane of the sheet (here regarded as the horizontal plane). To produce a vertically aligned stack, set the shift to zero. The direction of the shift (positive or negative) for each sheet is determined by the stacking geometry.
- Stack type option menu
-
Specify how the layers are stacked.
- ABAB—the direction of the shift is reversed for each layer that is added. The result is that the odd-numbered layers are vertically aligned, and the even-numbered layers are vertically aligned but are shifted relative to the odd-numbered layers.
- ABCD—the shift is applied in the same direction as each layer is added.
Tube section
Set up the parameters that define the geometry and number of tubes. This section is displayed if Nanotubes is selected for the Create option. The radius of the nanotube is dynamically calculated based on the parameters given and displayed at the bottom of the panel.
For multi-walled nanotubes without termination, the output structure is a periodic cell (ready for MD simulations) only if the chiral indices are equal, i.e. n=m, or if m=0. Otherwise it is simply a structure without periodic boundary conditions, as the periodicity of the individual tubes is different. You may have to correct the bond orders at the termini of the tubes in this case.
- Chiral index (n) text box
-
Specify the chiral index n for the nanotube, which must be greater than zero. If you choose to generate a set of nanotubes with different chiral indices n, this is the maximum value of the n chiral index that is used. If you choose to build a multi-walled nanotube, this is the index for the innermost tube.
- Chiral index (m) text box
-
Specify the chiral index m for the nanotube, which can take values from 0 to n. If you choose to generate a set of nanotubes with different chiral indices m, this is the maximum value of the m chiral index that is used. If you choose to generate a set of nanotubes with different chiral indices n, this is the minimum value of the n chiral index that is used. If you choose to build a multi-walled nanotube, this is the index for the innermost tube.
- Number of unit cells text box
-
Specify the number of unit cells to use when building the (inner) nanotube. This determines the length of the nanotube. The number is adjusted for each wall to obtain tubes of approximately the same length as the inner tube. The default is 2 unit cells. Nanotubes without termination that have equal chiral indices (n=m) must be built with 2 or more unit cells.
- Number of walls text box
-
Specify the number of walls of the nanotube.
- Wall separation text box
-
Specify the separation between the walls in a multi-walled nanotube. This value is used along with the chiral indices given for the innermost tube (above) to construct the outer walls to match as closely as possible the chiral angles of the innermost tube. Given the geometric constraints on the tube, the wall separation may not be reproduced exactly.
Enumeration options
Generate all possible nanotubes with a range of m or n chiral index values. This section is displayed if Nanotubes is selected for the Create option.
- Enumerate on chiral index n from m to n option
-
Generate all possible nanotubes with the chiral index n taking values from the m value given in the Tube section to the n value given in the Tube section. The values reported in the text change as you adjust the values in the Tube section.
- Enumerate on chiral index m from 0 to m option
-
Generate all possible nanotubes with the chiral index m taking values from 0 to the m value given in the Tube section. The value reported in the text changes as you adjust the m value in the Tube section.
Job toolbar
Manage job submission and settings. See Job Toolbar for a description of this toolbar.
The Job Settings button opens the Nanostructure Builder - Job Settings Dialog Box, where you can make settings for running the job.
Status bar
The status bar displays information about the current job settings and status for the panel. The settings includes the job name, task name and task settings (if any), number of subjobs (if any) and the host name and job incorporation setting. The job status can include messages about job start, job completion and incorporation.
Use the Reset button  to reset the panel to its default settings and clear any data from the panel.
The status bar also contains the Help button  , which opens the help topic for the panel in your browser. If the panel is used by one or more tutorials, hovering over the Help button displays a
  button, which you can click to display a list of tutorials (or you can right-click the Help button instead). Choosing a tutorial opens the tutorial topic.