Maestro to LiveDesign Export Panel
Export structures and data from a Maestro project or file to a LiveDesign project.
To open this panel: in the Maestro main window, choose File → Export to LiveDesign.
To open this panel from the entry group for the results of a Glide docking job .
.
- Using
- Features
- Additional Resources
Using the Maestro to LiveDesign Export Panel
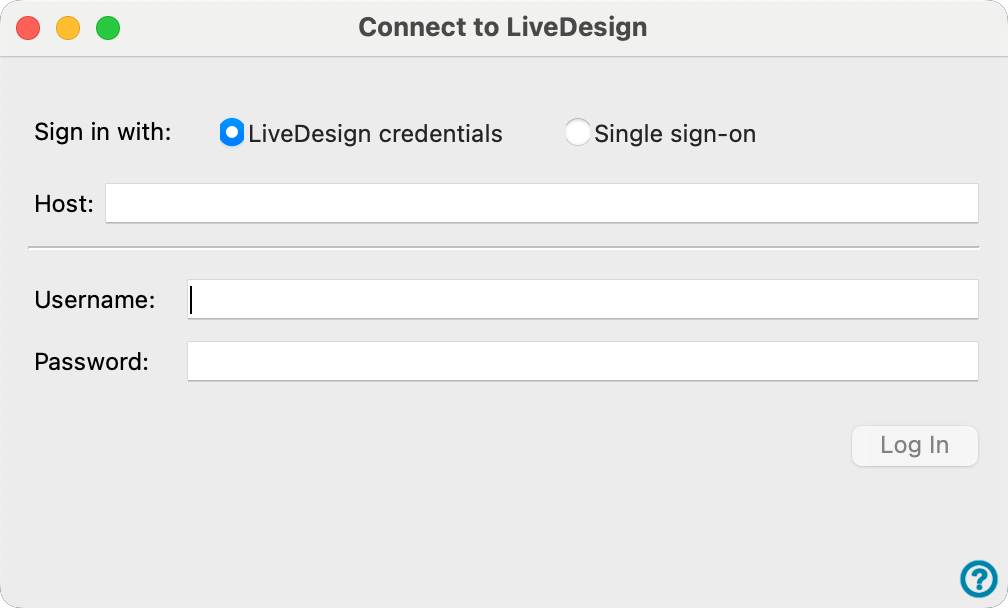
If you are already connected to your LiveDesign server, the panel opens immediately. If you are not connected to your LiveDesign server, the Connect to LiveDesign Dialog Box opens first.
The Maestro to LiveDesign export facility consists of two connected panels.
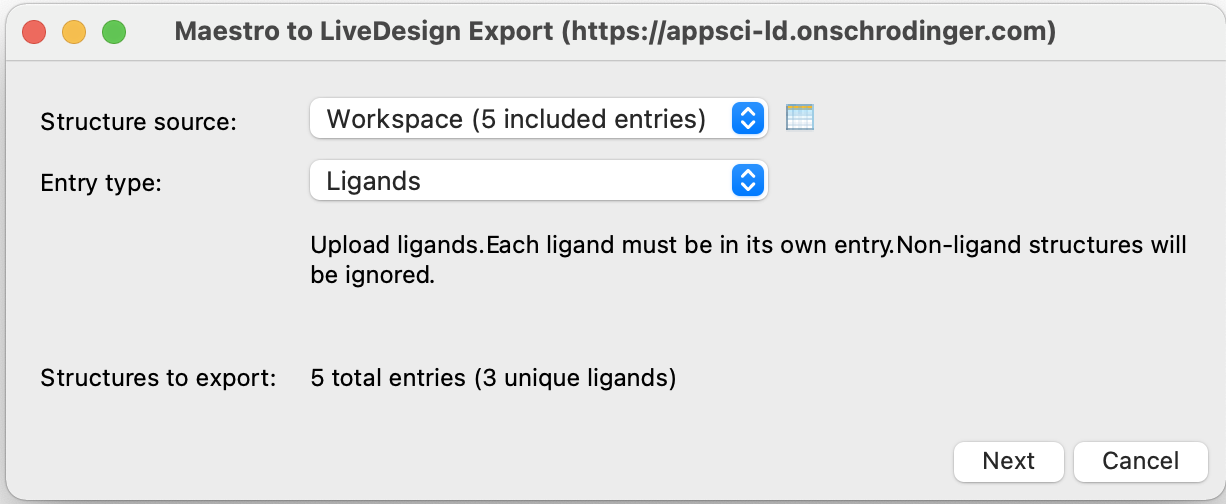
In the first panel you choose the source of the structures whose data you want to export, and specify the entry type of the structures.
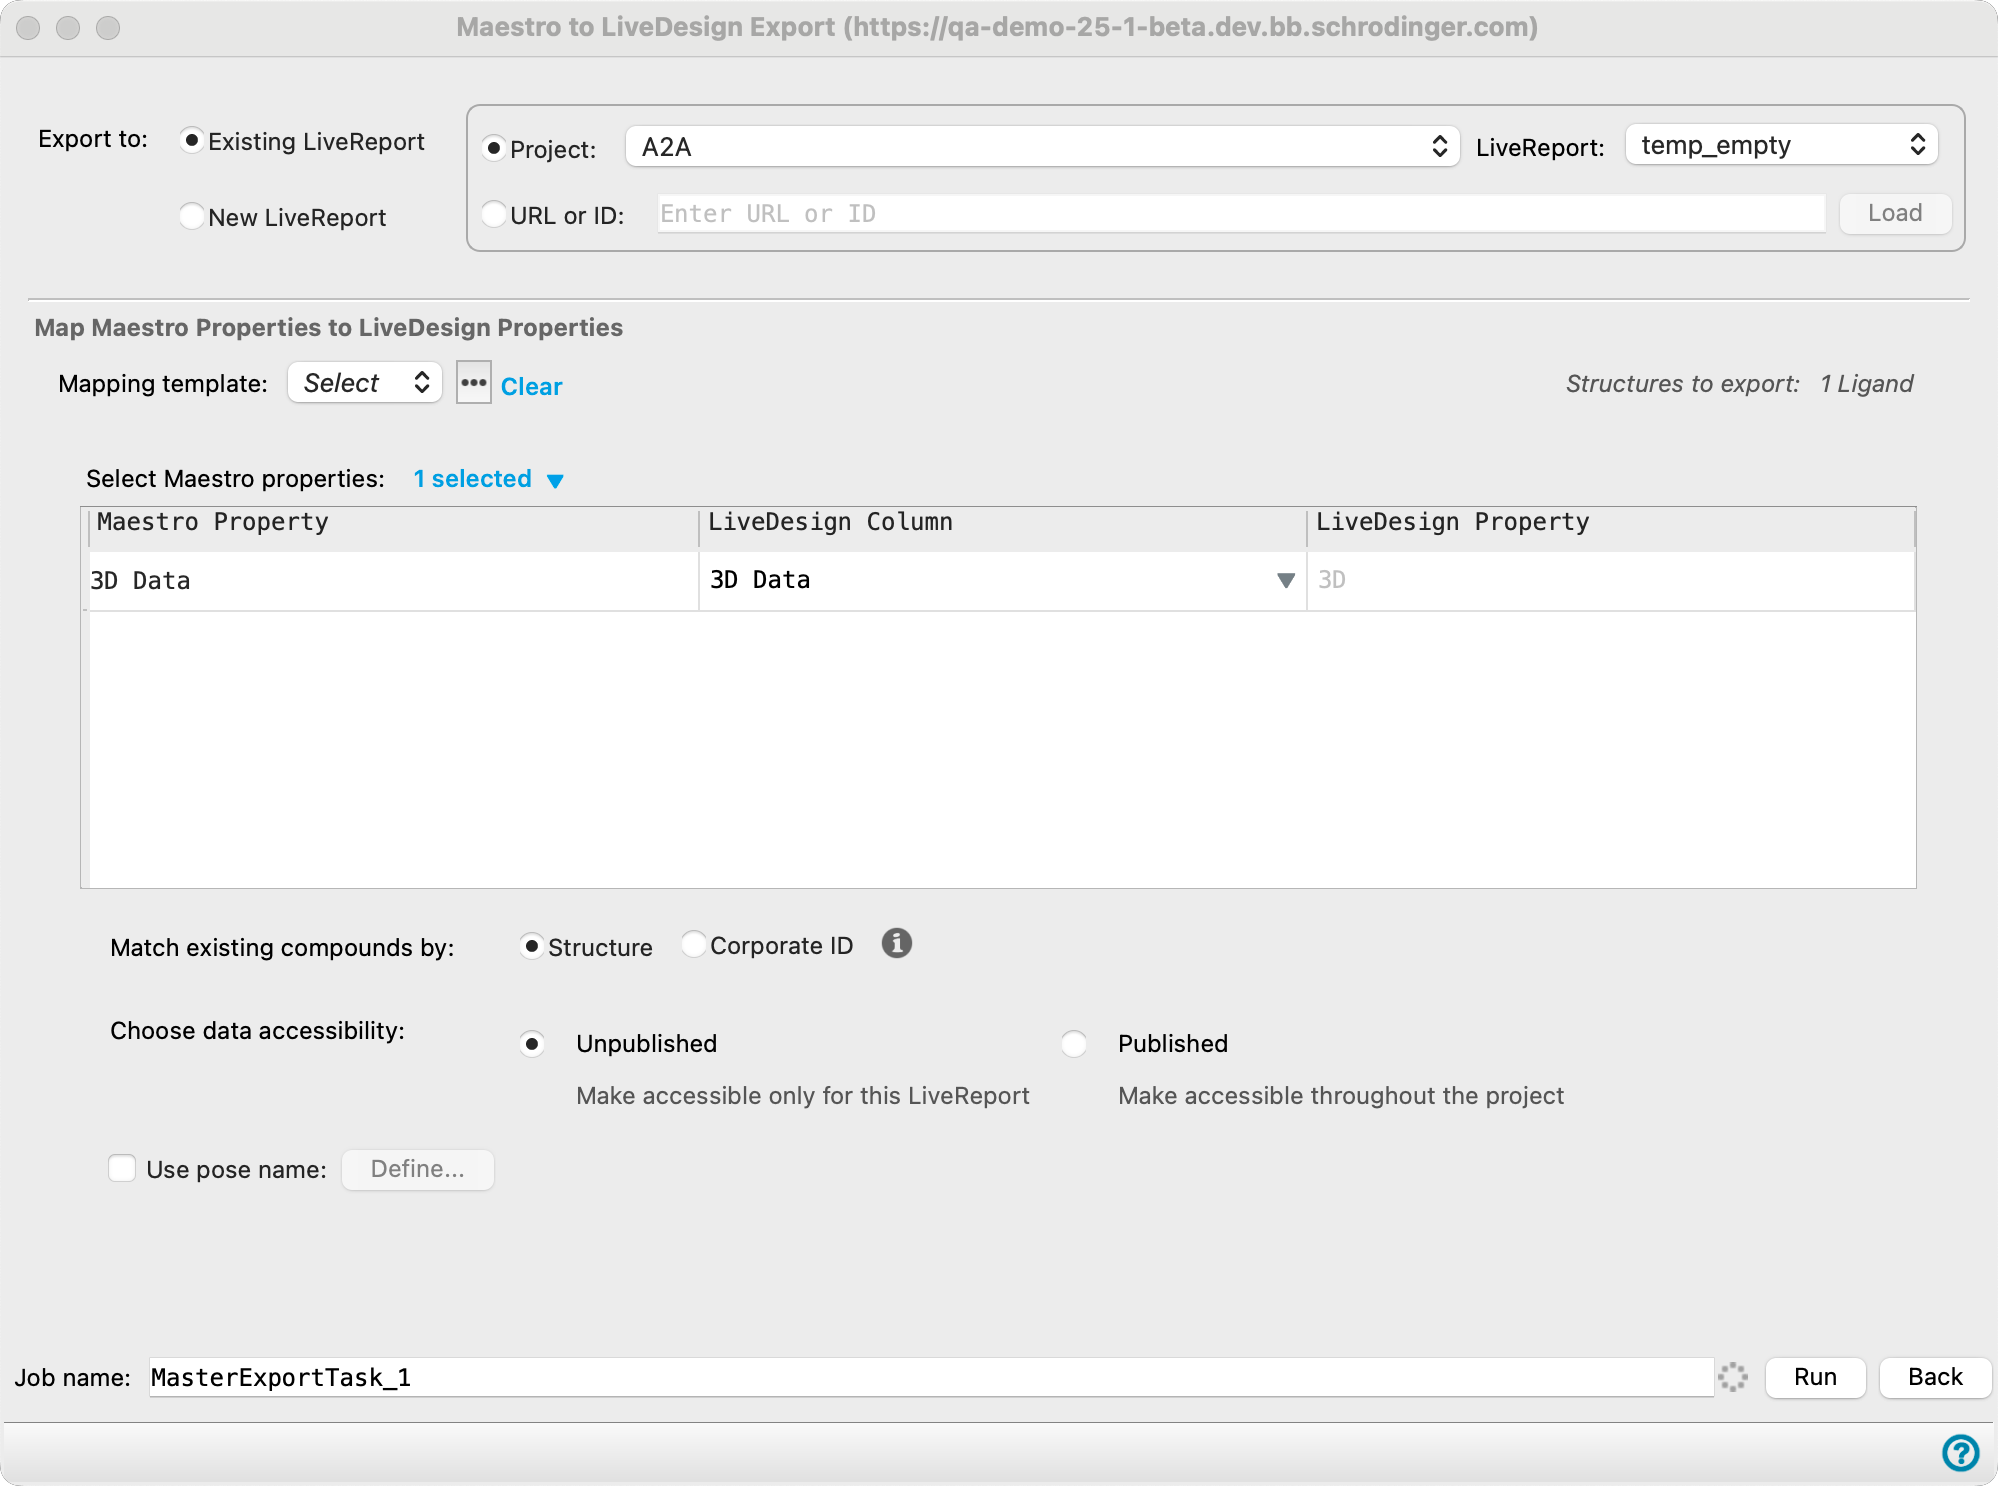
In the second panel you select the LiveDesign project and report, choose the properties to export and the destination in the report to which the properties will be exported. You then perform the export.
You can navigate between these two panels using the Next and Back buttons to choose different structures and export to different projects and reports.
Click Run to perform the export. Before the final export, a summary panel is displayed, giving details of the export and the destination of the structures and data in LiveDesign.
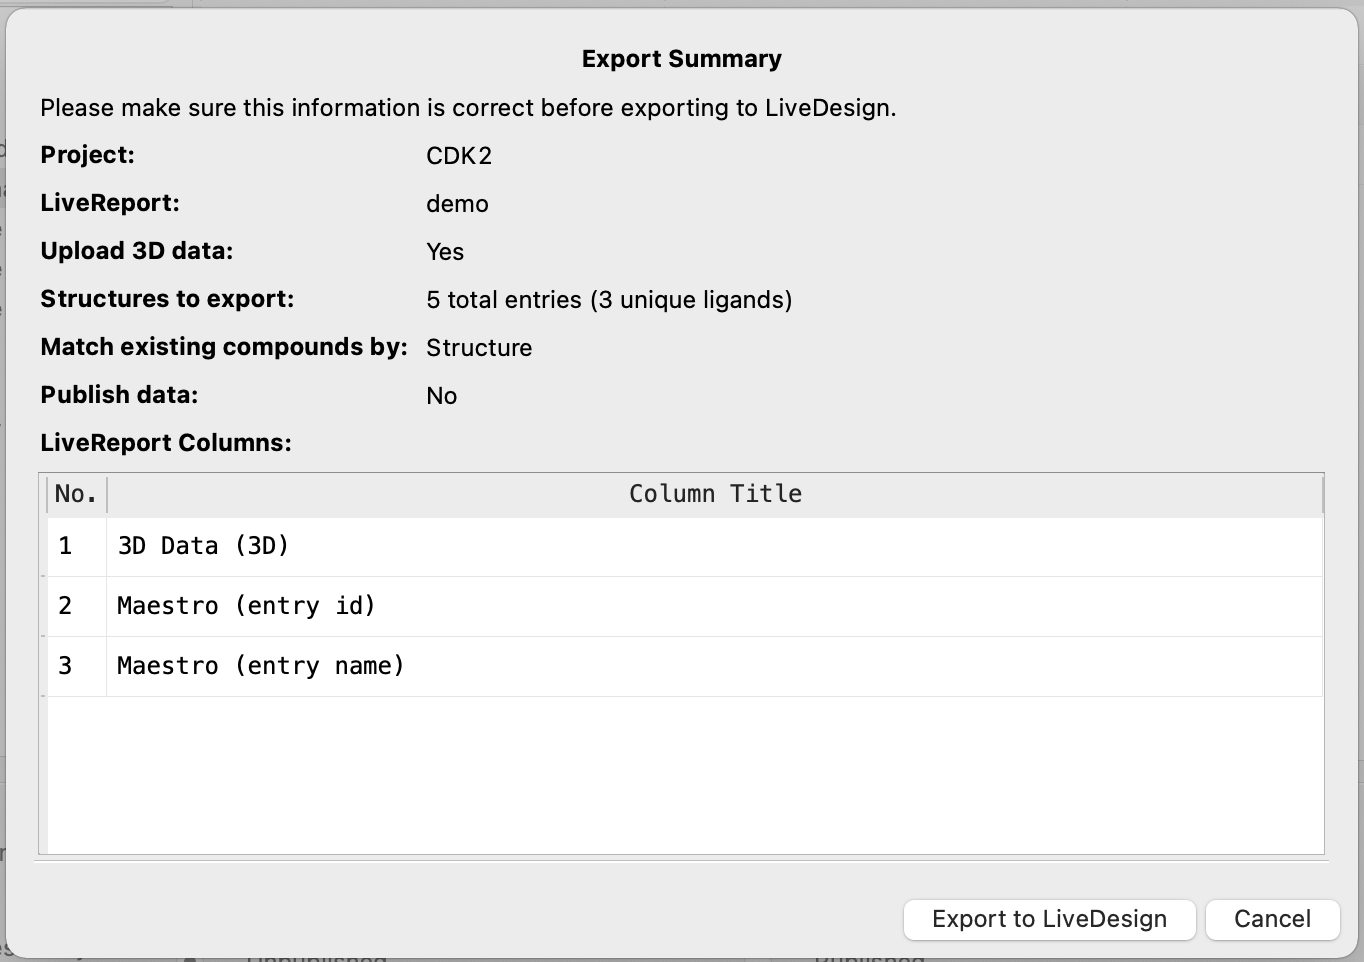
In the summary panel, you can click Export to LiveDesign to proceed with the export or Cancel to go back. Upon proceeding with the export, a dialog opens with a link to the uploaded LiveReport.
Note
Each Maestro session will have own ldclient log file, with the naming format: `ldclient_YYYY-MM-DD_HH-MM-SS_UUID.log`.
The Directory for log files is: `{schrodinger temp directory}/ldclient_logs`.
Maestro to LiveDesign Export Panel Features
- Structure selection panel
- Property selection and export panel
- Export to LiveReport options
- Map Maestro properties to LiveDesign properties section
- Match existing compounds by options and menu
- Choose data accessibility options
- Use pose name option and button
- Structures to export text
- Job name text box
- Restore settings from last export option
- Next button
- Cancel button
Structure selection panel
In this panel, you choose the source of the structures that you want to export to LiveDesign.
- Structure source option menu
-
Choose the structure source for export to LiveDesign.
- Project Table (n selected entries)—Use the entries that are currently selected in the Project Table or Entry List. The number of entries selected is shown on the menu item.
- Workspace (n included entries)—Use the entries that are currently included in the Workspace, treated as separate structures. The number of entries in the Workspace is shown on the menu item.
- Project Table (n selected entries)—Use the entries that are currently selected in the Project Table or Entry List. The number of entries selected is shown on the menu item.
- Open Project Table button
-
Open the Project Table panel, so you can

- Entry type option menu
-
Choose the type of entry to be exported to LiveDesign. This is used as a filter on the structures so that structures which do not match the entry type are ignored. The available options are Ligands, Docked Poses, Receptor-Ligand Complexes, Covalent Docking Complexes, Organometallic Compounds, and Generic Entities. A description of the chosen entry type and its requirements is shown below the option menu.
Note: For the Docked Poses option, the first structure is always chosen as the receptor.
Note: For the Generic Entity option, exporting data on new and existing entities simultaneously is not permitted: you can either export data on all new or all existing entities.
- Structures to export text
-
This text gives a summary of the structures that will be exported. The number of total entries is displayed, followed by a breakdown of those entries by entry type in parenthesis.
- Next button
-
The Next button takes you to the property selection and export panel.
Property selection and export panel
- Export to LiveReport options
-
Choose the means of specifying the LiveReport to export to. The choice determines the controls that are displayed immediately below.
- Existing LiveReport option
-
Select the option to export to an existing LiveReport by specifying the Project and LiveReport or by pasting a URL or ID.
-
Project option—Choose the LiveDesign project you want to export the data to. The dropdown menu lists the projects that are available on the LiveDesign server you connected to. From the LiveReport dropdown menu, select a LiveReport from the Project selected.
-
Paste LiveReport URL or ID text box and button—export to the LiveReport specified by a URL or by a report ID (number). Paste or type the URL or the ID in the text box. You can choose recently used LiveReport URLs or IDs from the dropdown menu that appears when you click the text box. Click the Load button to the right of the text box to load the information specified by the URL or ID. The project and LiveReport associated with the URL or ID are reported below.
-
- New LiveReport option
-
Select the option to export to a new LiveReport by specifying the Project, name, and template to use.
-
Project, Name, and Template fields—Choose the LiveDesign project you want to export the data to. The dropdown menu lists the projects that are available on the LiveDesign server you connected to. In the Name field, enter a name for the new LiveReport. You can also select a template (or blank template) to use from the Template dropdown.
-
- Map Maestro properties to LiveDesign properties section
-
- Mapping link
-
Save and load maps of Maestro properties to LiveDesign fields. The maps are used to populate the columns in the Map Maestro properties to LiveDesign properties table. Saving maps and reloading them avoids having to specify the mapping of each Maestro property to the corresponding LiveDesign column every time you perform an export.
Clicking on the Mapping dropdown shows a list of existing mapping names to select from.
Clicking on the "..." to the right of the Mapping dropdown opens the Export Mappings Manager Dialog Box, where you can Create New, Edit, and Delete mappings, as well as to Import or Export mappings.
Clicking on the Clear link will deselect the mapping name from the Mapping dropdown and deselect any Maestro properties for export.
- Entity registration status option (for Generic Entity export only)
-
Select the entity registration status, either All new entities (default) or All registered in LiveDesign. If the All new entities option is selected, then all entities that do not exist in LiveDesign will be dropped from the export. If the All registered in LiveDesign option is selected, then all new generic entities will be dropped from the export.
Note: For Generic Entity export, if the file format is
.cms, a zip file containing the.cmsand the associated trajectory data will be exported. If the trajectory is not available, only the.cmswill be exported. - Select Maestro properties: n selected link and menu
-
Click the n selected link to open a menu and choose the Maestro properties that you want to export. Only the properties that you choose to export will be exported. n is updated to show how many properties you have selected. Note: A warning icon will appear if a mapping is created with a property which is unavailable in the Project Table. You can still continue, but these unavailable properties will not be exported.
The properties are shown in a tree. You can search for the properties you want by typing in the search bar. The list is filtered as you type. To remove the filter, delete the text.
- Properties table
-
This table lists the Maestro properties that have been chosen for export, and allows you to map them to a LiveDesign column folder and property. The table has three columns.
- Maestro Property—Name of the Maestro properties that were selected in the Maestro properties list.
- LiveDesign Column—Name of the model or assay column folder in LiveDesign that you want to add the data to. Opens the LiveDesign Column Pane.
- LiveDesign Property—Name of the column in the LiveDesign report that will display the Maestro property. Opens the LiveDesign Property Pane.
- Match existing compounds by options and menu
-
Match existing compounds in the LiveReport by the property chosen from the following options:
- Structure—Match the compound by its 2D structure.
- Corporate ID—Match the compound by the corporate ID stored in a specified Maestro property. A Select column button is displayed. Click this button to open a property selector so you can select the Maestro property that contains the desired corporate ID. Note: If you select more than one entry with the same Corporate ID, only the first instance will be exported.
- Choose data accessibility options
-
Choose where the exported data can be accessed in LiveDesign from the following options:
-
- Unpublished—Export the data so that it is only accessible for the selected LiveReport.
- Published—Export the data so that it is accessible from any LiveReport within the selected project.
- Use pose name option and button
-
Choose a name template used for naming the exported poses. After checking the option, text displaying the current name template appears below. Click the Define button to set up the name template. Opens the Pose Name Specification dialog box, in which you can specify a short prefix to be used for all poses (Custom text box), then check the Include structure property option to select a structure property for the rest of the name (Select button). The prefix should be short as there is not much space in LiveDesign for the name. It should include any characters to separate it from the structure property, such as space or underscore. The structure property can be a string or a numerical value, such as a binding free energy. If a property is not given, the pose names will all be the same.
- Structures to export text
-
This text gives a summary of the structures that will be exported. The number of total entries is displayed.
- Job name text box
-
Specify a name for the export task.
- Restore settings from last export option
-
This option is disabled by default. Select this option to clear the table and restore the settings used in the last export.
- Next button
-
Display a summary of the export and its destination in LiveDesign for confirmation, then start the export. The job is run asynchronously, so you can continue with other work while it runs. When the export finishes, a dialog opens with a link to the uploaded LiveReport.
Note: If the user does not have Administrator permissions for a project involving generic entities and clicks Run, an error message will appear stating that only Admins and Project Admins have permission to export generic entities.
- Cancel button
-
Go back to the panel for selecting structures from the Maestro project. This allows you to choose a different set of structures and add their properties to LiveDesign.