Defect Setup Calculations Panel
Create point defect structures from perfect crystal supercells and run defect calculations.
To display this panel: click the Tasks button and browse to Materials → Quantum Mechanics → Quantum ESPRESSO → Defect Setup Calculations
The following licenses are required to use this panel: MS Maestro, Quantum Espresso Interface
- Using
- Features
- Additional Resources
Using the Defect Setup Calculations Panel
This panel enables you to generate a point defect structure from a bulk structure. Defect types such as vacancies, substitutions, and interstitials are available. Multiple defect structures can be generated from one bulk structure. The defect can be visualized in the Workspace by a spherical red surface, which is especially useful for vacancies and interstitials.
The workflow optimizes the atomic positions of the bulk and the defect structure at fixed cell parameters of the provided bulk input structure. Additionally, outputs for the projected density of states, spin density, and electrostatic potential files are generated using Quantum Espresso. The simultaneous setup of bulk and defect calculations ensures the use of the same calculation parameters for both structure types. The electrostatic potential surfaces are used in subsequent calculations with the Defect Formation Energy Panel, which calculates the defect formation energy and its correction term in the case of charged defect structures.
To write out the input file and a script for running the job from the command line, click the arrow next to the Settings button  and choose Write.
Defect Setup Calculations Panel Features
- Load bulk button
- Defect selection tools
- Add Defect button
- Delete all defects button
- Optimize atomic positions option
- Atomic Constraints button
- Pseudopotentials button
- Advanced Options button
- Load Options button
- Estimate Memory button
- Set Dimensionality button
- Job toolbar
- Status bar
- Load bulk button
-
Click the Import button to load a crystal structure from the Workspace. The bulk structure should be large enough, ~100 atoms, to avoid extensive interaction with the defect’s periodic image.
- Initial Parameters button
-
Set the initial magnetization (
starting_magnetization) value and Hubbard U (Hubbard_U) and J0 (Hubbard_J0) parameters for atoms in the system. Opens the Initial Parameters dialog box, where you can pick atoms in the Workspace and set the values. The initial magnetization for a specified atom can take values between −1 (all spins down) and +1 (all spins up); the value applies to the valence electrons of the atom or ion. Alternatively, you can set the spin values, which is the difference in the number of up and down spin valence electrons (Nα−Nβ), and is proportional to the initial magnetization. The Hubbard U and J0 parameters are only used if you turn on DFT+U calculations in the Quantum ESPRESSO Calculations - Advanced Options Dialog Box. These parameters are given in eV, and can be set for a restricted range of elements, which includes the d and f block elements and C, H, O, N, As, Ga, In.You can delete selected or all settings using the Delete and Delete All buttons.
-
Optionally set the Total magnetization(
tot_magnetization) and Total charge (tot_charge) values for the system. The total magnetization is defined as (majority spin charge − minority spin charge), so 0 represents a singlet, 1 represents a doublet, 2 represents a triplet, and so on. If the value is unspecified, the magnetization is determined during the SCF cycles. If you specify the total magnetization you should not specify initial magnetizations.
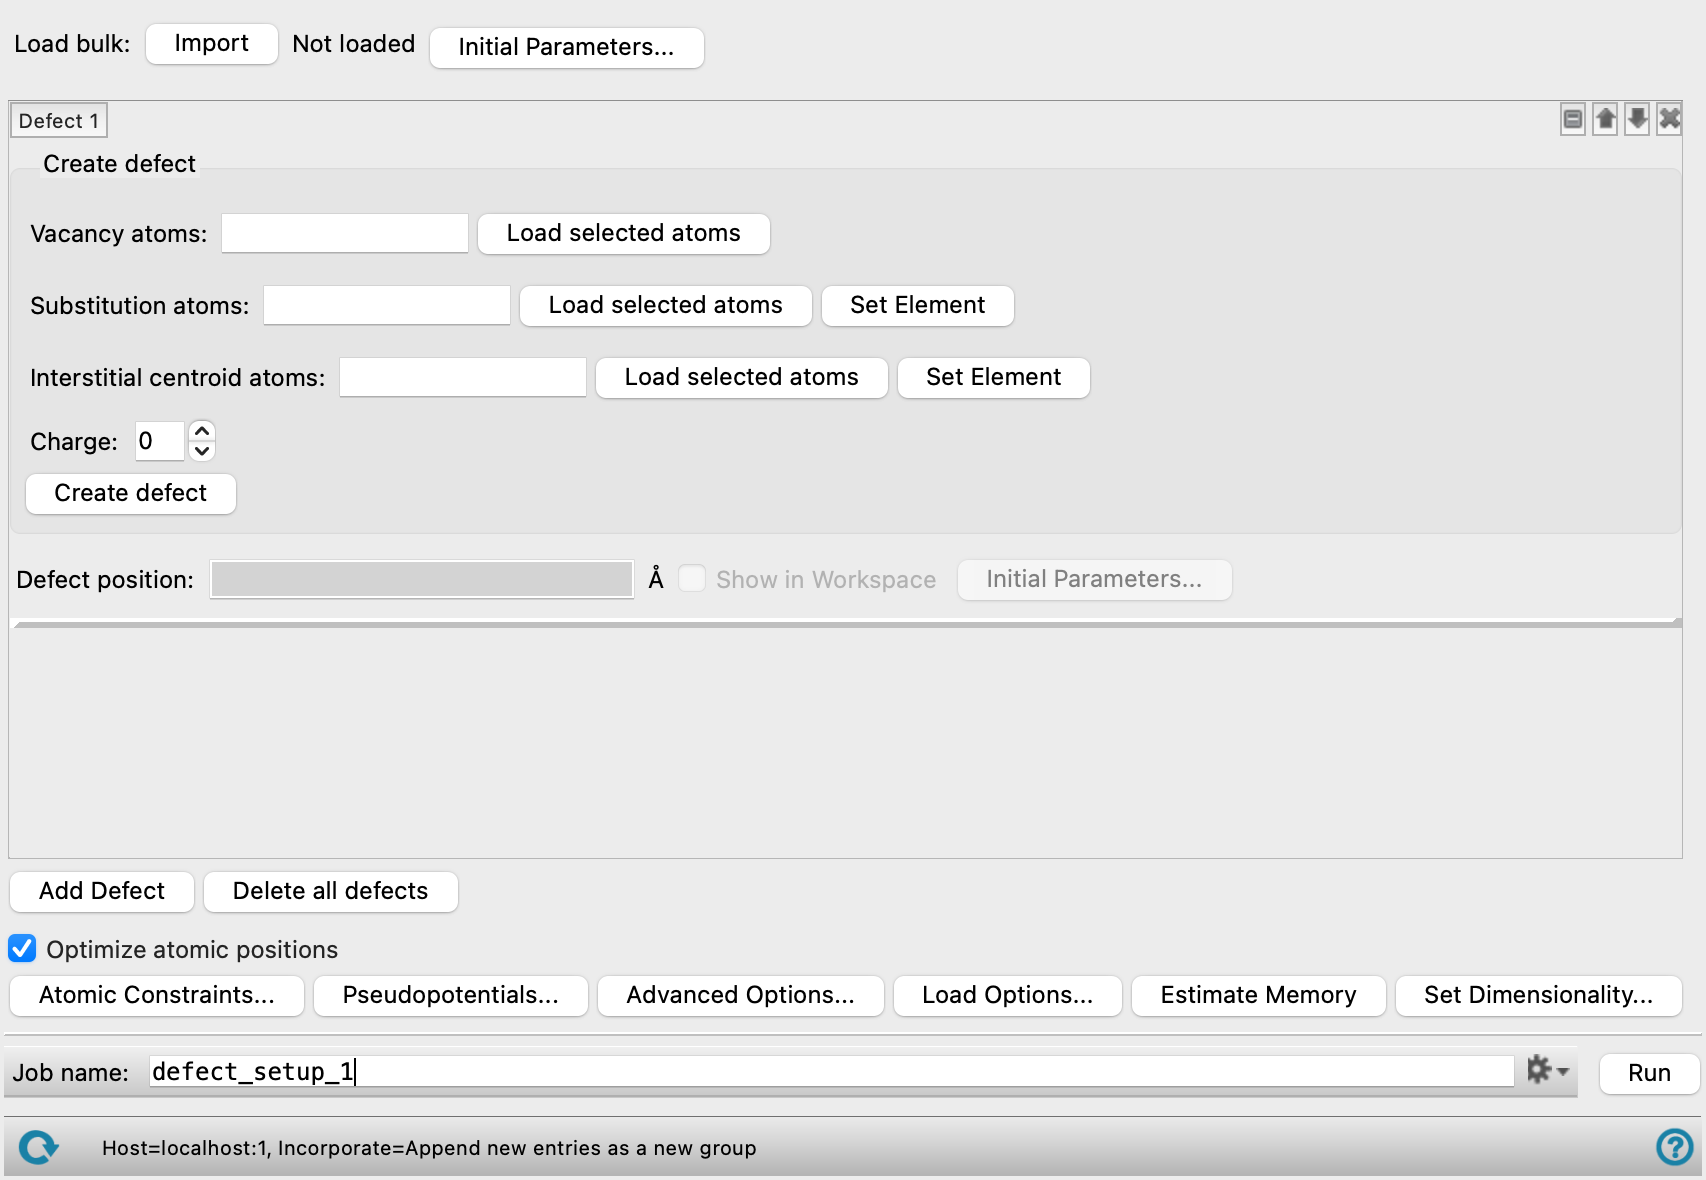
- Defect selection tools
-
These tools allow you to define the parameters for the point defect to introduce into the bulk crystal. Defect types such as vacancies, substitutions, and interstitial atom positions are available.
- defect entry management buttons
-
These buttons perform display and ordering operations on the defect entry. They allow for easy duplication and rearrangement of defect entrys.


Show or hide the contents of the defect entry. When hidden, only the defect entry number, label (if any) and these buttons are displayed. This is useful when you have a number of defect entrys and want to compare two separate defect entrys, for example. 

Move the defect entry up or down one place in the list. 
Delete the defect entry. - Create defect section
- Introduce at least one point defect into the crystal structure. Only one of the defect types is required in order to generate a valid defect structure.
-
- Vacancy atoms text box and Load selected atoms button
-
Specify the atoms to remove from this structure by: (1) entering atom numbers in the text box separated by commas or (2) selecting atoms in the workspace and loading them using the Load selected atoms button.
- Substitution atoms text box, Load selected atoms button, and Set Element button
-
Specify the atoms to substitute in this structure by: (1) entering atom numbers in the text box separated by commas or (2) selecting atoms in the workspace and loading them using the Load selected atoms button. Click the Set Element button to choose an element to replace the selected atoms with from a periodic table.
- Interstitial centroid atoms text box, Load selected atoms button, and Set Element button
-
Specify an atomic polyhedron and place an interstitial atom at the center of it by: (1) entering atom numbers in the text box separated by commas or (2) selecting atoms in the workspace and loading them using the Load selected atoms button. Click the Set Element button to choose an element to use for the interstitial atom from a periodic table.
- Charge text box
-
Specify the charge state of the system.
- Create defect button
-
Click to add the defect to the loaded bulk structure. The Defect position text box is updated with the position of the defect.
- Defect position text box and Show in Workspace option
-
Display the position of the defect in the cell in angstroms. For structures with several defects specified, the defect position is calculated as the average in the center of them all. Noneditable. Select Show in Workspace to show the defect site in the Workspace as a large red sphere.
- Initial Parameters button
-
Set the initial magnetization (
starting_magnetization) value and Hubbard U (Hubbard_U) and J0 (Hubbard_J0) parameters for atoms in the system. Opens the Initial Parameters dialog box, where you can pick atoms in the Workspace and set the values. The initial magnetization for a specified atom can take values between −1 (all spins down) and +1 (all spins up); the value applies to the valence electrons of the atom or ion. Alternatively, you can set the spin values, which is the difference in the number of up and down spin valence electrons (Nα−Nβ), and is proportional to the initial magnetization. The Hubbard U and J0 parameters are only used if you turn on DFT+U calculations in the Quantum ESPRESSO Calculations - Advanced Options Dialog Box. These parameters are given in eV, and can be set for a restricted range of elements, which includes the d and f block elements and C, H, O, N, As, Ga, In.You can delete selected or all settings using the Delete and Delete All buttons.
-
Optionally set the Total magnetization(
tot_magnetization) and Total charge (tot_charge) values for the system. The total magnetization is defined as (majority spin charge − minority spin charge), so 0 represents a singlet, 1 represents a doublet, 2 represents a triplet, and so on. If the value is unspecified, the magnetization is determined during the SCF cycles. If you specify the total magnetization you should not specify initial magnetizations.
- Add Defect button
-
Add another defect to the system. Use the defect selection tools to define the new defect.
- Delete all defects button
-
Remove all defects that have been added to the panel.
- Optimize atomic positions option
-
Optimizes the atomic positions of the bulk and the defect structure at fixed cell parameters of the provided bulk input structure. Deselecting this option is useful when you want to recalculate the defect formation energy with a different functional on already optimized structures.
- Atomic Constraints button
-
Set or remove Cartesian constraints for atoms in the system. Opens the Atomic Constraints Dialog Box, where you can choose the constraint type (X, Y, Z, or all three), and pick atoms in the Workspace or use the Workspace selection to apply the constraints to. You can delete selected or all constraints.
- Pseudopotentials button
-
Select pseudopotentials for use in the calculations. Opens the Quantum ESPRESSO Calculations - Pseudopotentials Dialog Box. The set of recommended PBE ultrasoft pseudopotentials is distributed with the suite and available from the dialog box. See Installing and Configuring Quantum ESPRESSO for instructions on downloading other pseudopotential sets.
- Advanced Options button
-
Set options for the calculation: spin treatment, density functional, dispersion corrections, Brillouin zone partitioning, occupation, SCF and optimization accuracy. Opens the Quantum ESPRESSO Calculations - Advanced Options Dialog Box.
- Load Options button
-
Load option settings from a Quantum ESPRESSO config file (
.cfg). Opens a file selector so you can navigate to and select the config file. The settings replace those in the Quantum ESPRESSO Calculations - Advanced Options Dialog Box. - Estimate Memory button
-
Estimate the memory needed for the selected calculations on the first input structure. After clicking the button, an Info dialog appears with the information. The estimated memory given is for a single CPU. This allows you to assess whether you have sufficient computational resources for a desired calculation without having to first run the calculation.
- Set Dimensionality button
-
Specify whether the system is a slab or bulk material. Opens the Set Dimensionality Dialog Box.
- Job toolbar
-
Manage job submission and settings. See Job Toolbar for a description of this toolbar.
The Job Settings button opens the Defect Setup Calculations - Job Settings Dialog Box, where you can make settings for running the job.
- Status bar
-
 to reset the panel to its default settings and clear any data from the panel.
If you can submit a job from the panel, the status bar displays information about the current job settings and status for the panel. The settings include the job name, task name and task settings (if any), number of subjobs (if any) and the host name and job incorporation setting. The job status can include messages about job start, job completion and incorporation.
The status bar also contains the Help button
 , which opens an option menu with choices to open the help topic for the panel (Documentation), launch Maestro Assistant, or if available, choose from an option menu of Tutorials. If the panel is used by one or more tutorials, hover over the Tutorials option to display a list of tutorials. Choosing a tutorial opens the tutorial topic.