Diffusion Coefficient Panel
Calculate the diffusion coefficient for either a type of atom or a type of molecule from an MD trajectory. The trajectory can be generated for the calculation, or an existing trajectory can be used.
To open this panel, click the Tasks button and browse to Materials → Classical Mechanics → Diffusion Coefficient → Diffusion Coefficient Calculations .
The following licenses are required to use this panel: MS Maestro, MS Transport, Desmond, MS Force Field Applications (optional)
- Using
- Features
- Additional Resources
Using the Diffusion Coefficient Panel
In this panel, you can set up and run MD simulations which are analyzed to obtain the isotropic and anisotropic diffusion coefficients for a particular type of atom or molecule. You can use the results of an existing calculation, if you have the output of an MD simulation with a trajectory. Otherwise, for Desmond model systems (.cms), you can run the simulation as part of the job. The analysis of the mean square deviation (MSD) or the velocity autocorrelation, used to calculate the diffusion coefficient, is performed as part of the job. The mean square deviation or the velocity autocorrelation is fit to simulation time differences (tau) over a specified range.
The input structure must be a Desmond model system (.cms) prepared with OPLS2005, OPLS4, OPLS5, or MLFF. The input additionally can be all-atom or coarse-grained, with or without a trajectory. The output from a Quantum ESPRESSO MD simulation (.maegz) with a trajectory can also be used (only for the mean squared displacement method). If you are running the MD simulation as part of the job, you should make sure that the Desmond system is already fully relaxed, as the simulation does not include relaxation stages.
The diffusion coefficient can be calculated for individual atoms, individual coarse-grained particles, individual molecules. The atoms or the molecules must all be of the same type: same element for atoms, same molecular structure for molecules, same particles for coarse-grained systems. This is necessary because the results are averaged over all selected molecules or atoms. When selecting the atoms or molecules for the diffusion calculations, therefore, you must ensure that you choose only atoms or molecules of the same type. The easiest way to do this is probably to enter an ASL expression in the text box in the Atoms for diffusion parameters picking tools section. For an atom, you can enter the expression a.e element-symbol to specify the element whose symbol is element-symbol. For a molecule you can use SMARTS, with the expression smarts. smarts-pattern to specify the molecules that match smarts-pattern. (Make sure that the SMARTS pattern doesn't match anything else.)
The diffusion coefficients are added to the output structure as Maestro properties. The name of the properties contain the text Diffusion Coefficient, the calculation type—MSD or autocorrelation—and the direction of the dipole moment in case anisotropic dipole moments are calculated. See the Anisotropic diffusion coefficient section for more information. These properties are given in units of m2/s. The upper and lower tau values are also reported, as Tau Start and Tau End, given in ns.
To write out the input file and a script for running the job from the command line, click the arrow next to the Settings button  and choose Write.
To visualize the results, you can use the Diffusion Coefficient Viewer Panel (click the Tasks button and browse to Materials → Classical Mechanics → Diffusion Coefficient → Diffusion Coefficient Results). To open this panel from the entry group for the results of a job .
.
Diffusion Coefficient Panel Features
- Use structures from option menu
- Open Project Table button
- Method tab
- Simulation protocols tab
- Diffusion parameters tab
- Job toolbar
- Status bar
- Use structures from option menu
-
Choose the structure source for calculation.
- Project Table (n selected entries)—Use the entries that are currently selected in the Project Table or Entry List. The number of entries selected is shown on the menu item.
- Workspace (n included entries)—Use the entries that are currently included in the Workspace, treated as separate structures. The number of entries in the Workspace is shown on the menu item.
- Project Table (n selected entries)—Use the entries that are currently selected in the Project Table or Entry List. The number of entries selected is shown on the menu item.
- Open Project Table button
-
Open the Project Table panel, so you can

- Method tab
-
- Trajectory options
-
Select an option for the source of the trajectory.
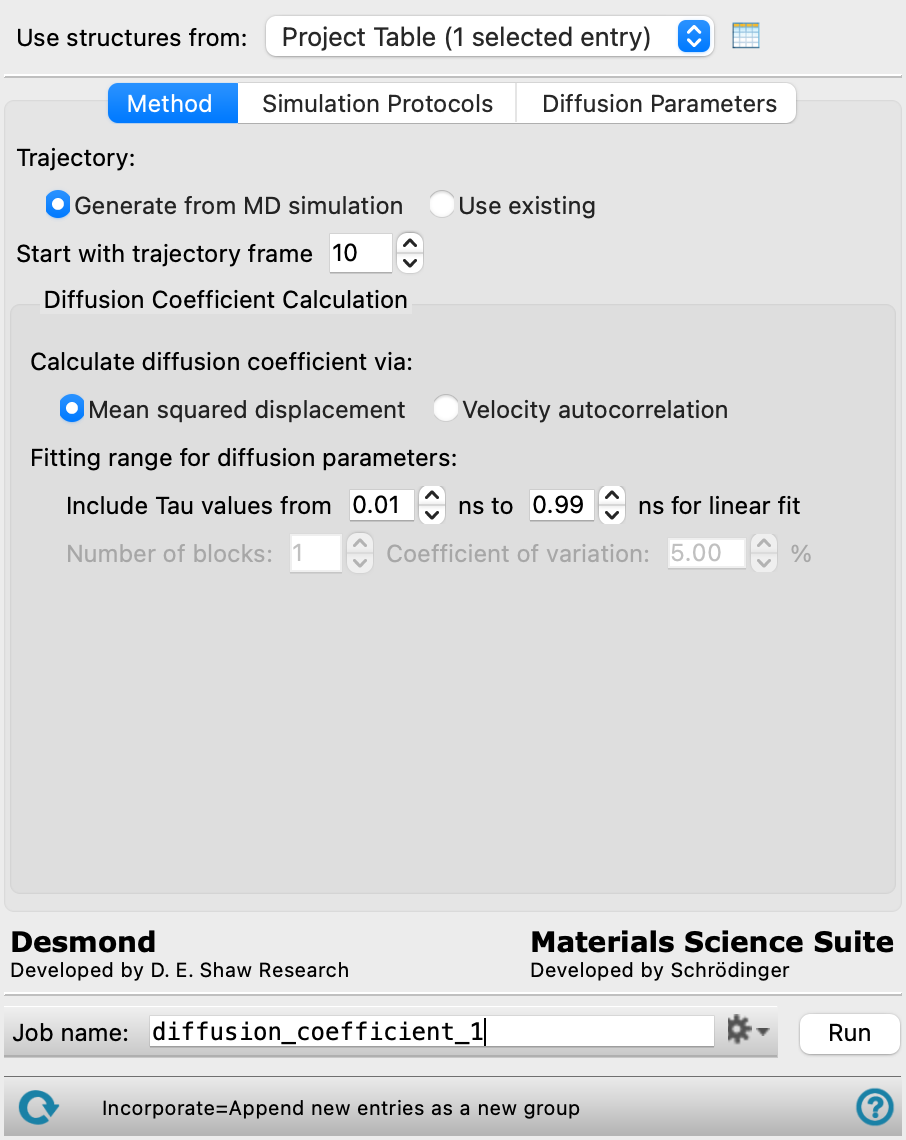
- Generate from MD simulation—select this option if the structure does not have an associated trajectory (there is no T button in the Entry List for the structure). With this option, a simulation is run to generate the trajectory. This option is not available for Quantum ESPRESSO MD simulations.
- Use existing—select this option if the structure has a trajectory that you want to use (there is a T button in the Entry List for the structure). The simulation is skipped, and the trajectory is analyzed to obtain the diffusion coefficients.
- Start with trajectory frame box
-
Start the calculations of the MSD against time difference (tau) from the specified trajectory frame. Earlier frames in the trajectory are discarded.
- Diffusion Coefficient Calculation section
-
Choose to run a diffusion coefficient calculation and specify the parameters for it.
- Calculate diffusion coefficient via options
-
Choose the method for calculating the diffusion coefficient:
- Mean squared displacement—calculate the diffusion coefficient using the mean squared displacement. This method works well with larger trajectory recording intervals and longer simulation times.
- Velocity autocorrelation—calculate the diffusion coefficient using the velocity autocorrrelation. This method requires much shorter trajectory recording intervals for accuracy, which may result in very large trajectories if the simulation time is long. If you want to use an existing trajectory with this method, you should make sure it contains velocities: in general, trajectories do not contain velocities by default. This method is not available for Quantum ESPRESSO MD simulations.
- Fitting range for diffusion parameters section
-
- Include Tau values from t1 ns to t2 ns for linear fit boxes
-
Perform the linear fit of the MSD for the diffusion coefficient between the specified time difference (tau) values. These text boxes allow you to discard small and large tau values where the relationship might not be linear. You can adjust the fit after the calculation is run, in the Diffusion Coefficient Viewer Panel.
- Number of blocks text box
-
Specify the number of blocks of simulation data that are used for analysis. The data from the original simulation is divided into equally-sized blocks. Within each block, the velocity autocorrelation is calculated for each tau value, and the coefficient of variation of the velocity autocorrelation within the block is then calculated. The coefficient of variation is used to discard simulation blocks in which the variation exceeds a specified threshold.
This option is only available for the velocity autocorrelation method.
This option is not available. See the Diffusion Coefficient Panel to use this option.
- Coefficient of variation text box
-
Set the maximum value for the coefficient of variation. Velocity autocorrelation data within a simulation block whose coefficient of variation is larger than this value are excluded from the diffusion coefficient calculation.
This option is only available for the velocity autocorrelation method when the number of blocks is greater than 1.
- Simulation protocols tab
-
Specify parameters for the simulation from which the diffusion coefficients are calculated.
- Ensemble class option menu
-
Choose the ensemble class for the simulation, from NVT, NPT, or NVE. The default is NVE.
- Temperature text box
-
Set the temperature in kelvin for the simulation and thus for the diffusion coefficients. If the ensemble is NVE, this text box supplies the initial temperature for the simulation, and is labeled Initial temperature.
- Pressure text box
-
Set the pressure in bar for the simulation and thus for the diffusion coefficients. Only available when the Ensemble class is NPT.
- Simulation time text box
-
Specify the desired simulation time in ns.
- Time step text box
-
Specify the time step for the simulation in fs.
- Trajectory recording interval text box
-
Set the recording interval for saving points on the trajectory, in ps. This is the amount of time between frames in the trajectory. The entered value is rounded to an integer multiple of the far time step size. The resultant number of records to be written is reported to the right.
-
For velocity autocorrelation, this should be no longer than 10 time steps.
- Set random number seed option and text box
-
Select this option to specify a random seed to be used in the simulations. Specifying the seed allows you to reproduce the results, unless other factors affect them. If this option is not selected, a seed is chosen at random.
- Save trajectory option
-
Save the trajectory when the simulation is done. If this option is not selected, the trajectory is used to evaluate the diffusion coefficients, then it is discarded.
- Diffusion parameters tab
-
Make settings for the calculation of the diffusion coefficient. If you have coarse-grained systems, you will not be able to use SMARTS patterns for selection.
- Center of mass for diffusion parameters section
-
- Use center of mass of each object option menu
-
Choose the substructure for which the MSD (mean square displacement) of the center of mass is calculated. The center of mass is calculated for the atoms or particles in each of these substructures represented in the atom selection. The default is to do the MSD calculation for each molecule. If you choose SMARTS, the SMARTS tools are activated.
- SMARTS text box and
-
Enter the SMARTS pattern for the center of mass atoms in the text box, or select the atoms in the Workspace for the SMARTS pattern and click
- Atoms for diffusion parameters picking tools
-
Select atoms for the calculation of diffusion parameters, using these standard picking tools. The mean square displacement (MSD) is averaged over all instances in the selection of the substructure chosen from the Use center of mass of each object option menu, i.e. for all molecules, all monomers, all atoms or particles, or all SMARTS-defined functional groups in the selection.
You can make a selection by picking in the Workspace, using the other tools, or entering an ASL expression in the text box (see Atom Specification Language). Useful ASL expressions are
all,water, or a SMARTS pattern with the syntaxsmarts. smarts-pattern. The default setting of the Pick option menu is coordinated with the choice from the Use center of mass of each object option menu: Molecules for Molecule, Residues for Monomer, Atoms for Atom and SMARTS. (Monomers in a polymer are the same as residues in this context, and coarse-grained particles are the same as atoms.) For coarse-grained systems, it may be helpful to use the Atom Selection Dialog Box (click the + button then click Select), as the coarse-grained particles and molecules and their properties are listed in the various tabs.Note: Make sure you have the right structure in the Workspace! If your source of structures is the selected entries rather than the Workspace, picking atoms in the Workspace might not give a meaningful atom set for the selected entries.
- Anisotropic diffusion coefficient section
-
Select options for calculating anisotropic diffusion coefficients in addition to the isotropic diffusion coefficient.
- Along the x, y, and z axes, respectively option
-
Select this option to calculate the diffusion coefficient parallel to the x, y, and z axes, respectively.
- In the plane perpendicular to vector option and Modify button
-
Select this option to calculate the diffusion coefficient in a plane perpendicular to a vector. The currently selected vector is printed next to this option. Click Modify to define the plane, for which the diffusion coefficient is computed. Opens the Define Interface Dialog Box
- Job toolbar
-
Manage job submission and settings. See Job Toolbar for a description of this toolbar.
The Job Settings button opens the Diffusion Coefficient - Job Settings Dialog Box, where you can make settings for running the job.
- Status bar
-
The status bar displays information about the current job settings and status for the panel. The settings includes the job name, task name and task settings (if any), number of subjobs (if any) and the host name and job incorporation setting. The job status can include messages about job start, job completion and incorporation.
Use the Reset button
 to reset the panel to its default settings and clear any data from the panel.
 The status bar also contains the Help button
 , which opens the help topic for the panel in your browser. If the panel is used by one or more tutorials, hovering over the Help button displays a
  button, which you can click to display a list of tutorials (or you can right-click the Help button instead). Choosing a tutorial opens the tutorial topic.
Tutorials
- Diffusion
- Liquid Electrolyte Properties: Part 2
- Ab initio Molecular Dynamics Simulations of Li-ion Diffusion in Solid State Electrolytes
Quick Reference Sheets