Droplet Contact Analysis Panel
Determine the contact angle of solvent droplets on a surface.
To open this panel: click the Tasks button and browse to Materials → Classical Mechanics → Droplet Contact Analysis → Droplet Contact Analysis Calculations .
The following licenses are required to use this panel: MS Maestro, OPLS (optional), MS Force Field Applications (optional), Desmond
- Using
- Features
- Additional Resources
Using the Droplet Contact Analysis Panel
This panel allows you to analyze the interaction of a solvent droplet on a surface and calculate the droplet contact angle.
The initial substrate should be a slab, which can be set up using the Build Slabs and Interfaces Panel. When building the initial system, the substrate surface should be large enough and should include a large enough vacuum layer to accommodate all the molecules you want to add. The substrate can be an amorphous surface or an ordered solid. The system should be well equilibrated.
In the Setup tab, you can specify the composition of the droplet as well as how many molecules the droplet should contain, or load a pre-built droplet. An MD simulation in the NVT ensemble is run in which the droplet approaches the substrate with an initial specified velocity, simulating the "dropping" process.
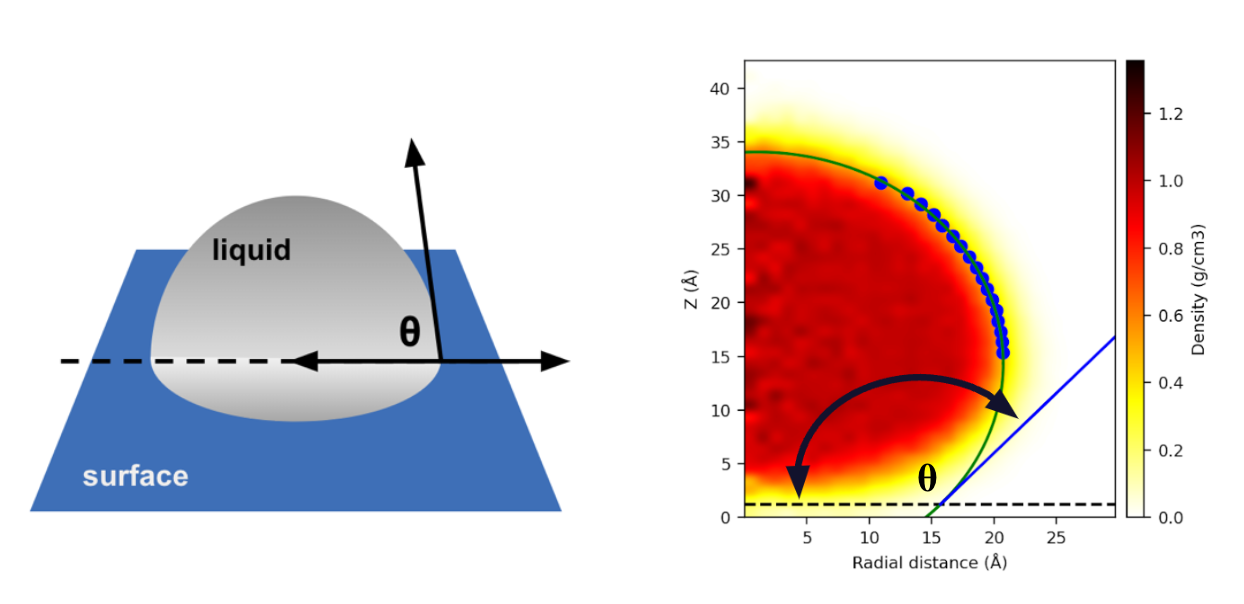
The contact angle θ is the angle at which a liquid-vapour interface meets a solid surface. The vector representing the liquid-vapour interface is the tangent of the circle formed from the shape of the droplet at the point of contact. After the MD simulation is run, you can load the results into the Droplet Contact Analysis Viewer Panel to plot the droplet at the point where it hits the surface. You can adjust parameters to define the solid surface, as well as fit the droplet to determine the liquid vapour interface. The graphic below shows a comparison between a standard contact angle depiction (left) and how it can be determined using the plot in the Droplet Contact Analysis Viewer Panel (right):
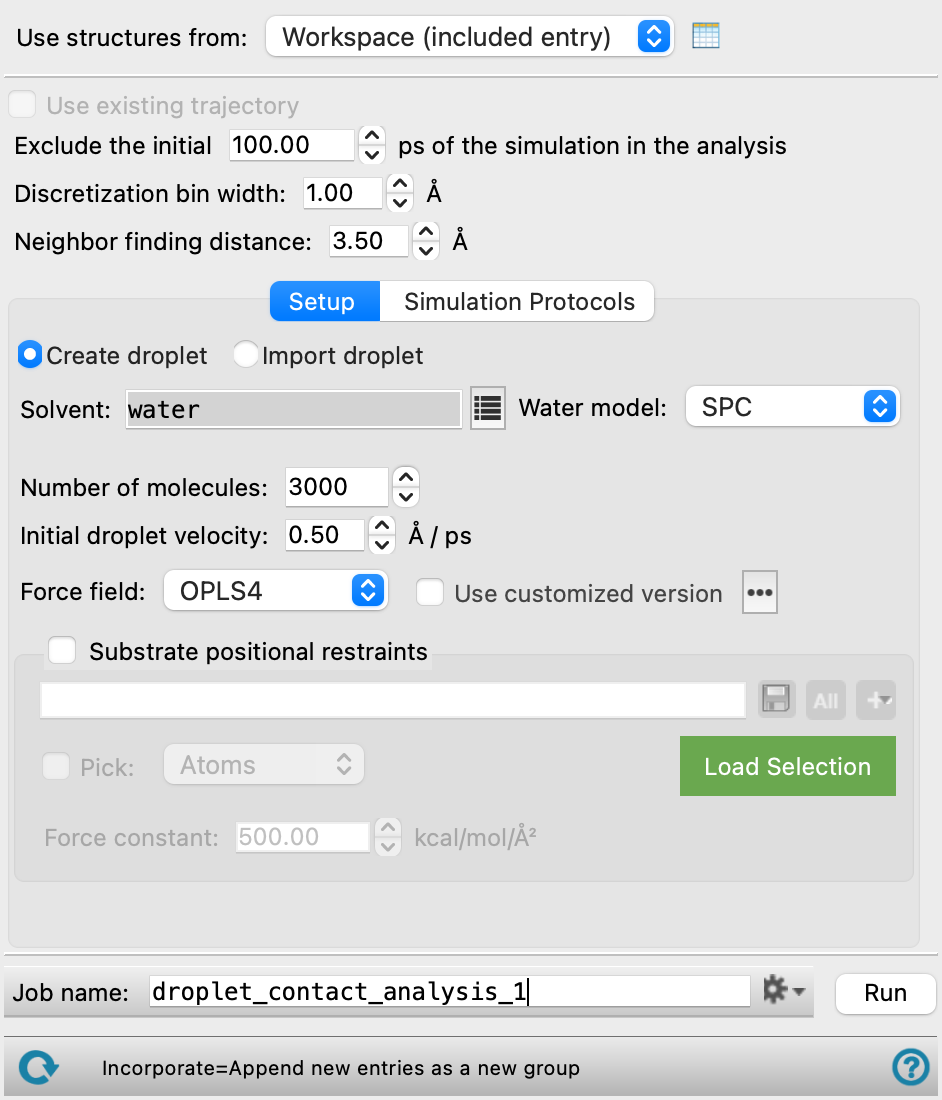
There are various parameters in the Droplet Contact Analysis panel that can be adjusted which affect the plot and fitting of the droplet. The analysis of the contact angle in the Droplet Contact Analysis Viewer should only include trajectory frames in which the droplet is in contact with the surface, as such, you can use the Exclude the initial ps of the simulation in the analysis text box to ignore the trajectory before this point. The number of fitting points used to fit the circle is determined by the Discretization bin width, which can be adjusted to give more or less points. The Neighbor finding distance will affect the shape of the droplet, as it determines which solvent molecules are considered part of the droplet. You can use the Use existing trajectory option to adjust only these parameters on a completed Droplet Contact Analysis output to re-fit the droplet without rerunning the whole MD simulation.
After the calculation is complete, determine the droplet contact angle in the Droplet Contact Analysis Viewer Panel ( click the Tasks button and browse to Materials → Classical Mechanics → Droplet Contact Analysis → Droplet Contact Analysis Results). To open this panel from the entry group for the results of a job .
.
To write out the input file and a script for running the job from the command line, click the arrow next to the Settings button  and choose Write.
Droplet Contact Analysis Panel Features
- Use structures from option menu
- Open Project Table button
- Use existing trajectory option
- Exclude the initial ps of the simulation in the analysis text box
- Discretization bin width text box
- Neighbor finding distance
- Setup tab
- Simulation Protocols tab
- Job toolbar
- Status bar
- Use structures from option menu
-
Choose the structure source for droplet contact analysis.
- Workspace (included entries)—Use the entries that are currently included in the Workspace, treated as separate structures.
- Open Project Table button
-
Open the Project Table panel, so you can

- Use existing trajectory option
-
Perform drop contact analysis on an existing trajectory without rerunning the MD simulation. You can use this feature to compare how the analysis changes if you exclude more or less of the simulation or if parameters such as the Discretization bin width and Neighbor finding distance are adjusted. If this option is selected, you cannot change settings in the Setup and Simulation Protocols tabs, as these settings control the MD simulation portion of the calculation. This option is only available if the input structure is a result from a previous Droplet Contact Analysis calculation with a trajectory. To generate an eligible output which can use this feature, you must check the Save intermediate data option in the Simulation Protocols tab and select CMS and trajectory from the option menu.
- Exclude the initial ps of the simulation in the analysis text box
-
Specify how much of the simulation should be skipped when analyzing the simulation from the Droplet Contact Analysis Viewer Panel, in ps. The analysis of the contact angle should only include trajectory frames in which the droplet is in contact with the substrate surface. The portion of the simulation where the droplet has not reached the substrate surface, i.e., the dropping process, should be excluded.
- Discretization bin width text box
-
Set the slice thickness for binning the trajectory, in angstroms. The width you supply is adjusted to the nearest value that results in an integer number of bins in the box. The width determines the number of fitting points used in the Droplet Contact Analysis Viewer Panel. A smaller bin width increases the number of fitting points.
- Neighbor finding distance
-
Specify the maximum distance between any two solvent molecules in the droplet, in angstroms. Any solvent molecule which is not surrounded by another solvent molecule within this distance is not considered part of the droplet and is excluded from the analysis. The default is 3.5 Å.
- Setup tab
-
Define the droplet and specify parameters for how the system is set up.
- Create droplet option
-
Create a droplet using the following options for use in the simulation.
- Solvent text box and button
-
Click the button to select the solvent which forms the droplet. A small pane opens with controls for selecting the solvent. The pane consists of a search text box, a filter button, and a list of available solvents. Typing in the text box narrows the list to solvent names that contain the text. When you choose a solvent from the list, the pane closes and the text box (which is noneditable) shows the solvent you chose.
If you choose water as the solvent, you must select a water model from the option menu that appears. If you choose Custom as the solvent, you must define the custom solvent with the Import from Workspace button and specify a bulk density. The built-in solvents use known densities to form the initial droplet.
- Bulk density text box
-
Specify a density for a custom solvent in g/cm3. This density is used for packing the solvent molecules into the initial droplet. Only present if Custom is selected as the solvent.
- Import from Workspace button
-
Define a custom solvent by including it in the Workspace and pressing this button. The solvent must be a single molecule. If the custom solvent has been successfully imported, its Entry Title is displayed to the right of the button. Only present if Custom is selected as the solvent.
Since the panel uses what is included in the Workspace for the input structure, you must switch what is included in the Workspace back to the input system after importing the solvent.
- Water model option menu
-
If water is one of the components of the system, choose the water model for the simulations. The water models available on the menu depend on the force field. For OPLS4, the models are SPC, SPCE, TIP3P, TIP4P, TIP4P2005, TIP4PEW, TIP5P, TIP4PD. For OPLS_2005, only the SPC and TIP3P models are available. If the water model is already assigned, choose Current to retain this model.
- Number of molecules text box
-
Specify how many solvent molecules are used to form the droplet. Systems which contain rough or hydrophilic surfaces may need more molecules to form a defined droplet. The default is 3000 solvent molecules.
- Import droplet option
-
Load a pre-defined droplet for use in the simulation.
- Import from Workspace button
-
Define a custom droplet by including it in the Workspace and pressing this button. If the custom droplet has been successfully imported, its Entry Title is displayed to the right of the button.
The droplet structure cannot be collinear or coplanar.
Since the panel uses what is included in the Workspace for the input structure, you must switch what is included in the Workspace back to the input system after importing the droplet.
- Initial droplet velocity text box
-
Specify the initial velocity of the droplet atoms in the direction perpendicular to the substrate surface, in Å/ps. A large initial velocity is not recommended, as it may lead to unphysical interactions between the droplet and the surface. The default is 0.50 Å/ps.
- Force field option menu
-
Choose the force field for the current task.
- Use customized version option
-
Use your customized version of the OPLS4 or OPLS5 force field, rather than the standard version in the distribution.
If the customized version is missing or invalid, the text of this option turns orange and an orange warning icon is displayed to the right, with a tooltip about the problem.
- Parameter set button
-
Select the set of custom parameters for the OPLS4 or OPLS5 force field. Opens the Set Custom Parameters Location Dialog Box.
- Substrate positional restraints
-
In this section you can set restraints on selected atoms in the substrate, with a specified force constant. This section contains a standard set of picking tools that you can use to select atoms.
- Simulation Protocols tab
-
Specify options for the MD simulation, which is run in the NVT ensemble.
- Simulation time text box
-
Specify the desired simulation time in ps.
- Time step text box
-
Specify the time step for the simulation in fs.
- Temperature text box
-
Specify the temperature to be used, in kelvin.
- Set random number seed option and text box
-
Select this option to specify a random seed to be used in the simulations. Specifying the seed allows you to reproduce the results, unless other factors affect them. If this option is not selected, a seed is chosen at random.
- Trajectory recording interval text box
-
Set the recording interval for saving points on the trajectory, in ps. This is the amount of time between frames in the trajectory. The entered value is rounded to an integer multiple of the far time step size. The resultant number of records to be written is reported to the right.
- Save intermediate data option and menu
-
Select this option to save data from the Desmond MD simulations. This option is selected by default. If you want to re-analyze the results of this panel using the Use existing trajectory option, you must select CMS and trajectory from the option menu. The menu has two choices:
- CMS files—save the CMS files from each of the Desmond simulations. These are the files that contain the structure and force field information.
- CMS and trajectory—save the CMS files and the trajectories from each of the Desmond simulations. Note that trajectory files can be large and may take up a lot of disk space.
- Job toolbar
-
Manage job submission and settings. See Job Toolbar for a description of this toolbar.
The Job Settings button opens the Droplet Contact Analysis - Job Settings Dialog Box, where you can make settings for running the job.
- Status bar
-
 to reset the panel to its default settings and clear any data from the panel.
If you can submit a job from the panel, the status bar displays information about the current job settings and status for the panel. The settings include the job name, task name and task settings (if any), number of subjobs (if any) and the host name and job incorporation setting. The job status can include messages about job start, job completion and incorporation.
The status bar also contains the Help button
 , which opens an option menu with choices to open the help topic for the panel (Documentation), launch Maestro Assistant, or if available, choose from an option menu of Tutorials. If the panel is used by one or more tutorials, hover over the Tutorials option to display a list of tutorials. Choosing a tutorial opens the tutorial topic.