Redefine Lattice Panel
Redefine the lattice for a crystal structure, by specifying new lattice constants, defining a plane for one face of the new cell, supplying a transformation matrix, or converting to a primitive cell.
To open this panel: click the Tasks button and browse to Materials → Tools → Redefine Lattice.
The following licenses are required to use this panel: MS Maestro
- Features
- Additional Resources
Redefine Lattice Panel Features
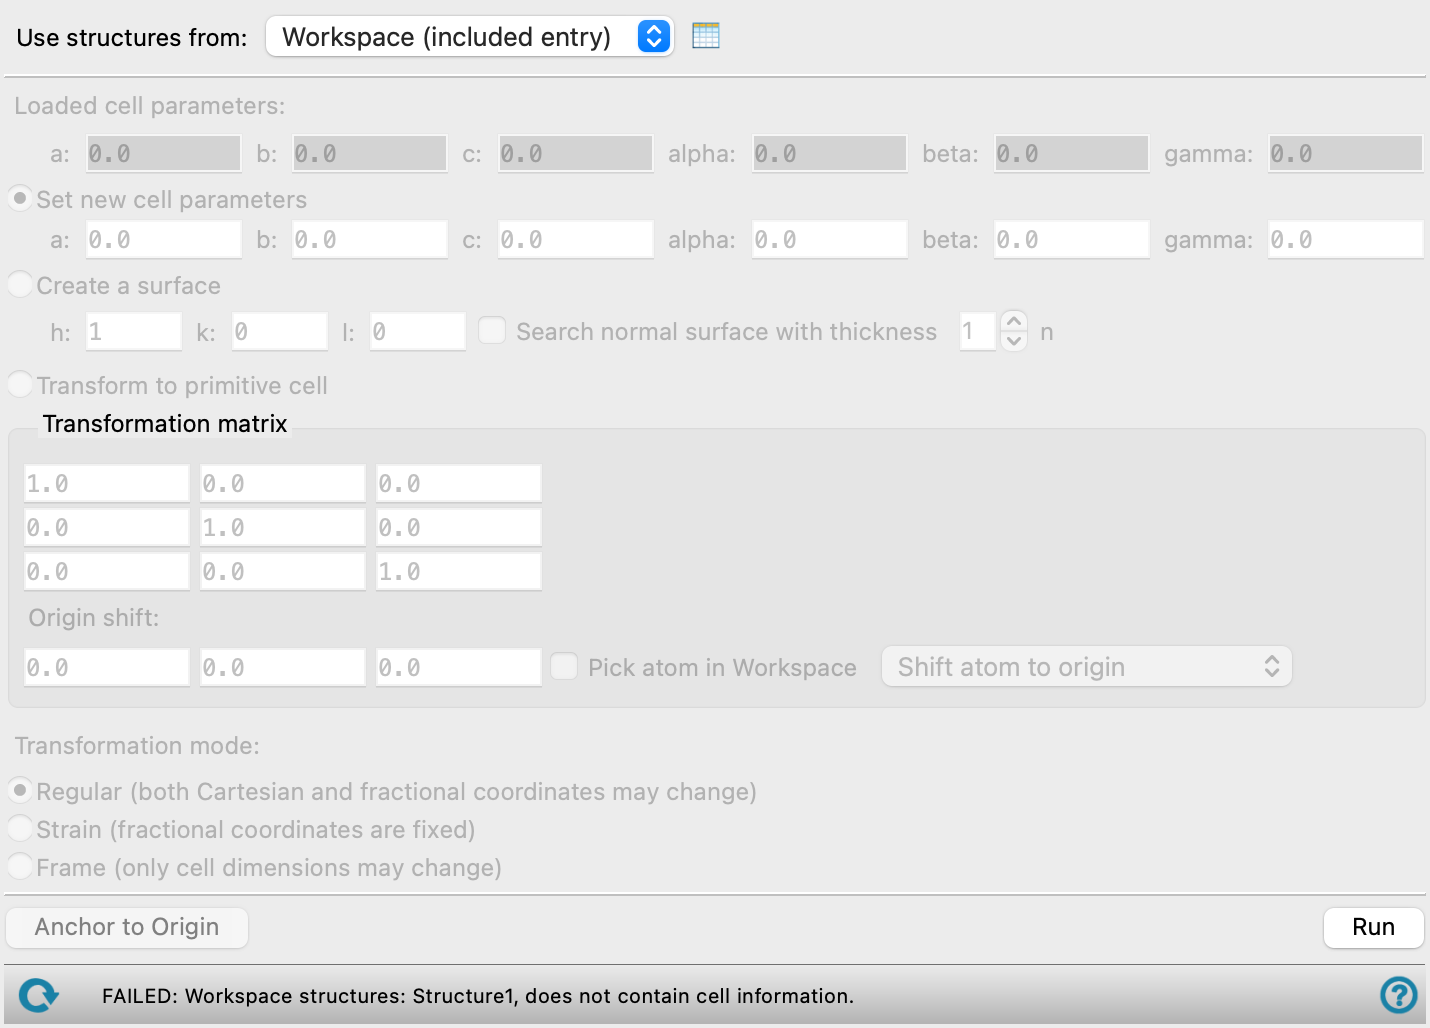
- Use structures from option menu
- Open Project Table button
- Loaded cell parameters text boxes
- Set new cell parameters option and text boxes
- Create a surface option and text boxes
- Transform to primitive cell option
- Transformation matrix text boxes
- Origin shift text boxes
- Pick atom in Workspace option and menu
- Transformation mode options
- Anchor to Origin button
- Run button
- Status bar
- Use structures from option menu
-
Choose the structure source for the current task.
- Workspace (n included entries)—Use the entries that are currently included in the Workspace, treated as separate structures. The number of entries in the Workspace is shown on the menu item.
- Workspace (n included entries)—Use the entries that are currently included in the Workspace, treated as separate structures. The number of entries in the Workspace is shown on the menu item.
- Open Project Table button
-
Open the Project Table panel, so you can

- Loaded cell parameters text boxes
-
These noneditable text boxes display the lattice constants of the original structure, loaded from the Workspace.
- Set new cell parameters option and text boxes
-
Specify the lattice constants of the new unit cell in these text boxes. The default values are set to the original lattice constants.
- Create a surface option and text boxes
-
Transform the original cell into a cell with a and b axes in the plane of the Miller plane defined in the text boxes, and the c axis out of the plane (but not necessarily normal to it). This places the specified plane at the surface of the new cell.
- Search normal surface with thickness option and text box
-
With the given Miller indices, find the cell for which the c axis is normal to the a-b plane and for which the thickness is the specified number of unit cells. If such a cell cannot be found, the one with the c axis closest to normal is chosen.
- Transform to primitive cell option
-
Transform the unit cell to a primitive cell. If the space group is not assigned, you must assign it first, using the Assign Space Group Panel.
- Transformation matrix text boxes
-
The transformation matrix (P) to be applied to the lattice vectors a, b, and c. Each row corresponds to an old lattice vector, each column to a new lattice vector. The transformation is given by
(a', b', c') = (a, b, c) P
The text boxes are updated automatically for each of the options for redefining the lattice. You can also edit the transformation matrix manually.
- Origin shift text boxes
-
Shift the origin to the fractional coordinates specified in the text boxes.
- Pick atom in Workspace option and menu
-
Pick the atom in the Workspace to place at the origin of the new coordinate system or at the center of the cell. The target location of the atom can be chosen from the menu.
The fractional coordinates of this atom replace the values in the Origin shift text boxes, if placed at the origin; if placed at the cell center, the fractional coordinates with the appropriate offset to define the origin shift are shown.
-
You can also place an atom at the center of the cell by right-clicking the atom and choosing Center Cell on Atom.
- Transformation mode options
-
Select one of the following options for applying the transformation to the lattice. These options are only available if you select Set new cell parameters.
- Regular—General transformation, which can change both the Cartesian coordinates and the fractional coordinates.
- Strain—Change the Cartesian coordinates in response to the transformation so that the fractional coordinates remain the same. This corresponds to applying a strain to the cell.
- Frame—Only cell dimensions may change. This adds a vacuum layer where the cell has been expanded.
- Anchor to Origin button
-
Display the box that marks the unit cell with a corner at the coordinate origin. (This box can be shifted to other places as desired, but its position does not affect the actual coordinates.)
- Run button
-
Apply the transformation to the Workspace structure, creating a new project entry for the transformed structure. Any pre-existing barrier set using the Set Barrier Potential for MD Panel is removed from the structure.
- Status bar
-
 to reset the panel to its default settings and clear any data from the panel.
If you can submit a job from the panel, the status bar displays information about the current job settings and status for the panel. The settings include the job name, task name and task settings (if any), number of subjobs (if any) and the host name and job incorporation setting. The job status can include messages about job start, job completion and incorporation.
The status bar also contains the Help button
 , which opens an option menu with choices to open the help topic for the panel (Documentation), launch Maestro Assistant, or if available, choose from an option menu of Tutorials. If the panel is used by one or more tutorials, hover over the Tutorials option to display a list of tutorials. Choosing a tutorial opens the tutorial topic.