Umbrella Sampling Calculation Panel
Perform MD sampling of molecules along a path perpendicular to the surface of a substrate, to generate a free energy curve.
To display this panel: click the Tasks button and browse to Materials → Classical Mechanics → Umbrella Sampling → Umbrella Sampling Calculations
The following licenses are required to use this panel: MS Maestro, Desmond, OPLS (optional), MS Force Field Applications (optional)
- Overview
- Using
- Features
- Additional Resources
Overview of Umbrella Sampling Calculation
Umbrella sampling provides information on the free energy of a molecule along a path perpendicular to a substrate. Sampling is done along a line between the center of mass of the molecule and of the substrate (the collective variable); the system is aligned so that this line is on the z axis. Currently the panel is set up for the free energy of a molecule on a path that enters a membrane.
Umbrella sampling is an alternative to metadynamics, but may also be a supplement to metadynamics. It has similar accuracy to FEP+. The use of constraining harmonic potentials to restrict sampling to each of a set of windows along the collective variable ensures more uniform sampling across the entire range than other methods.
Using the Umbrella Sampling Calculation Panel
The calculation requires a model system file (CMS), prepared with the membrane, molecule, and solvent. The MD calculations can use any of the available force fields (including Martini and DPD).
When the results are incorporated into the project, you can use the Workflow Action Menu  for the entry group in the Entry List (Entries) to choose an action to apply to the results.
Umbrella Sampling Calculation Panel Features
- Use structures from option menu
-
Choose the structure source for the umbrella sampling calculation. The structure must be a prepared Desmond model system (CMS) with the membrane, solvent, and solute molecule in place.
- Project Table (n selected entries)—Use the entries that are currently selected in the Project Table or Entry List. The number of entries selected is shown on the menu item.
- Workspace (n included entries)—Use the entries that are currently included in the Workspace, treated as separate structures. The number of entries in the Workspace is shown on the menu item.
- File—Use the specified file. When this option is selected, the File name text box and Browse button are displayed.
- Project Table (n selected entries)—Use the entries that are currently selected in the Project Table or Entry List. The number of entries selected is shown on the menu item.
- Open Project Table button
-
Open the Project Table panel, so you can

- File name text box and Browse button
-
Enter the file name in this text box, or click Browse and navigate to the file. The name of the file you selected is displayed in the text box.
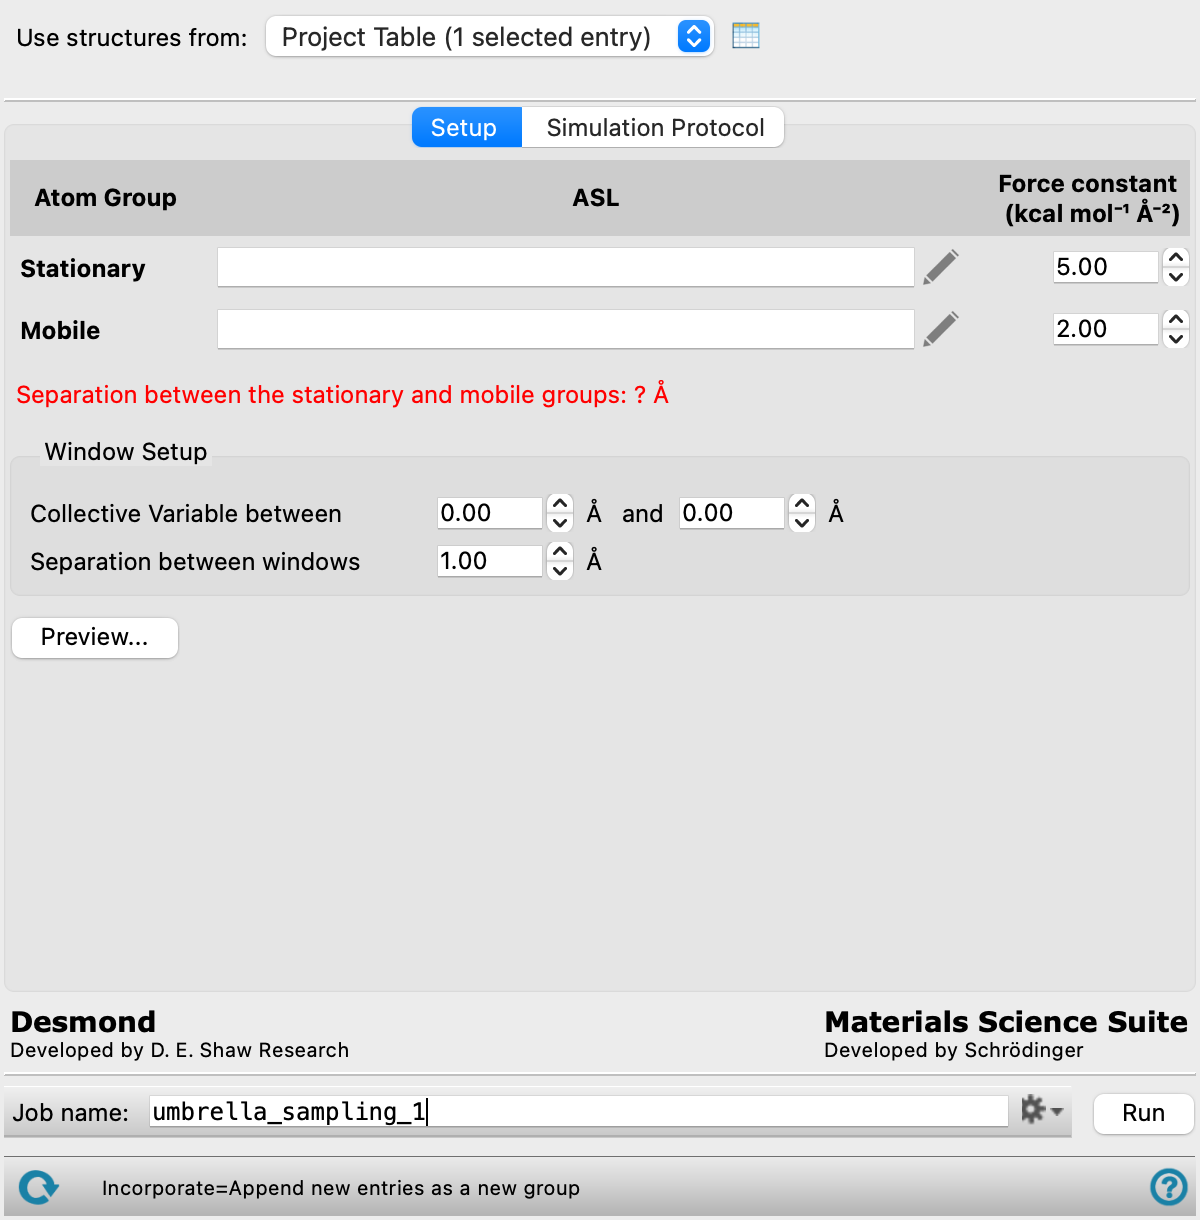
- Setup
- Simulation Protocol
- Atom group definition section
-
Set up the stationary and mobile atom groups. You must use single quotes in the ASL expression, if quotes are needed.
- Stationary text boxes
-
Specify the ASL defining the stationary atoms and the force constant. This force constant is used to restrain both the stationary and the mobile groups in the preparation stage. It is also used in the sampling stage to apply restraints in the x and y directions.
- Mobile text boxes
-
Specify the ASL expression defining the mobile atoms and the force constant. The force constant is the biasing harmonic force constant applied between the mobile group and the stationary group in the z direction, to ensure that the MD sampling is confined to a narrow region along z.
- Window Setup section
-
Set up the sampling window.
- Collective Variable between text boxes
-
Specify the range of values of the collective variable used in the sampling. The collective variable is the z-axis distance between the centers of mass of the solute molecule and the membrane. The membrane is aligned with the z axis perpendicular to the surface.
- Separation between windows text box
-
Specify the separation between windows that are sampled. Each window corresponds to a distance of the solute along the z axis in the range specified for the collective variable. The separation between adjacent windows is the step length along the collective variable.
- Preview button
-
Preview the calculation setup. The setup is laid out in the Workspace as follows:
The stationary and mobile groups are extracted into a new structure and incorporated into the Workspace. The stationary group center of mass is placed on the x-y plane, and a plane is drawn at this position. The mobile group center of mass is placed at a position on the z axis, and a tube is drawn that connects the two centers of mass. Planes perpendicular to the z axis are also drawn at the minimum and maximum values of the collective variable.
In the Preview panel, moving the slider moves the mobile group center of mass and adjusts the tube accordingly. You can change the minimum and maximum values of the collective variable, and the planes are redrawn at the new positions.
- Remove center of mass motion option
- Ensemble class option menu
- Temperature text box
- Preparation section
- Sampling section
- Advanced MD Options button
- Remove center of mass motion option
-
Remove the center-of-mass motion from the frames during the simulation.
- Ensemble class option menu
-
Choose the ensemble class from this option menu. The following classes are available:
- NVT—constant particle number (N), volume (V) and temperature (T). This class represents the canonical ensemble.
- NPT—constant particle number (N), pressure (P) and temperature (T). This class is an isothermal-isobaric ensemble, the common experimental conditions.
-
The class chosen is used in both the preparation and the sampling stages.
- Temperature text box
-
Specify the temperature to be used, in kelvin.
- Preparation section
-
Set up the parameters used for the preparation of the system, including addition of a relaxation stage.
- Add Relaxation option
-
Add a relaxation stage to the preparation of the system.
- Simulation time text box
-
Specify the desired simulation time in ps.
- Time step text box
-
Specify the time step for the simulation in fs.
- Set random number seed option and text box
-
Select this option to specify a random seed to be used in the simulations. Specifying the seed allows you to reproduce the results, unless other factors affect them. If this option is not selected, a seed is chosen at random.
- Trajectory recording interval text box
-
Set the recording interval for saving points on the trajectory, in ps. This is the amount of time between frames in the trajectory. The entered value is rounded to an integer multiple of the far time step size. The resultant number of records to be written is reported to the right.
- Save intermediate data option and menu
-
Select this option to save data from the Desmond MD simulations.
- CMS files—save the CMS files from each of the Desmond simulations. These are the files that contain the structure and force field information.
- CMS and trajectory—save the CMS files and the trajectories from each of the Desmond simulations. Note that trajectory files can be large and may take up a lot of disk space.
- Sampling section
-
Set the parameters for the sampling calculation. These settings have the same meanings as in the Preparation section.
- Advanced MD Options button
-
Display options for the thermostat and barostat methods. These options are described in the Ensemble tab section of the Desmond — Advanced Options Dialog Box. The settings apply to both the preparation and the sampling stages.
- Job toolbar
-
Manage job submission and settings. See Job Toolbar for a description of this toolbar.
- Status bar
-
 to reset the panel to its default settings and clear any data from the panel.
If you can submit a job from the panel, the status bar displays information about the current job settings and status for the panel. The settings include the job name, task name and task settings (if any), number of subjobs (if any) and the host name and job incorporation setting. The job status can include messages about job start, job completion and incorporation.
The status bar also contains the Help button
 , which opens an option menu with choices to open the help topic for the panel (Documentation), launch Maestro Assistant, or if available, choose from an option menu of Tutorials. If the panel is used by one or more tutorials, hover over the Tutorials option to display a list of tutorials. Choosing a tutorial opens the tutorial topic.