Entry List / Structure Hierarchy panel
This panel provides a simplified view of the Project Table contents and the Workspace contents, and allows you to perform actions related to the contents. It has two sections: the Entry List and the Structure Hierarchy.
To open this panel, choose Window → Entry List / Structure HierarchyWindow → Entry List, press Ctrl+E (⌘E), or click the Entries / Hierarchy button in the Workspace Configuration Toolbox.
This panel opens by default when you start Maestro.
- Using
- Features
- Additional Resources
Using the Entry List and Structure Hierarchy panel
This panel is intended to provide access to the basic features of the Project Table in a lightweight panel, without having the full Project Table panel open, and to provide a convenient way of performing Workspace operations on structures and substructures that can be selected from a hierarchy rather than having to use the selection toolbar.
This panel is docked into the Workspace by default, so you can easily switch focus from the panel to the Workspace. You can undock the panel if you want to place it somewhere else. To dock or undock the panel, use the docking button  in the title bar (left of the Close button) .
Entry List and Structure Hierarchy Features
Entry List (Entries)
The entry list is a simplified view of the Project Table Panel that allows you to perform basic operations such as selection and inclusion without having the full Project Table open.
-
 Search button
 -
The search button displays the search text box and Filter button. These allow you to filter the list of entries that is shown in the entry list. Filtering this list has no effect on the selection or the inclusion of the entries, or what is visible in the Project Table. However, once the list is filtered, selection or inclusion of multiple entries with shift-click and control-click operates only on the filtered list.
To filter the list by entry or group title, enter the text to match in the text box. The list is filtered as you type. The matching is case-insensitive. To clear the text filter, click the Clear (X) button. You can use regular expression syntax as follows:
- use ? to represent any single character
- specify a range of characters to match inside square brackets, e.g [0-5]
- separate alternatives with |, eg; 17|25 means match 17 or 25
You can also apply a global filter, by clicking the Filter button. The button is indented, to indicate that the global filter is applied. To remove the global filter without removing the text filter, click the button again. There are three ways of defining the global filter, which you can set by clicking and holding on the button, then choosing from the menu that is displayed.
- Included—Show only the entries that are included in the Workspace in the list.
- Selected—Show only the entries that are selected in the Project Table in the list.
- Filter—Open the Select Entries by Property Values Dialog Box to define the filter in terms of entry properties or previously defined filters. If you want to change the filter, you can select this item again, even if it is already selected.
Filters are reapplied whenever the Project Table changes. For example, if the global filter is Selected, and you deselect an entry, it is removed from the list.
-
 Style button
 -
The Style button opens the Style Toolbox to style the selected entries (whereas the Style toolbox on the toolbar styles the entries in the Workspace). This instance of the Style toolbox does not have items for surfaces. See Changing Structure Styles for more information.
You can specify which parts of the entries to style from the menu at the top of the toolbox. The choice depends on the Maestro profile you are using.
In Maestro:
- All Atoms
- Ligands
- Binding Sites + Ligand
- Binding Site Residues
- Receptors
- Waters
In Maestro BioLuminate:
- All Atoms
- Receptors
- Backbone
- Side Chains
In Materials Science Maestro:
- All Atoms
- Metals
- Ions
- Waters
-
 More Options button
 -
This button menu has settings for configuring the entry list.
- Show Property—opens a property selector in which you can select properties to show in the entry list.
- Show 2D Structure—show the column that contains the 2D structure.
- Fit Columns to— fit the column widths to the Header, Data, or Header + Data (the larger of the two).
- Collapse / Expand Entry List— Collapse the Entry List so that only the title bar with the tools is visible. This allows more space for the Structure Hierarchy. The expand button restores the Entry List to its previous size. You can also drag the divider between the Entry List and the Structure Hierarchy to change their relative sizes, or double-click the divider to equalize the sizes.
- Float panel— detach the Entry List and Structure Hierarchy panel from the Workspace. You can drag the panel to where you would like to view it on your screen, allowing for more space in the Workspace. Drag the panel to the left edge or the right edge of the Workspace to dock it back in place.
- Hide panel— hide the Entry List and Structure Hierarchy panel. To open this panel, choose Window → Entry List / Structure HierarchyWindow → Entry List, press Ctrl+E (⌘E), or click the Workspace Navigator button in the Workspace Configuration toolbox.
-
- Entry list
-
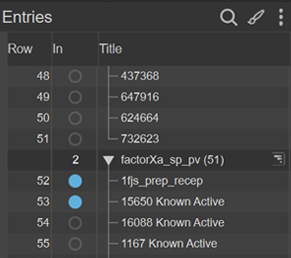
Lists the project entries, with the Row column, the In column and the Title column displayed by default; other property columns can be added. For entry groups, the number of entries is shown to the right of the title. The entry list is kept synchronized with the Project Table.
You can include entries in the Workspace with the usual click, shift-click and control-click in the In column. To exclude an entry, you can either control-click or middle-click. To fix an entry in the Workspace, double-click in the In column. Double-clicking a fixed entry unfixes it but leaves it included in the Workspace; control-click excludes it.
You can select multiple entries in the list with the usual shift-click and control-click. If the list is filtered and you select with shift-click, only the entries that are shown in the list are added to the selection. For entries that are in between these entries but are hidden, the selection is not changed, so selected entries remain selected, unselected entries are not selected. The same applies to entry inclusion. If the list is filtered, only the entries that are shown in the list are included in the Workspace.
Shortcut menus are displayed when you right-click on a row, so that you can perform common operations, like Duplicate, Lock, and so on. These menus are the same as the menus that appear in the Project Table, with a few exceptions. For an entry row, the Project Table Panel is shown; for an entry group row, the Project Table Panel or the Project Table Panel is shown.
The heading row has a reduced shortcut menu that allows you to show or hide property columns, show the 2D structure, sort, color, or select by a property value, add or remove properties from the Workspace property display, and set the column width. You can also open the shortcut menu by clicking the arrow that is displayed in any column header when the pointer is in the header.
The Title column has auxiliary feature buttons on the right, if the entry has features such as surfaces, trajectories, or hypotheses. Clicking the button opens a menu for performing actions related to the auxiliary feature. If an entry has a trajectory (T) button, you should not edit the entry. If you do, a warning is displayed when you click the button, with the choice to reset to the original structure (discarding the edits) and open the Trajectory Player, or cancel the action. If you do want to modify the structure, you should create a new entry from it, and edit the new entry.
Entry groups that have been imported as a result of job incorporation may have a Workflow Action Menu (WAM) button
 at the right of the row. The button opens a menu that has three kinds of items:
- Common tasks—These are listed at the top, if there are any, as separate items.
- Analysis—These items open panels that perform appropriate analysis tasks on the entries. They are usually displayed on a submenu.
- Next Steps—These items open panels that use the entries as input to another task.
The contents of each Workflow Action Menu are determined by the job that was run, and correspond to common or useful actions to take on the job results. The actions can be applied to one entry, several entries, or all of the entries in the group, depending on the chosen action. The items available on the menu may also depend on which entries are selected in the group. If an action operates only on a single entry, but there are several entries in the group to which that action applies, a submenu is shown so you can choose the entry (including the Workspace Entry if applicable).
Structure Hierarchy (Hierarchy)
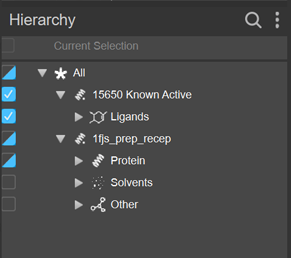
The Structure Hierarchy shows a hierarchical view of the contents of all the entries that are included in the Workspace, classified into components of various types. The classification is shown in a tree, so that you can expand or collapse the tree to show the components that constitute a larger component. For example, a receptor entry may be classified into Protein, Ligands, Solvents, and Other. The protein is divided into chains, which are divided into individual residues. Or an antibody entry can be divided into antibody and antigen, the antibody into light and heavy chains, then into the various regions and finally into residues.
Each entry in the Workspace is represented as a row in the Structure Hierarchy, with an "All" folder at the top level that contains everything, if there is more than one entry in the Workspace. In addition, there is a row for the current atom selection that functions in the same way as the other components in the hierarchy.
The Structure Hierarchy allows you to work with the structure at each level, offering a visibility toggle, a styling toolbox, and atom selection for each row of the tree.
-
Search button
-
The search button displays and hides the search text box, so you can filter the hierarchy on the names. For example, filtering on ARG shows all the arginine residues (and anything else whose name happens to match this text). You can search for multiple items using OR logic by separating them with a | character: for example
ARG|LYSsearches for ARG or LYS.To remove the filter, clear the text or use the X button at the right of the search text box.
-
More Options button
-
This button menu has settings for configuring the behavior of the structure hierarchy.
-
Display Polar H Only—when changing the display of any component, display only the polar hydrogens, rather than all hydrogens, for that component. This is a setting, so it does not change the display immediately, in contrast to the button in the Style toolbox, which acts immediately on the selection.
-
Show Annotated Features—toggle on or off to display the annotated features for antibodies. When annotated features are displayed, a check mark is displayed to the left of Show Annotated Features.
-
Collapse/expand button—Collapse the Structure Hierarchy so that only the title bar with the buttons is visible. This allows more space for the Entry List. The expand button restores the Structure Hierarchy to its previous size. You can also drag the divider between the Entry List and the Structure Hierarchy to change their relative sizes, or double-click the divider to equalize the sizes.
-
-
- Structure hierarchy
-
Lists the content of all entries that are in the Workspace (included entries), in a hierarchy that allows you to examine and operate on the various components of the entry, such as chains, residues, ligands, monomers, solvent molecules, and so on. The hierarchy is expanded by default to show the top level for each entry in the Workspace.
Clicking on a row in the hierarchy selects the atoms in the Workspace that belong to the component represented by the row. You can use shift-click and control-click to select multiple rows and therefore select the corresponding atoms in the Workspace. Shift-click adds the atoms from the selected rows to atoms that are already selected—this operates in the same way as selection by any other method.. Nonpolar hydrogens can be excluded from the selection—see Selecting Hydrogen Atoms.
Double-clicking a row fits the atoms represented by the row to the Workspace.
The features of each row are listed below. The presence of some of the features depends on the nature of the structure component that the row represents.

-
Visibility check box—Show or hide the atoms in the Workspace for this component. This check box allows you to change what is shown in the Workspace without having to make an atom selection first.
button status 
Displayed. All components are displayed. For lowest items, at least one atom is displayed. 
Partially Displayed. Component contains both displayed and undisplayed atoms. 
Undisplayed. None of the atoms in the component are displayed. -
Expand/collapse icon—Expand or collapse the item to show its components. By default, the top-level item for all entries in the Workspace are expanded.

-
Component icon—Indicates the type of component: protein, ligand, etc.

-
Name—Name of the component or component type. If it is an entry, the name is the entry title. For components of a chain, the chain letter prefixes the name of the component.
-
Shortcut menu—Right-clicking on the row displays a shortcut menu that depends on the type of component: if an entry, the Selected Entries menu is shown; if a structure, the Selected Atoms menu is shown.
-
Style button—Clicking this button opens the Style toolbox (see Changing Structure Styles). The button is displayed on the right of the row when the pointer is over the row.
-
Highlighting—The row is highlighted if any atoms in the component are selected in the Workspace. The highlighting is lighter if only some of the atoms are selected; it is darker if all the atoms are selected.
At the top is a separate row for the current atom selection. This row has the same features as other rows (except for the expand/collapse icon), so you can use it for styling the current selection rather than using the Style button on the toolbar. It has its own shortcut menu, the Current Selection menu, which can be used to operate on the selection.
-
- Shortcut menus
-
The shortcut menus available in the hierarchy are described below:
- Selected Atoms shortcut menu
-
This shortcut menu opens if the component in the hierarchy is a structure, and applies the action to the atoms in the structure component. The items are:
- Display / Undisplay—Show or hide the selected atoms.
- Style—Open the Style palette to apply a style to the selected atoms.
- Expand to Full Residues—Expand the selection to all atoms in the residues, if some residues are partially selected.
- Expand to Full PDB Chain—Expand the selection to the full PDB chains that are represented in the selection.
- Copy to New Entry—Copy the selected atoms to a new project entry.
- Extract to New Entry—Delete the selected atoms from the current entry and place them in a new entry.
- Delete Atoms—Delete the selected atoms.
- Selected Entries shortcut menu
-
This shortcut menu opens if the component in the hierarchy is an entry. The items are:
Include Include the selected entries in the Workspace along with the entries that are already included. Exclude Exclude (remove) the selected entries from the Workspace. Fixed entries are also removed with this command. Fix in Workspace Include the selected entries in the Workspace, and keep them in the Workspace until explicitly excluded or unfixed, the Workspace is cleared, or the project is closed. Actions that exclude other entries from the Workspace, such as Include Only, have no effect on the fixed entries. A pin icon appears in the In column for these entries. Clear Fix Change any fixed entries in the entry selection so that they are no longer fixed. The entries remain in the Workspace, but can be removed by actions like Include Only. The padlock icon is removed from the In column for these entries. Lock (set non-editable) Lock the selected entries so that they cannot be modified or deleted until they are unlocked. A padlock icon appears in the Row column for these entries. When you include locked entries in the Workspace, a banner is displayed to notify you of their presence. Locked entries cannot be modified in the Workspace. Unlock (set editable) Unlock the selected entries so that they can be modified or deleted. The padlock icon is removed from the Row column for these entries. Split Split the entry into several entries based on the content. The submenu offers the following choices: - By Molecule—Split the selected entry into a set of entries, one for each molecule in the source entry.
- By Chain—Split the selected entry into a set of entries, one for each chain in the source entry.
- Into Ligands, Water, Other—Split the selected entry into a set of entries, one for each ligand in the source entry, one for the waters, and one for any other atoms, such as a protein.
- Copy Properties—Copy the properties of the source entry to the new entries when the source is split.
Duplicate Submenu with the following actions: - In Place—Duplicate the selected entries and place each new entry immediately below its source entry.
- Into New Group—Duplicate the selected entries and place the entries into a new group. Opens the New Group dialog box, in which you can give the group a title and choose a location for the new group, either at the top level or in a parent group of the selection.
- Into Existing Group—Duplicate the selected entries and place the entries into an existing group, at the end of the group. Opens the Duplicate into Group dialog box, in which you can choose the group for the duplicated entries.
- As Ungrouped Entries—Duplicate the selected entries and place the entries at the end of the table.
- Copy Properties—Select this option if you want to copy the properties of the source entries to the target entries when duplicating entries; deselect it to copy only the structure.
Merge Merge the selected entries into a single entry. The merged entry is placed after the last selected entry, inside the last entry's entry group if one exists. Delete Delete the selected entries and groups in the Project Table. The entries and groups are removed from the project. Add to Shortcut Rows Add a shortcut for each selected entry to the shortcut row section. The shortcuts are placed at the top of the table in the fixed area, so they are always visible in the table. Shortcuts are synchronized with the source entries. Color Row Color the rows in the Project Table for the selected entries. Opens the Color Rows dialog box which has the following options: - No Coloring—Reset the background color for the selected entries to the default color.
- Constant Color—Color the background of the entire row for the selected entries with a chosen color. Opens a color selector, in which you can choose the color to apply to the rows. The color is stored in the project, associated with the entries that are colored.
- By Entry Property—Color table cells based on ranges of property values. Click the button to select the property. When you click OK, the Edit Color Settings Dialog Box opens, in which you can define the property ranges and select and apply the colors.
Set Stars Mark the selected entries with the number of stars chosen from this submenu. The star rating is displayed in the Stars column to set the number of stars for a single entry. The submenu offers the following choices: - None—Set the number of stars for the selected entries to 0.
- 1 (*)—Set the number of stars for the selected entries to 1.
- 2 (**)—Set the number of stars for the selected entries to 1.
- 3 (***)—Set the number of stars for the selected entries to 3.
Group Group the selected entries and groups into a new group. Opens the Group Selected Entries & Groups dialog box, in which you can specify the title of the new group and choose the location of the new group. The group can be placed at the top level, with a choice of locations (top, end, at first or last selected row), or in any common parent group in the hierarchy. Move to Move the selected entries so that the first entry is at a specified location. Submenu with the following options:
- Existing Group—Move the entries to the end of a specified group. Opens a dialog box in which you can select the group.
- Top of Table—Move the entries to the top of the Project Table, ungrouped.
- End of Table—Move the entries to the end of the Project Table, ungrouped.
- Top of Group—Move the entries to the top of the group they are currently in. The entries must be in the same group.
- End of Group—Move the entries to the end of the group they are currently in. The entries must be in the same group.
- Top of Parent Group—Move the entries to the top of the group above the groups the entries are currently in (move them up one level in the hierarchy). All entries must share this parent group.
- End of Parent Group—Move the entries to the end of the group above the groups the entries are currently in (move them up one level in the hierarchy). All entries must share this parent group.
- Other—Opens the Move to Row dialog box, in which you can specify a row number or move the entries to the first or the last row.
Ungroup Groups Remove the grouping for any fully selected groups. The entries are placed in the same location in the hierarchy as the groups they were in. Change Property Value Set the value of the property in the cell you clicked in. The cell is placed in edit mode (the same as double-click). Only present if a single row is selected. Set Property Set the value of the property in the column you clicked in to a specified value. Opens the Set Property for Selected Entries dialog box, where you can specify the value and choose whether to apply it to the clicked entry or to all selected entries. The value in the cell you clicked in populates the text box for the value, which you can then change. Only present if multiple rows are selected. Manage Entry Properties Copy properties from a selected entry to the clipboard; paste properties to selected entries, clear property values. Only one entry should be selected for copying, but multiple entries can be selected for pasting or clearing. This submenu is for managing properties within Maestro. To copy entry property values for external use, use the context menu in the Project Table — Property Tree Panel.
Submenu with the following options:- Copy All Values—Copy all entry properties to the clipboard for pasting into other entries.
- Copy Column Values Only—Copy the entry properties that are shown (the visible columns) in the Project Table to the clipboard, for pasting into other entries.
- Paste Values—Paste the property values from the clipboard into the selected entries. The existing properties are overwritten. If a property does not exist (or is of a different type) a new property is created for those entries. If a property value is empty in the source entry, the value will be empty in the target entries.
- Clear All Values—Clear all property values in the selected entries.
- Clear Column Values Only—Clear all property values for the properties that are shown (the visible columns) in the selected entries.
- Choose Properties to Clear—Choose the property values to clear. Opens the Clear Property Values Dialog Box for choosing the properties for which to clear values.
Group by Entry Property Group the selected entries by the value of a property. Groups are created by property range for numerical property values, and for each unique value for string property values.
Opens the Group By Entry Property Panel.Scroll Table to Row Scroll the Project Table to the source row for the shortcut row you clicked on. Only present when you click in a shortcut row. Remove Shortcut Remove the shortcuts for the selected entries. Only present when you click in a shortcut row. Style Apply a display style to the atoms in the selected entries. Displays the Style Toolbox (without the ribbon properties), where you can choose the style to apply. Export Export data from the selected entries to external files. The submenu offers the following choices: - Structures—Export entries from the current project to one or more files, with a choice of file formats and options to control the export behavior. You can create new structure files or append to an existing structure file. Opens the Export Dialog Box.
- Spreadsheet—Export rows and columns from the Project Table to a CSV file, which can be read into a spreadsheet application. Opens the Export Spreadsheet Panel.
- To LiveDesign—Export the selected entries to a LiveDesign project. Opens the Maestro to LiveDesign Export Panel (after authentication, if necessary) with the structure source set to the selected entries.
Apply Annotations Apply annotations to the selected entries, with options for Antibody or T-Cell Receptor. Selecting Antibody opens a dialog with options to select from the following numberring schemes: Kabat, Chothia, EnchancedChothia, IMGT, and AHo. Selecting T-Cell Receptor opens a dialog with options to apply IMGT or AHo numbering schemes. - Current Selection shortcut menu
-
This shortcut menu opens from the Current Selection row, and applies the action to the selected atoms. The items are:
- Undisplay—Hide the selected atoms.
- Style—Open the Style palette to apply a style to the selected atoms.
- Expand to Full Residues—Expand the selection to all atoms in the residues, if some residues are partially selected.
- Expand to Full PDB Chain—Expand the selection to the full PDB chains that are represented in the selection.
- Select Entries in Table—Select the entries in the Project Table that contain the selected atoms.
- Exclude Entries—Exclude the entries that contain the selected atoms from the Workspace.
- Copy to New Entry—Copy the selected atoms to a new project entry.
- Extract to New Entry—Delete the selected atoms from the current entry and place them in a new entry.
- Save as Custom Set—Generate a custom atom set from the selection. Opens the Save Selection as Custom Set Dialog Box.
- Quick Save (within session)—Save the selection as the next one of the numbered selections.
- Restore Quick Save—Change the selection to the chosen numbered selection.
- Delete Atoms—Delete the selected atoms.
Project information
This area shows information on the entries and entry groups that are present in the project, which filter (if any) has been applied to the entry list, and how many entries are shown in the entry list after filtering.