Nonstandard Residues Panel
Set up a database of nonstandard residues, by building new residues or importing existing residues, and choose the nonstandard residues that are shown in the residue selection tools for residue scanning and FEP protein mutation.
To open this panel: click the Tasks button and browse to Biologics → Nonstandard Residues, or click the Define Nonstandard Residues button in the Options tab of the MM-GBSA Residue Scanning Panel.
- Using
- Features
- Additional Resources
Using the Nonstandard Residues Panel
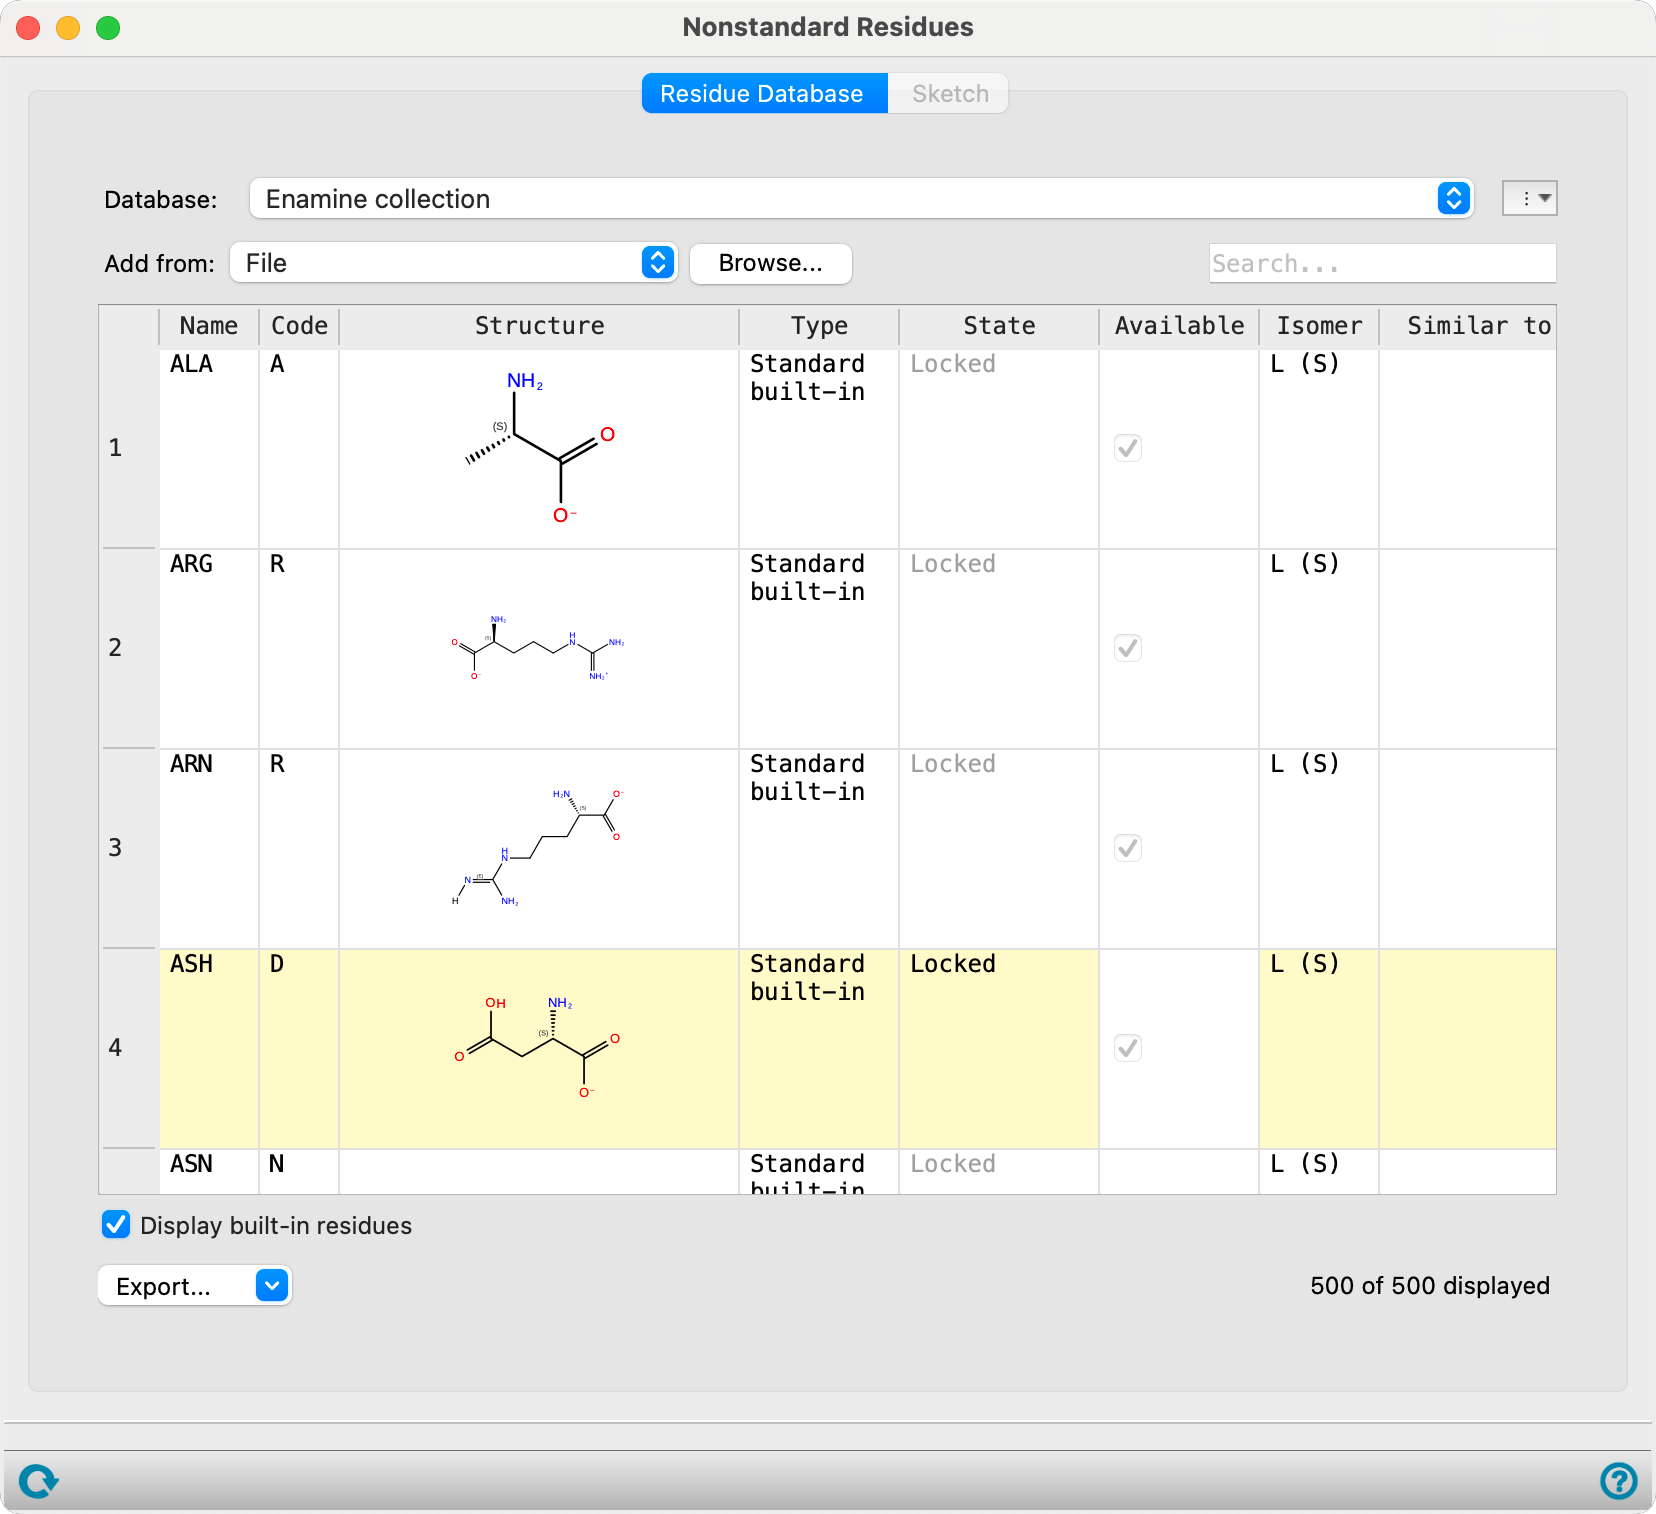
The two tasks of this panel are to manage a nonstandard residue database, and to select nonstandard residues to show in the residue selection tools. The database table is prepopulated with standard residues, built-in nonstandard residues, and custom nonstandard residues that you create. You can use the residues in the table as templates for new residues or select them to show in the residue selection tools.
Custom nonstandard residues are stored in a custom nonstandard residue database in your User resources directory. This database is updated automatically as you add residues. You can delete custom residues, but not residues in the built-in set. You can export nonstandard residues to the Project Table or to a file for use in other contexts, or for reloading. By default, the custom residues are exported, but you can set an option to export the selected residues, which can include custom and built-in residues.
You can also specify a corresponding standard residue that is used as a proxy for the nonstandard residue for the purposes of sequence alignment or calculating sequence identity or similarity. The choice is made in the Aligns with column.
To create a new nonstandard residue from an existing residue:
-
Right-click on the residue in the Residue Database tab and choose Use as template.
The template is placed in the sketcher, which is displayed.
-
Use the sketching tools to change the structure.
-
Enter a 3-letter residue name and a 1-letter code.
A valid name or code is indicated by a green check mark to the right of the box.
-
Enter a description for your own use.
-
Click Add to Database.
The residue is added to the database, with a notification indicating that the action has happened.
To build a series of nonstandard residues on a template:
-
Choose a template and build the first residue according to the instructions above.
-
Edit the structure in the sketcher to create the next residue, and fill in the text boxes with the new name, code, description. You can click Reset Sketcher to revert the changes you made to the template, so you can build onto the template again.
-
Add the residue to the database, and repeat for as many structures as you want to build.
To change the stereochemistry of a residue:
-
Right-click on the residue in the table and choose Set stereochemistry toisomer.
To edit the structure of a residue:
-
If it is locked, right-click and choose Unlock.
-
Double-click the structure, or right-click and choose Edit structure.
To select residues to appear in the residue selection tools:
-
Check the box for the residue in the Mutate to column.
Nonstandard Residues Panel Features
Start with database option menu
Choose the nonstandard residue database to use as a starting database. The residues from this database are shown below the built-in set. The menu has the following items:
- Default residues— loads the built-in standard and nonstandard residues. This is the default if no custom databases have been stored. These residues are always shown in the residues table, even when a different database is chosen. To start a new database from scratch, choose this option.
- Enamine Collection — loads a subset of Enamine's catalog of unnatural residues to use.
- Browse — opens a file selector so you can locate a nonstandard residue database to use. The database name is added to the menu.
- Database names — load the chosen database. These items are only present if you have already added databases with the Browse button. The 10 most recently used databases are shown, in order of use, and the most recent is selected by default.
The residues from the database you select are added at the end of the residues table. Any built-in residues from a custom database are ignored.
Additionally, clicking the dropdown menu to the right of the database option menu shows options to Duplicate or Delete the selected database.
Residue Database tab
In this tab you can manage the nonstandard residues in the chosen database: add new residues, provide name, code, description, select for inclusion in the menus that show lists of nonstandard residues.
- Add nonstandard residues from option menu and Browse button
-
Choose a source from which to import nonstandard residues. If you choose File, click the Browse button to locate the file and read in the residues. If you choose Workspace or Project Table, the included entries or the selected entries are added to the database when you click Import.
A check is done as the residues are imported to detect duplicates. If a duplicate is found, a warning is posted, and you can choose to overwrite the existing residue with the imported residue, assign a new name to the imported residue by using the automatic naming scheme, or provide a new name for the imported residue. When importing structures with residues that lack a PDB residue name, a dialog box will appear to address the unnamed residue(s). You can select from the options to auto-assign a name, or to skip import of the unnamed residue(s).
- Filter bar
-
Use the filter function to scan the entire table to search for residues matching the entered text. The number of matches displayed is shown at the bottom right of the Residues table. The filter function also supports using decimal values for the minimum cutoff for Similarity Score, where the values below the filter value will be omitted from the table.
- Residues table
-
This table lists three sets of residues: standard residues, built-in nonstandard residues, and custom residues. The first set is listed so that you can select them as templates for building new residues. The second set is listed both for selection as templates and for marking to appear on the list of residues to mutate to in application panels. The third set is the set that you add to the database. Note that only the third set is actually stored in the database; the first and second are stored in the installation and are presented in this table for easy access. You can hide them by deselecting Display built-in residues.
The table has a shortcut menu with the following items:
-
Use as Template—Use the selected row as a template for building a new residue. When you choose this item, the residue is added to the drawing area in the Sketch tab, where you can modify it and add the new residue to the database. This item is only present if a single residue row is selected.
-
Enable Mutate To—Check the box in the Mutate to column of the table for the selected residues, so that they appear on lists in application panels. This item is not present if all the residues selected are standard residues.
-
Lock/Unlock— This item is only present for custom residues. Locking a residue makes it noneditable until it is unlocked. The Edit Structure item does not appear on the menu for locked residues (or for standard or built-in residues).
-
Edit Structure—Edit the structure of the residue. The structure is displayed in the Sketch tab, where you can modify it and update it in the database. This item is only present for custom residues that are not locked.
-
Set 1-letter code—Set the 1-letter code for the residue. This item is only present for custom residues that are not locked. The 1-letter code does not have to be unique.
-
Set stereoisomer to isomer—Change the stereoisomer from L to D or D to L. This item is only present for custom residues that are not locked.
-
Select All—Select all residues in the table.
-
Select Inverse—Invert the selection of residues in the table: the selected residues are deselected and the unselected residues are selected.
-
Export to File—Export the selected residues to a Maestro file.
-
Add to Project Table—Add the selected residues to the Project Table as new project entries.
-
Duplicate Rows—Duplicate the selected rows in the table. The new rows are added at the end of the table.
-
Delete Rows—Delete the selected rows from the table. This action removes these structures from the database, and is only available for custom residues.
The table rows are described below.
Name Three-letter residue name. This name must be unique in the database. You can edit the table cell to change the name of any custom residue. Code One-letter residue code. This code does not have to be unique. Structure 2D structure of the residue. A larger version is displayed in a tooltip when you pause the pointer over the table cell. If the residue is a custom residue that is not locked, you can double-click in the cell to edit it in the Sketch tab. Locked This column indicates the source of the residue if it came from the installation, or the edit status of the residue. Residues that are locked cannot be edited unless they are unlocked. Mutate to The check box in this column marks residues that are included in the residue selection tools for mutation, in the Residue Scanning panel. Isomer Stereoisomer of the residue: L, D, or None. Chirality may also be reported in parentheses as R or S. Similarity Score Displays the Similarity Score (if available) for the residues. Similar to Specify a standard residue that has the same properties as the custom nonstandard residue, for purposes of sequence alignment and evaluating sequence similarity or identity. Double-clicking a cell in the column shows a list of standard residues, from which you can select one, or set to blank to clear the assignment. In the Multiple Sequence Viewer/Editor Panel, the letter for the standard residue is shown in the sequence. Note: For residues that have a value in the Similarity Score column, their values in the Similar to column will not be editable. Description Description of the residue, such as its chemical name. You can double-click in the cell to edit the description. -
- Display built-in residues option
-
Display the built-in standard and nonstandard residues in the table as well as the custom residues. If this option is deselected, only the custom residues are displayed.
Sketch tab
In this tab you can use the 2D sketching tools to draw new residue structures or edit existing residue structures. You can place a template residue into the sketcher for modification, by right-clicking on the residue in the table in the Residue Database tab and choosing Use as template.
- Residue name text box
-
Enter the 3-letter name for the residue. A name is automatically generated for new residues. The name must be different from any other name in the table in the Residue Database tab, i.e. it must be unique in the current nonstandard residues database. The icon to the right indicates the status of the residue name:
- green check mark for a valid unique name: the residue can be added to the database
- yellow exclamation point for valid existing name: the residue can replace the existing residue in the database on confirmation
- red X for an invalid name or locked existing residue: the name exists in the database and the residue it belongs to cannot be replaced
- 1-letter code text box
-
Specify the 1-letter code for the residue. The code does not have to be unique, but it cannot be blank. A green check mark to the right indicates a valid code.
- Description text box
-
Enter a description of the residue in this text box. You can add any information you want about the residue.
- Add to Database button
-
Add the residue to the database. When you click this button, the residue is added to the table (after you resolve any issues), and the structure is converted to 3D. The residue remains in the sketcher and this button is disabled until you have set a new name for the residue. This allows you to make multiple edits on the same template to produce a series of related residues, naming each one and adding it to the database.
- Toolbar
-
File Tools 
Clear Sketcher
Clear the drawing area completely.
Import
Menu items: Import from File, Paste in Text, Replace Current Content (option).
Export
Menu items: Save Image, Export to File.Settings 
Settings
Toggles: Heteroatom Colors, Stereocenter LabelsHelp 
Help
Help, About 2D Sketcher - Drawing area
-
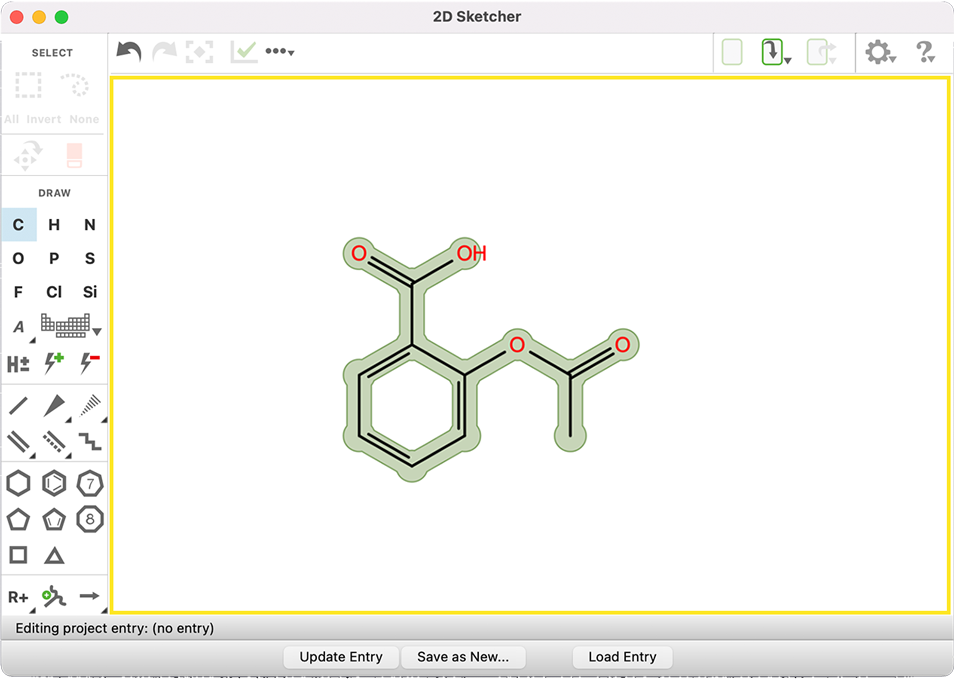
The drawing area shows the structure and is used to build or edit structures. You can pan the view with the right mouse button, and rotate it with the middle mouse button. You can zoom in and out with the mouse wheel, and you can scroll the drawing area with the scroll bars. The area is large, so it is possible to place a number of structures in it.
Drawing a New Structure
If the drawing area is empty, the Draw tools will be active.
Drawing creates a carbon-atom framework. You can change the element with the element buttons, either during drawing or after you have finished drawing.
To start a new structure, you can use:
The C Element tool. Click on the background of the drawing area to add a CH4, or click and drag briefly to add two bonded carbons. Subsequent clicks with the same tool on one of the existing carbons will add another bonded carbon. The bond is placed in a default orientation with respect to existing bonds. Clicking directly on an existing bond will increase the bond order (up to three, after which it will return to one).
Other Element tools may be used similarly. Click an existing atom with a different Element tool to change the element. Click and drag away from an existing atom to add a bonded atom with the active element. Element tools may also be used to draw bonds between existing atoms.
The Single Bond or Bond Chain tool. Click and drag on the background of the Drawing area with the Single Bond tool to add a pair of bonded carbons, then click on one of the carbons to add another bond. Alternatively, click the Bond Chain tool and then press and drag on the drawing area to draw a series of bonds. The small number at the end of the chain indicates the number of bonds that will be added when you release the mouse button. Use other bond tools to modify the single bonds, or simply right-click the bond itself and choose a different option from the popup menu.
A Ring tool. Click on a ring in the Fragments palette and then click in the drawing area to place the ring. Add bonded atoms or change elements on the ring as described above.
When editing an existing atom or bond, or adding a new bond to an atom, look for the pale green highlight on the atom or bond before clicking. This highlight moves as you move the pointer over the structure.
Editing an Existing Structure
When there is a drawing in Drawing Area, the Edit tools will be active.
- Reset Sketcher button
-
Reset the drawing area to show the last template that was placed in it. This allows you to easily clear changes from the template and make another set of changes to produce a new structure.


Export option menu
Export the current set of nonstandard residues in the table to a database. The option menu has two items:
-
Database—export residues to a database file. Opens a file selector so you can navigate to a location and save the database file.
-
Export Selected Only—export only the residues that are selected in the table. If this option is selected, all residues that are selected in the table are exported, including standard residues. If this option is not selected, all custom nonstandard residues are exported (excluding the built-in residues). This option only controls what is exported; you must subsequently choose Database to perform the export. On import, any built-in residues in the database are ignored.