FEP Protein Mutation Panel
Calculate the change in binding affinity of two proteins or the change in stability of a single protein due to a set of single mutations.
To open this panel: click the Tasks button and browse to Free Energy Perturbation → Protein FEP.
- Using
- Features
- Additional Resources
Using the FEP Protein Mutation Panel
The purpose of this panel is to provide information on how the mutation of protein residues affects its stability or its binding to another protein. The input is one or two protein structures, which can be in the same or separate project entries, or read from a file. If two protein structures are input, they are merged into a single structure when the input structure file is written. The second protein is assumed to be positioned in a binding pose relative to the first, and not have any chain names in common. As for FEP+, the protein structures are immersed in water for the simulations, with enhanced water sampling via GCMC. You can add a POPC membrane if needed by selecting Run membrane protocol in the FEP+ Advanced Options Dialog Box.
To choose a residue to mutate, you can pick it in the Workspace or select it in the residues table. The residue can be a standard residue or a nonstandard residue. When you have chosen a residue, click in the Mutation column to set the mutations. You can mutate multiple residues, each with multiple mutations. You can mutate to nonstandard residues if you select them first in the Nonstandard Residues Panel.
Submitting a structure with incorrect PDB names results in those names being overwritten, as proper PDB names are required for atom mapping.
FEP calculations can use a large amount of memory. There is a script that you can use to estimate the memory required for an FEP job—see fep_memory_estimation.py Command Help for more information. You can estimate the number of atoms by building the initial system, including solvent, in the System Builder Panel. With a solvent buffer of 8 Å, the output structure approximately provides an upper limit to the size of the FEP systems. This information is needed to estimate the memory required.
The output structures for each mutation are written to a Maestro file. You can examine the results in the FEP+ Panel, which shows the overview, perturbation map, and analysis.
As part of the selection process, you may want to use the MM-GBSA Residue Scanning Panel to identify suitable candidates for mutation. This panel offers a wide variety of tools for selecting residues for mutation, such as contacts with other residues, solvent accessibility, homology to find variable or conserved residues, surface shape complementarity. The procedure uses MM-GBSA for energetics and performs minimizations in the vicinity of the mutations, and can optimize binding affinity or stability due to a set of mutations. It can therefore be used as a rapid screening tool to provide input for FEP evaluation of binding affinities or stabilities.
FEP Protein Mutation Panel Features
- Use structures from option menu
- Open Project Table button
- Load button
- File name text box and Browse button
- Protein to mutate text
- Calculation type options
- Residue scan with λD option
- Binding partners option menu
- Select residues to mutate controls
- Job toolbar
- Status bar
- Use structures from option menu
-
Choose the structure source for the protein to mutate. The structures must be one or two protein structures, which are merged when loaded into the panel. The chain names across multiple structures must be unique.
- Project Table (selected entries)—Use the entries that are currently selected in the Project Table.
- File—Use the specified file. When this option is selected, the File name text box and Browse button are displayed.
- Open Project Table button
-
Open the Project Table panel, so you can

- Load button
-
Load the structures from the
- File name text box and Browse button
-
Enter the file name in this text box, or click Browse and navigate to the file. The name of the file you selected is displayed in the text box.
- Protein to mutate text
-
Reports the title (PDB ID) of the protein and indicates whether it passes the protein health check.
- Calculation type options
-
Select an option for the type of calculation.
-
Stability—calculate the stability of the protein with respect to the mutations.
-
Selectivity—calculate the change in binding energy of one group of chains to its complement, to determine the binding selectivity with respect to the mutations. The Binding partners option menu is displayed so you can partition the chains into the two groups. Clicking on a chain selects it; clicking again deselects it.
-
- Residue scan with λD option
-
Select this option to run FEP+ residue scanning with the lambda dynamics approach, which can rapidly identify high quality protein variants [15]. There are certain limitations to using this option:
- The mutation chain must be a valid, isolated substructure.
- Multi-site mutations are not supported.
- Mutation to/from the amino acid Proline is not supported.
- Non-Standard Amino Acids (NSAA) are not supported.
Advanced options for this option can be selected from the λD Advanced Options Dialog Box.
For a tutorial, see Identifying impactful mutations using FEP+ residue scanning.
- Binding partners option menu
-
Choose the chains that form one of the binding partners from the option menu, by checking or clearing the boxes for the chains. The remaining chains form the other binding partner.
This menu is populated from the chains present in the input structure. If more than one structure is specified, the chain names across all structures must be unique, otherwise the structures cannot be merged. You can rename the chains using the Change Atom Properties Panel.
Only present if Selectivity is selected as the calculation type.
- Select residues to mutate controls
-
These controls allow you to show a filtered list of the residues in the protein, select the residues you want to mutate, and choose the mutations for each residue. The total number of mutations is displayed and updated as you choose mutations. The selections you can make depend on whether you want to perform single mutations on a protein to produce a set of mutants (in the Single mutations tab), or whether you want to perform multiple simultaneous mutations on a protein to generate one or more mutants (in a Multi-site mutation tab for each protein).
- Single Mutations tab
-
Select sites and mutations to generate a set of mutant proteins with a single mutation from the parent protein. For each site, a mutated protein is generated for each selected mutation.
- Pick residue option
Pick a residue in the Workspace to mutate. The residue is selected in the table.
- Residues table
This table lists the residues in the protein
Click in the Mutation column to choose the mutation
In this pane you can select
- Multi-site Mutation tab
-
Select sites to mutate and a single residue for each site to mutate to, to generate a protein with multiple mutations. Only one mutation can be made at a given site. To define another multi-site mutant of the protein, click the + tab to the right, to add another copy of the Multi-site mutation tab in which to define the mutations.
- Pick residue option
-
Pick a residue in the Workspace to mutate. The residue is selected in the table.
- Residues table
-
This table lists the residues in the protein
Click in the Mutation column to choose the mutation for a residue. A small pane opens above or below the row. The small pane closes when you click Close, click elsewhere in the main panel, press Esc or Enter, or move the pointer out of the main panel.
In this pane you can select
- Job toolbar
-
Manage job submission and settings. See Job Toolbar for a description of this toolbar.
The FEP+ tasks are run on the GPU host chosen in the the Job Settings Dialog Box. Typically, three subjobs are submitted per perturbation (for complex, solvent, vacuum). You can set Maximum simultaneous FEP subjobs to limit the number of subjobs on the GPU host at the same time.
The Settings button menu provides access to custom features:
- Advanced Options—set advanced options for the MD simulations. Advanced options cannot be set when uploading to FEP+ Web Services. Opens the FEP+ Advanced Options Dialog Box.
If you have purchased Web Services, the Submit to Web Services option is present. Select to upload the job to Web Services for execution, and click the Submit button. The number of credits to be used and the number of available credits are reported, and the job is uploaded on confirmation of the credit usage for the job. If you have access to multiple Web Services projects, you are prompted to choose the project to associate the job with. The FEP+ Web Services Job Table Panel opens.
If you have Web Services credentials but do not see the Submit to Web Services option, see Troubleshooting.
The Job Settings button opens the FEP Protein Mutation - Job Settings Dialog Box, where you can make settings for running the job.
- Status bar
-
The status bar displays information about the current job settings and status for the panel. The settings includes the job name, task name and task settings (if any), number of subjobs (if any) and the host name and job incorporation setting. The job status can include messages about job start, job completion and incorporation.
Use the Reset button
 to reset the panel to its default settings and clear any data from the panel.
 The status bar also contains the Help button
 , which opens the help topic for the panel in your browser. If the panel is used by one or more tutorials, hovering over the Help button displays a
  button, which you can click to display a list of tutorials (or you can right-click the Help button instead). Choosing a tutorial opens the tutorial topic.
Tutorials
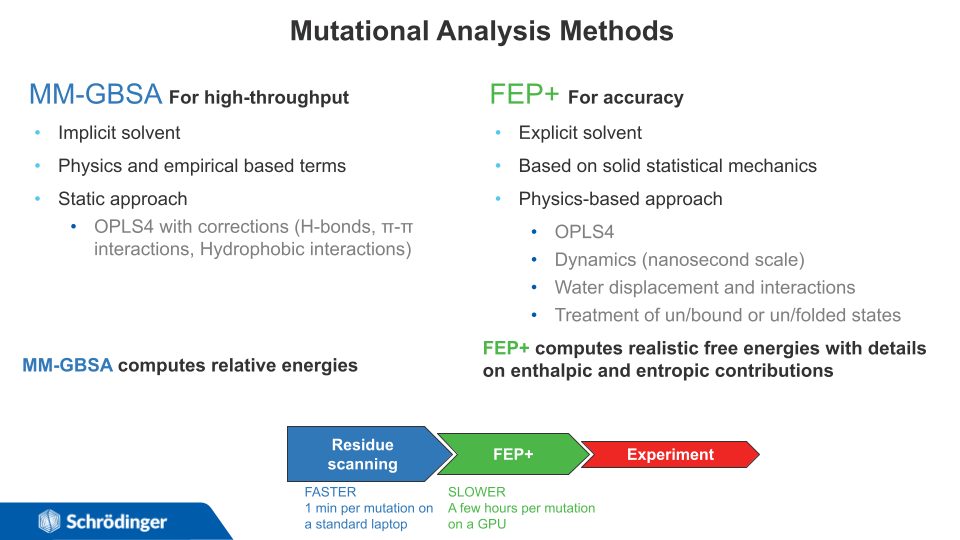
Comparing Mutational Analysis Methods
The table below compares approaches for protein stability and affinity prediction for residue scanning and protein FEP+. MM-GBSA: Molecular Mechanics with Generalized Born and Surface Area Solvation. See Related Topics below for more information.