FEP+ Panel
Set up, run, and analyze FEP calculations for the relative binding affinities of a set of congeneric ligands to a target. Charged ligands can be used as well as neutral ligands. The ligands must be docked to the receptor.
To open this panel, do one of the following:
- Click the Tasks button and browse to Free Energy Perturbation → FEP+
- Click the Tasks button and browse to FEP+ → FEP+
- Click the Tasks button and browse to Desmond → FEP+
- Click the Tasks button and browse to Lead Optimization → Free Energy Perturbation → FEP+
To open this panel from the entry group for the results of a Glide docking job ..
..
- Overview
- Using
- Features
- Additional Resources
Overview of FEP+ for Relative and Absolute Binding Affinities
Relative Binding Affinities
The relative binding affinity in FEP methods is calculated from a thermodynamic cycle, represented as follows:
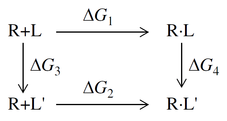
where R is the receptor, L and L' are the two ligands, R+L represents the free ligand and free receptor (solvated); R·L represents the receptor-ligand complex. The relative binding free energy of the two ligands L and L' is
ΔΔG = ΔG2−ΔG1 = ΔG4−ΔG3 .
Calculating ΔG1 and ΔG2 is difficult because the change is large; these are the binding free energies, which can be measured experimentally. Calculating ΔG3 and ΔG4 is much easier, as the changes involved are relatively small, provided the ligands are suitably chosen. However, these are "alchemical" changes, which involve transmuting one set of atoms into another. This is done in a series of steps, known as "lambda windows", where the potential energy and interactions for one ligand are scaled down while they are scaled up for the other ligand (see Free Energy Perturbation in MacroModel for a more detailed description). Two sets of simulations are performed: one for the complex, R·L → R·L', known as the "complex leg", yielding ΔG4; and the other for the ligand in solvent, L → L', known as the "solvent leg", yielding ΔG3 (note that the contribution of the receptor in solvent cancels in R+L → R+L', leaving L → L'). For more information on the theory and how error estimates are obtained, see FEP+ Methodology.
FEP+ can successfully handle ligands that are bound by noncovalent interactions (hydrogen bonding, electrostatics, etc.) and ligands that are covalently bonded to the receptor. The ligands can be neutral or charged; in the latter case, a counter ion is introduced in the solvent, and is transformed alchemically to a water molecule. The receptor can be in solution or it can be embedded in a membrane which in turn is placed in solution. For information on adding a membrane, see Preparing a Membrane-Bound Protein for FEP+.
Exploration of ligand space can be efficiently performed by fragment docking to find fragments that bind well in different parts of the binding pocket. This is followed by linking of fragments, as the linked fragments may bind more effectively than the separate fragments. The binding free energy of the separately bound fragments relative to that of the linked fragments can be evaluated with the same thermodynamic cycle as shown above. Here, one ligand L consists of two separated fragments, A and B, while the other ligand L' consists of these two fragments linked together, A–B. R·L represents both fragments bound to the receptor, R·(A,B); R·L' represents the linked fragment bound to the receptor, R·A–B. The free energy for this perturbation, ΔG4, is relatively easy to evaluate; however the solvent leg ΔG3 is difficult to converge, because of the large entropy of the two separate fragments in solution. The approach to this problem is to introduce restraining potentials to keep A and B in the same configuration (in solution) as in the linked structure but without the linker. The free energy change for replacing the linker with the restraints is evaluated. A second thermodynamic cycle is introduced, in which the free energy for removal of the restraints is evaluated, by evaluating the hydration free energy of one fragment with and without restraints, combined with the analytic free energy for gas-phase removal of restraints. These two pieces are combined to give the solvent leg ΔG3 for linking the fragments in solution.
Absolute Binding Affinities
The absolute binding free energy (affinity) is calculated from FEP simulations in which the ligand is annihilated in the complex and regrown in solvent. As this process does not allow for much rearrangement of the structure, it is suited to structures such as ligands that are noncovalently docked into a receptor - for example, Glide results.
The annihilation of the ligand in the complex is preceded by an MD stage, used to examine the motions of the ligand in the complex and determine restraints (both for the ligand-protein orientation and the ligand internal dihedrals) to be applied during the annihilation so that the ligand maintains its orientation during the process.
Using the FEP+ Panel
The FEP+ panel allows you to construct and modify the input for an FEP+ calculation for relative and absolute binding affinities (free energies) of ligands docked to a receptor. You can have multiple instances of the FEP+ panel open for different FEP+ calculations.
FEP+ calculations can take input for noncovalent and covalent ligands, and proteins that are in an aqueous environment or in a membrane immersed in water. The water molecules do not need to be included in the structure, as waters are added if needed. By default the number of waters is adjusted using GCMC methodology (see Grand Canonical Monte Carlo Addition of Water). The ligands must be docked to the receptor. You can add a POPC membrane if needed by selecting Run membrane protocol in the FEP+ Advanced Options Dialog Box.
The receptor is included in the Workspace when the structures are imported; any membrane or waters are not automatically included in the Workspace.
The ligand structures are stored in an entry group in the project, along with the properties added to or generated in the FEP+ panel. The project properties are updated from the panel. However, if you try to make structural changes or changes to the properties in the Project Table, these changes are reverted with a warning.
When you add or delete structures in the panel, they are added to or deleted from the entry group. Likewise when you add structures to or delete structures from the entry group, they are added or removed in the panel. Adding structures initiates a check for duplicate titles, and opens a dialog box to make the titles unique or cancel the operation. The environment structures (receptor, membrane, solvent, etc.) are placed above the ligands in the entry group. These structures cannot be deleted from the entry group while the panel is open. The structures are locked during map generation and job submission. When you close the panel, the receptor is excluded from the Workspace. The group can then be deleted, or kept as a normal entry group.
If you add ligands to a map for which you have already run a job to predict affinities, there are two possible ways of proceeding:
-
Start a new job with the new ligands and edges. This approach calculates just the new edges, and includes information from the previously run edges in the output. If the results with the previous defaults are satisfactory, this is the simplest approach. However, if you want to extend the time for any of the edges, this approach does not work, and you will need to take the second approach.
-
Export the map to the same location as the previous job, to overwrite the
.fmpfile for that job, then rerun the previous job (e.g. with thejobname.shscript). In this way, all the information from the previous job is preserved and you can extend simulation times, and so on.
If you import a new set of structures into the panel, the old ones are removed both from the panel and the entry group.
If you have trouble importing an .fmp file, it might be due to extraneous properties in the file; you can remove them with the script clear_multisim_properties.py.
As the entries are normal project entries, you can apply styling to the structures in the group for display purposes, for example.
The OPLS4 force field is used for the FEP+ simulations, with settings taken by default from the Force Field settings section of the Preferences Panel. These settings can include use of a custom OPLS4 force field. You can change the custom force field used after the ligand health check is run in the setup panel, by clicking the ligand health icon.
If you close the current project, all instances of the FEP+ panel are closed. The entry groups remain in the project, so they can be re-imported into the panel from the project at a later time.
You can reset the panel, clearing all the data, by choosing Reset from the Settings button menu  . After confirming the reset, the setup panel is redisplayed and you can import a new set of data. This is useful if you make changes and want to reload the panel from the original file: in the setup panel, just choose the original file and click Next.
If you want to run the job from the command line (e.g. transferring it to a cluster), you can choose Write from the Settings button menu . The directory where the files are written is reported in the status bar.
FEP+ simulations can take a large amount of memory. There is a script that you can use to estimate the memory required for an FEP job—see fep_memory_estimation.py Command Help for more information. You can estimate the number of atoms by building the initial system, including solvent, in the System Builder Panel. With a solvent buffer of 8 Å, the output structure approximately provides an upper limit to the size of the FEP systems. This information is needed to estimate the memory required.
The FEP+ User Manual — Contents contains a lot of information on the FEP+ process, considerations for designing an effective calculation, preparation of structures, and troubleshooting. It is strongly advised that you refer to this material before starting an FEP+ project. In particular, you should read FEP+ Best Practices. It is also recommended that you work through the tutorial, BACE1 Inhibitor Design Using Free Energy Perturbation.
Below are several use cases and some information on each:
-
Small molecule FEP: This is the default use case, where a set of ligands is bound by noncovalent interactions to the receptor. The receptor and the ligands can be imported from a pose-viewer file, for example. The peripheral groups on the ligands are usually the target of the perturbations.
Absolute binding FEP: The input complex must be a noncovalent receptor-ligand complex, or a receptor and a series of ligands that are docked to it, such as results of a Glide docking run.
-
Reversible covalent ligand FEP: Here, the input structure for each ligand is a protein-ligand covalent complex (which can be prepared, for example, from a reference complex by duplicating it and editing the ligand in Maestro with the build tools). Each complex is truncated to retain only the ligand attached to a dipeptide capped by Met on each end, which is displayed as the "ligand" in the FEP+ panel. The procedure is the same as for noncovalently bound ligands. The complex leg corresponds to perturbation from protein-ligand1 covalent complex to protein-ligand2 covalent complex, and the solvent leg corresponds to perturbation from ligand1-dipeptide to ligand2-dipeptide. The custom core option is not available for covalent ligand FEP.
-
Small molecule FEP for membrane-bound proteins: For membrane-bound proteins, the procedure for preparing the model system is described in Preparing a Membrane-Bound Protein for FEP+. Otherwise the use case is the same as the default use case where there is no membrane.
-
Fragment linking FEP: Here, there are only two ligands: one consisting of two fragments, the other consisting of the same fragments connected by a linker. The binding free energy of the linked fragments relative to the separate fragments is evaluated. The fragments may (for example) come from a docking run where they are docked into the receptor in different locations in a binding pocket, to optimize binding in each part of the pocket. The free energy evaluation involves two thermodynamic cycles (as outlined above). The linker is detected automatically, so you do not need to specify a custom core. Only one of the ligands may be charged, the other must be neutral.
-
Linker enumeration FEP: Related to fragment linking FEP, fragments are joined by different linkers to create a set of ligands. The linker must be identified in one of the ligands in the Map Options Dialog Box; the fragments must be the same for each ligand and represent the "core", as it is the linkers that are perturbed.
-
Protein mutation FEP: Here, the change in binding affinity of two proteins or the stability of a single protein due to one or more mutations is evaluated. The FEP Protein Mutation Panel is used for the mutations; this panel can be used for review of the results.
FEP+ Panel Features
The FEP+ panel is actually two panels, connected by Next and Back buttons. The tabs in the panel are described in separate topics, linked below.
- Setup panel
- Review panel
- FEP+ Panel — Overview Tab
- FEP+ Panel — Map Tab
- FEP+ Panel — Activity Cliffs Tab
- FEP+ Panel — Groups Tab
- FEP+ Panel — Analysis Tab
- FEP+ Panel — Analysis Tab
- Prediction type information
- Ligands information
- Total Connections information
- Apply filter option menu
- Search text box
- Toolbar
- Back button
- Job toolbar
- Status bar
Setup panel
In this panel you import the structures or perturbation map and make some settings for the review panel. Once you have imported the structures, an entry group is created in the Project Table that contains all the structures.
- Import structures or perturbation map from option menu
-
Import the receptor and ligands or import an existing perturbation scheme, which contains the receptor and ligands, into the workflow. The receptor and ligands must be imported together; you cannot do multiple imports to add a receptor or ligands. These structures replace any existing structures in the panel (and its entry group). The menu has the following items:
- Project Table (n selected entries)—Import the entries that are currently selected in the Project Table. The number of entries selected is shown on the menu item. An icon is displayed to the right which you can click to open the Project Table and select entries.
- File—Import the receptor and the ligands from a Maestro file, or import a perturbation scheme, which includes the receptor, ligands, and graph data, from a file. When this option is selected, the File name text box and Browse button are displayed. Click Browse and navigate to the file you want to use. The file name is displayed in the text box when you click Open in the file selector. You can also enter the file name in the text box.
- Web Services—Import results from an FEP+ Web Services job. The jobs are listed in a table below this option menu. Click Refresh to refresh the job listing. Once you have selected a job, click Download to download the file. The menu then switches to File with the downloaded file shown, and the file is imported. This option is only available if you have purchased FEP+ Web Services.
- Open Project Table button
-
Open the Project Table panel, so you can

- Import button
-
Import the selected structures from the Project Table into the workflow. The structures are checked for duplicate titles; if there are duplicates, you are offered the choice of automatic renaming or canceling the import.
- File name text box and Browse button
-
Enter the file name in this text box, or click Browse and navigate to the file. The name of the file you selected is displayed in the text box. If you open the same file as previously, the data from the file is reloaded.
- Receptor, membrane, and ligand information
-
Displays the receptor title (truncated, with full text in a tooltip), the membrane name, and the total number of ligands, with an indication of the status. A health check is run for the receptor and ligands to determine whether they are suitably prepared for FEP+ calculations, and the result is given by the status icons. The tooltip for the status icon gives a text description of the status.
If potential problems are detected in the receptor, the status is a clickable button that opens the Protein Reliability Report Panel.
For ligands, the status icon is a clickable button that opens the Custom OPLS4 Settings Dialog Box, where you can choose the desired custom force field. This choice only applies to the current FEP+ panel, so you can have multiple FEP+ panels open with different custom force fields set. You can change the custom force field by clicking this button again. When you close the panel, the custom force field settings are cleared. The initial force field settings are taken from the Force Field settings section of the Preferences Panel. If you want to use the standard OPLS4 force field, make the necessary settings in the Force Field settings section and open a new instance of the FEP+ panel.
- Calculate Binding Free Energy for buttons
-
Click the relevant button for the type of binding free energy you want to calculate. These buttons are available when you import structures.
-
Relative—calculate the relative binding free energies of a set of ligands, by alchemical transformation of one ligand into another. When you click this button, the Overview, Map, Activity Cliffs, and Analysis tabs are displayed in the Review panel.
-
Absolute—Calculate the absolute binding free energy of a set of ligands, by annihilation of the ligand from the complex. When you click this button, the Overview tab is displayed, with a dummy ligand that is used in the calculations, in addition to the imported ligands. Some of the toolbar buttons are not available, and some Export options are not available, as these are not relevant to absolute binding free energy calculations.
-
- Next button
-
Go to the review panel. The setup panel closes. Not available until the structures are imported.
- Cancel button
-
Exit out of the setup panel.
- FEP+ Best Practices link
-
Click this link to open the FEP+ Best Practices topic in your browser.
Review panel
In this panel you can review the ligand data and the perturbation map, add ligands and modify data, start an FEP job with the current map (for ligand perturbation only), and view analyses of the results of the perturbation calculations. The main part of the panel consists of a set of tabs, which are described in separate topics:
The remaining controls are described below.
- Prediction type information
-
Shows the type of affinity currently displayed in the panel. This is selected from the Affinity button menu in the Toolbar.
- Ligands/Total compounds/Total mutants information
-
This text shows the number of ligands, compounds, or mutants, depending on the type of affinity prediction. For ligands, the text shows both the total number of ligands and the number displayed. The number of selected ligands is displayed in the Status bar.
- Total Connections information
-
This text displays the total number of connections between ligands (edges), and is updated as connections are added or removed.
- Apply filter option menu and settings button
-
Filter ligands by their properties. You can choose a filter from this option menu, or choose Create new to open the FEP+ — Edit Filter Dialog Box and create a new filter. To edit or delete the current filter, click the Settings button (gear icon) and choose the appropriate item.
- Search text box
-
Search for ligands by title, property, or by SMARTS matches. The tabs are updated to show data only for the ligands that match, and the ligands information is updated. You can enter the following kinds of text in the text box:
-
a plain text string, which is used to find matches to the title or to properties in the table in the current tab.
-
a SMARTS pattern, which is used to find matches to the structure. You can click the Sketch icon in the text box to generate a pattern by sketching the structure in the Search by SMARTS dialog box. See 2D Sketcher Panel for more information on the tools in this dialog box. If the text box already contains SMARTS strings, the dialog box opens with all matches to the string displayed in the sketcher.
When you clear the search text box, the full set of ligands is displayed.
-
- Toolbar
-
The toolbar items are all present for ligand relative binding FEP; some are not available for absolute binding FEP (marked below); for protein mutation FEP, only the Settings and Export buttons are present.

The check mark default is blue. If Health Check button is orange the OPLS settings have changed since the most recent health check. Click to check ligand health. 
Change the interaction with the Maestro project and make settings for the simulation. Opens the FEP+ Settings Dialog Box 
Change the units of all binding affinity properties. Clicking the button displays a list, from which you can choose the desired units. The button icon changes to display the chosen units. 
Create new ligands by sketching them in 2D. Opens the Add Ligand from Sketcher panel, where you can sketch the ligand using the 2D sketching tools - see 2D Sketcher Panel for more information on the tools. This custom version has an option menu, Choose template ligand, which allows you to import one of the existing ligands into the sketcher to use for sketching the new ligand. The menu item tooltip shows the 2D structure of the ligand. When you have the desired structure, click Save as New to provide a title and add the ligand to the set. If the title is not unique, a dialog box prompts you to make the titles unique or cancel the save. You can then continue to sketch other ligands and save them. When you have finished adding new ligands, click Close to close the sketcher.
Not available for absolute binding free energy calculations.
Import new or replacement structures into the map. The structures are checked for duplicate titles; if there are duplicates, you are offered the choice of automatic renaming (by adding a numerical suffix) or canceling the import.
-
Import Ligands—import new ligands into the map.
- From File—import the new ligands from a file. All ligands in the file are imported. Opens a file selector, in which you can enter the file name or navigate to the file.
- From Project Table (selected entries)—Add the selected entries in the Project Table to the map. The entries should be selected before you choose this item, and they must all be ligand structures.
-
Replace Receptor—replace the receptor with a different receptor structure. This is useful for off-target analysis or investigating a different conformer of the receptor.
- From File—import the new receptor from a file. Opens a file selector, in which you can enter the file name or navigate to the file.
- From Project Table (selected entry)—Replace the receptor with the selected entry in the Project Table. The entry should be selected before you choose this item.
- From Workspace(selected entry)—Replace the receptor with the structure in the Workspace.
All calculated data relating to the old receptor is removed, on confirmation of the replacement. Clearing of experimental data is done on setting an option in the confirmation dialog box. This feature allows you to retain experimental data when replacing a receptor with a different conformation. Ligand health checks are rerun for the new receptor, and the hot atoms must be redefined.
-
Merge Map (Relative affinity only)—Merge another map into the current map, adding any ligands and edges that are not in the current map, and overwriting any data for ligands or edges that are already in the current map. If the two maps have the same topology but different data, the current map is replaced by the imported map; if they are completely different, the merged map contains both maps as independent maps. Opens a file selector, in which you can choose the map to merge in.
If both maps have FMPdb files, you are prompted to save the merged FMPdb file. Saving the file combines the data into a single file and makes trajectories and representative structures from both maps available in the merged map. Canceling means that none of the trajectory data will be available in the merged map.
-
Merge FEP Data (Absolute affinity only)—Merge data from another results (
.fmp) file into the current set of data, including the FMPdb files, if any. The procedure is the same as for relative affinity map merging, except that there are no edges.

Export structures and data to external files. The items available depend on the tabs that are present in the panel. Structures are exported to Maestro or SD files with affinity properties, plots or maps are exported as images, with a choice of formats, reports are exported as PDF files, and tables are exported to CSV files with headings or an Excel spreadsheet. The items available for export are listed below. Some of these options are not available for absolute binding free energy calculations.
- Structures (Selected or All)—export ligand structures to a Maestro or an SD file, with affinity properties.
- Representative Structures (Selected or All)—export representative structures for all or selected nodes to a Maestro file. The representative structures for each node are placed in separate groups in the Maestro file.
- Edges (Selected or All)—export all or selected edges to a
.edgefile. This file can be used to extend the simulation for these edges, by passing the file name with the-extendargument to thefep_plus Command Helpcommand. - All Numerical Data—export all tables to an Excel spreadsheet, with one sheet per table, named after the originating tabs. There is also a Statistics table, containing the statistics in the correlation plot.
- Overview Table—export the table in the Overview tab to a CSV file or an Excel spreadsheet.
- FEP (Map or Map Tables)—export the FEP map as an image in PNG format.
- Activity Cliff (Plot or Table)—export data from the Activity Cliffs tab, as a plot or a table.
- Analysis (Report or Table)—export data from the Analysis tab as a PDF report (to a directory) or a table. Values and errors are exported as separate columns in the report or table. Reports can be exported for selected edges or all edges.
- Perturbation Map—export the perturbation map to a
.fmpfile. If the map was merged and the merged.fmpdbfile was saved, exporting to the same location with the same name ensures that the archive is also opened when you reopen the map. If you add new ligands to a perturbation map, you can export the new map to overwrite the old map, and rerun the original job to add the new ligands and if needed, extend the time. - Protocol file—Write a
.ymlfile which contains all the options from the Advanced Options Dialog Box and Force Field settings. Only available for small molecule relative binding calculations. - To LiveDesign—export selected or all ligand structures and data to a LiveReport in a LiveDesign project. Opens the FEP+ to LiveDesign Export Panel, after login to LiveDesign.

Show a plot of experimental vs predicted ΔG with errors indicated on the plot, a list of statistics, and a histogram of ΔΔG errors. Opens the the Correlation Plot (FEP+) Panel, where you can also export the plot as a PDF file. The button is enabled only when both predicted and experimental ΔG columns are present in the Overview Tab.
Not available for absolute binding free energy calculations.
Change the type of affinity to display in the panel. The items the menu depends on properties available in the
fmpfile.Choose Experimental Data to add binding affinity data and optionally their errors to the ligands. The data must be available in the structure source or in a CSV file. Opens the Choose Affinity Property Dialog Box, where you can choose the source, the properties, and set the affinity units. The affinity and error are added as columns to the table in the Overview tab and the summary table in the Map tab.

Opens a pane that reports on receptor and ligand health, type of FEP calculation, presence of high hysteresis, low similarity score for edges, hot atoms, map connections, map cycle information, and presence of an FMPdb file.
Some of these items are not relevant for absolute binding FEP or solubility FEP, so are not present in the report.
Click the button again or press ESC to hide the pane. The button changes color when problems are detected or resolved in the map.
-
- Back button
-
Go to the Setup panel. The review panel closes.
- Job toolbar
-
Manage job submission and settings. See Job Toolbar for a description of this toolbar.
If you have added ligands to a map that already has predicted affinities, you can run a new job, or you can overwrite the map file for the previous job and rerun that job. If you want to extend the time for any of the edges, you must do the latter. See under Using the FEP+ Panel for more information.
If you loaded a protein mutation map, this toolbar is not present, as you can only review the map in this panel. Use the FEP Protein Mutation Panel for running protein mutation jobs.
The FEP+ tasks are run on the GPU host chosen in the the Job Settings Dialog Box. Typically, three subjobs are submitted per perturbation (for complex, solvent, vacuum). You can set Maximum simultaneous FEP subjobs to limit the number of subjobs on the GPU host at the same time.
The Settings button menu provides access to custom features:
- Advanced Options—Opens the FEP+ Settings Dialog Box.
If you have purchased FEP+ Web Services, the Submit to Web Services option is present. Select to upload the job to FEP+ Web Services for execution, and click the Submit button. The number of credits to be used and the number of available credits are reported, and the job is uploaded on confirmation of the credit usage for the job. If you have access to multiple Web Services projects, you are prompted to choose the project to associate the job with. The FEP+ Web Services Job Table Panel opens.
If you have Web Services credentials but do not see the Submit to Web Services option, see Troubleshooting.
The Job Settings button opens the FEP+ Job Settings Dialog Box, where you can make settings for running the job.
- Status bar
-
The status bar displays information about the current job settings and status for the panel. The settings includes the job name, task name and task settings (if any), number of subjobs (if any) and the host name and job incorporation setting. The job status can include messages about job start, job completion and incorporation.
Use the Reset button
 to reset the panel to its default settings and clear any data from the panel.
 The status bar also contains the Help button
 , which opens the help topic for the panel in your browser. If the panel is used by one or more tutorials, hovering over the Help button displays a
  button, which you can click to display a list of tutorials (or you can right-click the Help button instead). Choosing a tutorial opens the tutorial topic.
Tutorials
- FEP Solubility
- BACE1 Inhibitor Design Using Free Energy Perturbation
- Ligand Binding Pose Generation for FEP+
- Absolute Binding Free Energy Perturbation to Post-process Docking Results
- Drug Development with Macrocycles
- Improving the Thermostability of T4 Lysozyme Using Protein FEP+ Guided Design
- Membrane-Bound FEP+ with A2A
- Validating a Protein Free Energy Perturbation Model for Thermostability Predictions for Single Point Mutations
- Identifying impactful mutations using FEP+ residue scanning
- Potency Predictions for RNA-Binding Small Molecules Using RB-FEP
Quick Reference Sheets