FEP+ Protocol Builder Panel
Generate a set of FEP+ protocols and use machine learning to identify an optimal protocol for the system.
To open this panel: click the Tasks button and browse to FEP+ → FEP Protocol Builder
Note:
Before using FEP+ Protocol Builder, make sure to prepare the system following general FEP+ guidelines. FEP+ Protocol Builder is not meant to replace the system preparation process, but rather to find an optimal set of parameters for an appropriate system.
- Using
- Features
- Additional Resources
Using the FEP+ Protocol Builder Panel
To set up a typical FEP+ calculation, you must prepare a receptor and a set of ligand structures, and then define various parameters for running the free energy perturbation calculation. These parameters include both simulation options, such as the type of water model, and structural specifications, such as defining protonation states for select ligands. We can refer to the combination of the receptor, reference ligands, and parameters as an FEP protocol.
The development of an accurate FEP+ protocol for certain systems can take many iterations of manual adjustments and tests, which is both labor-intensive and costly. FEP+ Protocol Builder [14] allows you to automate this process.
In the FEP+ Protocol Builder panel, you can specify allowed values for common parameters of an FEP+ calculation. Protocols are randomly generated from this set of values, and machine learning is used to identify the most optimal protocols for your system. Currently, the FEP+ Protocol Builder is available for small molecule relative binding FEP+ for non-covalent and covalent interactions. For the majority of systems, running with the default panel settings is recommended.
The set of parameters that can be sampled with the FEP+ Protocol Builder is listed in the following table. The FEP+ Protocol Builder column links to where they can be set in this panel, while the FEP+ column links to where they are typically set in a typical FEP+ calculation:
The Protocol Builder workflow is shown in the graphic, with the default values from the panel, and summarized in the steps below:
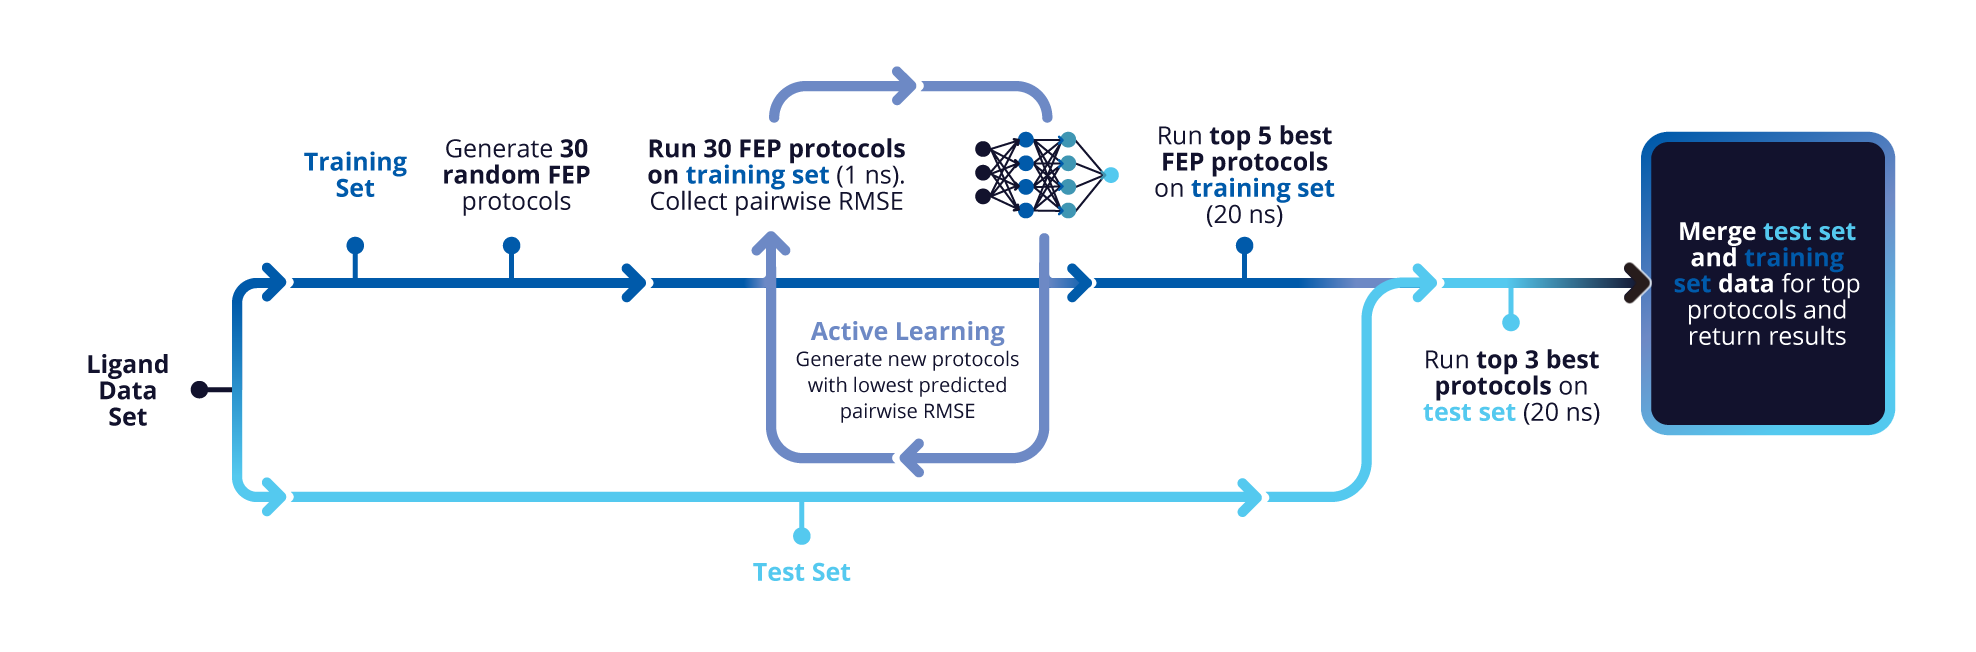
- The ligands are split into training and test sets (Train/Test sets)
- N protocols (Protocols per cycle) are randomly generated from the set of parameter values specified in the FEP+ Parameters tab and the Structural Options tab.
- An FEP+ calculation is run with a shortened production runtime (Simulation times - initial) using each generated protocol on the training set
- The pairwise RMSE values of the protocols are used to train a machine learning (ML) model. The model is then applied to score a maximum of 10,000 randomly generated protocols.
- The top N protocols (Protocols per cycle) are selected based on the ML model scores, which correspond to the pairwise RMSE.
- Steps 2-4 are repeated to sample new protocols and improve the machine learning model in an active learning cycle. The number of times the cycle is repeated is defined using the Learning cycles text box.
- The top protocols that emerge from the learning cycles are run with extended production runtime to ensure good convergence. The number of top models to extend can be set with the Max # top protocols for extended simulation text box. The length of the extended simulation time can be set with the Simulation times - Extended/Test text box.
- The top M protocols from step 7 are then run on the test set (Max # top protocols for test phase).
- The FEP maps generated from running these M top protocols on the test set are merged with the maps generated from running those protocols on the training set, and the final RMSE from the merged maps is reported.
To review the results and obtain the parameters of the optimal protocol, you can use the FEP+ Protocol Builder Results Viewer Panel (click the Tasks button and browse to FEP+ → FEP Protocol Builder Results Viewer).
If an FEP+ Protocol Builder job is interrupted and stops for any reason, you can resubmit the same job by navigating to the job directory and relaunching the job from the command line. The job automatically continues where it left off.
To write out the input file and a script for running the job from the command line, click the arrow next to the Settings button  and choose Write.
FEP+ Protocol Builder Panel Features
- Use structures from option menu
- Specify experimental affinity option
- FEP+ Parameters tab
- Use structures from option menu
-
Import the receptor and ligands, or a ligand-receptor complex. The receptor and ligands must be imported together; you cannot do multiple imports to add a receptor or ligands. The menu has the following items:
- File and Browse button—Import the receptor and the ligands from a Maestro Pose Viewer file. Click Browse and navigate to the file you want to use.
- Project Table (n selected entries) and Load button—Import the entries that are currently selected in the Project Table. The number of entries selected is shown on the menu item. Click Load to import the entries in the panel.
- Specify experimental affinity option
-
Add binding affinity data to the ligands. The data must be available in the structure source. Click Define to open a pane, where you can choose the property, and set the affinity units. You can also set the assay range by defining values for the Top of assay and Bottom of assay. For a given ligand, if both its predicted and experimental binding affinity fall above the Top of assay, or both fall below Bottom of assay, the prediction is considered to be qualitatively correct and have no error. This treatment allows the generation of ML models which can more accurately predict weak or inactive binders.
Once you have made the selection, the property and its units are displayed in the panel.
- FEP+ Parameters tab
-
Specify allowed values for parameters related to the FEP+ simulation.
- Map Settings section
-
- Map topology option menu
-
Choose the type of map topology allowed when generating a map.
- Optimal—Create a map in which the connections are determined for optimal performance of the FEP+ calculations (high similarity of the connected ligands).
- Double Star (Recommended)—Create a map in which 2 reference ligands are connected to every other ligand, and the other ligands are not connected to each other. This is known as the "double star" topology. The reference ligands are chosen from the set defined from the Reference ligand set option menu.
- Optimal or Double Star—Protocols generated can have either Optimal or Double Star topology.
- Custom cores option menu
-
Specify whether to define a custom core. Custom cores are useful for ligands with asymmetric substituted rings. See Using a Custom Core in the FEP+ Panel for more information.
-
On—Define a custom core using the Define link. This can be useful so that more atoms are included in the "hot" region that is sampled with reduced potentials. Once the custom core is defined for each ligand, the set of core atoms used for an edge is determined by mapping the atoms in one custom core to the atoms in the other custom core. If only one ligand has a custom core defined, the atoms in that custom core are mapped onto the set of all atoms in the other ligand. A given SMARTS pattern must match only once in each ligand. If there are multiple matches of a single SMARTS pattern, the pattern is ignored.
-
Off—Generated protocols do not use custom cores.
-
On or Off—Generated protocols may either have custom cores defined, or not. Define a custom core using the Define link.
-
- Reference ligand set option menu
-
Specify the set of ligands from which the reference ligands can be randomly selected. Two reference ligands are selected for all protocols.
- All—Reference ligands can be selected from all available ligands.
- Specified—Reference ligands can be selected from a user-defined subset of ligands. Click Define to select the subset of ligands. A pane opens, where you can either choose to specify ligands that should be included in the subset (Allowed ligands), or ligands to exclude from being selected as possible reference ligands (Excluded ligands). Select the desired entries from the Project Table or Workspace, then click Add Selected Entries to add them to the table.
- Use Epik to calculate populations and adjust predicted affinities - with pH option and text box
-
Use Epik to calculate the populations of protomers in solution at the pH specified in the text box.
- Calculation Parameters section
-
- Equilibration Times text boxes
-
Sampling multiple equilibration times allows you to find the optimal time for making sure the system is well-equilibrated. Specify allowed simulation times for unrestrained equilibration before the FEP+ simulations, in nanoseconds. Use the plus icon to add more values, or use the delete icon to remove them.
- Force field option menu
-
Choose the force field for generated protocols to be allowed to use.
- Use customized version option
-
Use your customized version of the OPLS4 or OPLS5 force field, rather than the standard version in the distribution.
If the customized version is missing or invalid, the text of this option turns orange and an orange warning icon is displayed to the right, with a tooltip about the problem.
- Parameter set button
-
Select the set of custom parameters for the OPLS4 or OPLS5 force field. Opens the Set Custom Parameters Location Dialog Box.
- Water models option menu
-
Specify the water models generated protocols can use. The available water model options are SPC, TIP3P, TIP4P, TIP4PD, TIP4PEW, and TIP5P.
- GCMC water sampling option menu
-
Specify whether to use grand canonical Monte Carlo (GCMC) to accelerate the sampling of water molecules. See Grand Canonical Monte Carlo Addition of Water for more information.
- On—Generated protocols use GCMC sampling of water molecules. The MD simulations are run in the μVT ensemble, which has a variable number of water molecules with a fixed chemical potential (μ) and a fixed number of solute atoms (N).
- Off—Generated protocols do not use GCMC. The MD simulations are run in the NPT ensemble.
- On or Off—Generated protocols can either have GCMC water sampling turned on or off.
- Lambda windows option menu
-
Specify the allowed sets of the number of lambda windows for different perturbation types that generated protocols can contain. The set of numbers listed in the option menu correspond to (R-Group, Core-hopping, Charge).
- R-Group (R) —Number of lambda windows for standard side-chain perturbations
- Core-hopping (Co)—Number of lambda windows for perturbations of the ligand core
- Charge (Ch)—Number of lambda windows for perturbations that change the charge on the ligand
- Structural Options tab
-
In this tab, you can choose allowed values for parameters that modify how the system is treated in the simulation.
- Ligand hot atoms option menus
-
Selected allowed hot region definitions for the FEP/REST enhanced sampling method, which generated protocols can use. Use the Solvent leg and Complex leg option menus to specify the hot region for the ligand in the solvent and complex respectively.
- Solvent leg option menu
-
Choose the hot region for the ligand in the solvent. The default for the hot region is described in FEP+ Hot Atoms Dialog Box.
-
Default—use the default ligand atoms for the hot region in the solvent.
-
All—use all ligand atoms for the hot region in the solvent. If Default is selected in the Complex leg option menu, this option provides more conformational sampling of the entire ligand when it is in the solvent. If All is selected in the Complex leg option menu, this option provides conformational sampling of the entire ligand rather than just in the vicinity of the perturbation.
-
None—Do not use any ligand atoms for the hot region in the solvent.
-
- Complex leg option menu
-
Choose the hot region for the ligand in the complex. The default for the hot region is described in FEP+ Hot Atoms Dialog Box.
-
Default—use the default ligand atoms for the hot region in the complex.
-
All—use all ligand atoms for the hot region in the complex.
-
None—Do not use any ligand atoms for the hot region in the solvent.
-
- Enhanced dihedral sampling option menu
-
Specify whether to use enhanced sampling of dihedrals in the ligands.
- On—Generated protocols enhance the sampling of dihedrals by lowering the rotation barrier.
- Off—Generated protocols do not enhance the sampling of dihedrals.
- On or Off—Generated protocols can either have the enhanced sampling of dihedrals turned on or off.
- Receptor restraint option menu
-
Select the possible ways that the receptor can be restrained during the simulation. The generated protocols can use one of the selected options.
- Unrestrained—The protein is unrestrained.
- C-alpha—The alpha carbon of each residue is restrained in the protein.
- Backbone—The protein backbone is restrained.
- Load Binding Site Residues link
-
Click the link to automatically add and select relevant binding site residues to the options in the Residue selection section. Residues within 5 angstroms of the ligand are selected. We recommend using this feature to select residues.
- Residue selection section
-
- Receptor hot atom residues selection options
-
Select the protein residues to include in FEP/REST enhanced sampling. If residues are selected, the (16, 20, 28) lambda scheme is required and automatically included. Click the Select link to open a pane where residue selection can be made. Include a residue in the Workspace, and then click Add Workspace Selection to add it to the table. Use the Load Binding Site Residues link to automatically select all binding site residues.
- Charged residue states selection options
-
Select the allowed tautomer and protonation states for histidine, asparagine, glutamine, lysine, cysteine, and arginine residues. Click the Select link to open a pane where residue selection can be made. Include a relevant residue in the Workspace, and then click Add Workspace Selection to add it to the table. For each residue, use the Select states section on the right to choose the allowed states that the residue can take.
The allowed residues and protonation values that can be added are:
HIS, HID, HIE, HIP: ['HID', 'HIE', 'HIP'] GLU, GLH, ASP, ASH: ['Charged', 'Neutral 1', 'Neutral 2']
LYS, LYN: ['LYS', 'LYN'] ARG, ARN: ['ARG', 'ARN'] CYS, CYM: ['CYS', 'CYM'] - Flipped HIS/ASN/GLN states selection options
-
Select the allowed orientation for histidine, asparagine, and glutamine. Include a residue in the Workspace, and then click Add Workspace Selection to add it to the table and allow the simulation to sample both the default orientation and the flipped version. Use the Load Binding Site Residues link to automatically select all histidine, asparagine, and glutamine residues in the binding site.
- Reset button
-
Clear all residues selected in this section.
In this tab, you can specify parameters in relation to the Protocol Builder workflow itself. See the workflow graphic and steps in the Using section for more information. In general, we recommend using the default parameters.
- General Settings section
-
- Learning cycles text box
-
The number of active learning cycles run to iteratively improve the machine learning model for predicting protocol performance. The default is 3. See step 6 of the Protocol Builder workflow.
- Train/Test sets assignment options
-
By default, the ligand set is randomly split evenly into Training and Test tests (50%-50%). Click Change to open the Change Train/Test Assignments dialog box, where you can manually assign ligands to be in the Training or Test set. You can select the Use submaps option to add a Submap column to the table. Click the Generate Submaps link at the bottom left to generate submaps, then right-click on a row to assign a Submap ID to the ligand. A submap needs to have at least 2 ligands from the Training set and 2 ligands from the Test set.
Use the reset button to split the set into the initial distribution. Click the Assign Ligands 50-50% link to evenly split the ligand set for each submap.
The Training/Test set distribution and the number of submaps are displayed in the panel.
- Protocols per cycle text box
-
The number of protocols selected to undergo a shortened simulation and used in training the ML model. See steps 2 and 5 of the Protocol Builder workflow. The default is 30 protocols.
- Simulation times text boxes
-
Set the simulation times for the FEP+ jobs in ns.
- Initial—The simulation time for the shortened production runs which are used to train the ML model.
- Extended/Test—The simulation time for the extended production runs of the training set on the final top protocols, and on simulations with the test set. The number of protocols run with the training set which undergo extended simulation is specified in the Max # top protocols for extended simulation text box. The number of protocols run with the test set is specified in the Max # top protocols for test phase text box.
-
Note:
If the number of iterations multiplied by the number of protocols per iteration is less than or equal to the number of protocols that the variable space can generate, the active learning will be skipped, but will score all possible protocols before filtering, extending the simulations time, filtering, testing and then finally merging the results.
-
- Extended Simulation & Test Parameters section
-
- Minimum RMSE for extended simulation text box
-
Specify the minimum pairwise RMSE needed for a protocol to be considered for extended simulation, in kcal/mol. See step 7 of the Protocol Builder workflow. The default is 2.00.
- Max # top protocols for extended simulation text box
-
The maximum number of protocols selected for extended simulation on the training set. See step 7 of the Protocol Builder workflow. The default is 5.
- Favor faster protocols when ranking option
-
Select to rank protocols below a RMSE threshold by complexity, with the simpler (faster) protocols on top. These protocols are then favored for extended simulation. By default, protocols with an RMSE below 1.50 are ranked. Click on the vertical dots to change the RMSE threshold.
- Max # top protocols for test phase text box
-
The maximum number of protocols selected for simulation on the test set. See step 8 of the Protocol Builder workflow. The default is 3.
Manage job submission and settings. See Job Toolbar for a description of this toolbar.
The Job Settings button opens the FEP+ Protocol Builder - Job Settings Dialog Box, where you can make settings for running the job.
If you have purchased FEP+ Web Services, the Submit to Web Services option is present. Select to upload the job to FEP+ Web Services for execution, and click the Submit button. The number of credits to be used and the number of available credits are reported, and the job is uploaded on confirmation of the credit usage for the job. If you have access to multiple Web Services projects, you are prompted to choose the project to associate the job with. The FEP+ Web Services Job Table Panel opens.
If you have Web Services credentials but do not see the Submit to Web Services option, see Troubleshooting.
If the panel has a Job toolbar, you can reset the panel from the Settings button menu.
If you can submit a job from the panel, the status bar displays information about the current job settings and status for the panel. The settings include the job name, task name and task settings (if any), number of subjobs (if any) and the host name and job incorporation setting. The job status can include messages about job start, job completion and incorporation.
The status bar also contains the Help button  , which opens an option menu with choices to open the help topic for the panel (Documentation), launch Maestro Assistant, or if available, choose from an option menu of Tutorials. If the panel is used by one or more tutorials, hover over the Tutorials option to display a list of tutorials. Choosing a tutorial opens the tutorial topic.