Main Window Shortcut Menus
- Selection Shortcut Menu
- Workspace Shortcut Menu
- Bond Shortcut Menu
- Surface Shortcut Menu
- Measurement Shortcut Menu
- Ring Centroid Shortcut Menu
- Highlight Text Shortcut Menu
- Sequence Viewer Shortcut Menu
- Sequence Viewer Selection Shortcut Menu
- Sequence Viewer Gap Menu
- Workspace Sequence Viewer Menu
- Related Topics
Several of the main window components have shortcut menus, which you open by right-clicking and holding over the component. The shortcut menus for the status bar and the command input area only have two items, Hide, which hides the component, and Help, which displays the relevant help topic.
The Workspace has three shortcut menus: one for the Workspace itself (the Workspace shortcut menu), one for the atoms in the current selection (the selection shortcut menu), and one for bonds (the bond shortcut menu). The selection shortcut menu is also available from the sequence viewer, but has a more limited selection of items, and has a few additional items. The items on these menus are described below. Where relevant, conditions on when the item is displayed are included.
When you right-click and hold in the Workspace:
- On an unselected atom, the atom becomes the selection and the selection shortcut menu is displayed.
- On a selected atom, the selection shortcut menu is displayed.
- On an unselected bond, the two atoms in the bond are selected and the bond shortcut menu is displayed.
- On a selected bond, the bond shortcut menu is displayed.
- On empty space, the Workspace shortcut menu is displayed.
The sequence viewer shortcut menu can be uses to perform various actions on the sequences or the display. If you do not have any residues selected in the sequence viewer, the sequence viewer shortcut menu is displayed. If you have residues selected, the selection shortcut menu is displayed.
The Structure Hierarchy (Hierarchy) has its own shortcut menus—see Shortcut menus.
Note: These shortcut menus are not available if you have the Toggle Table open.
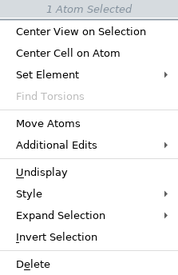
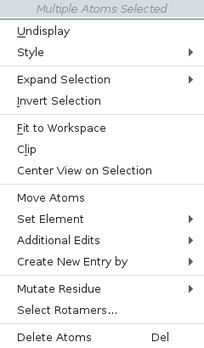
Selection Shortcut Menu
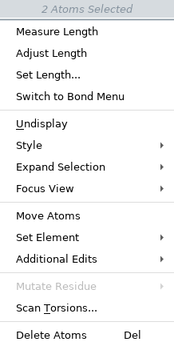
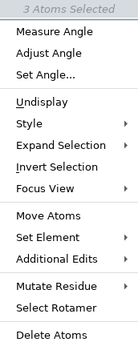
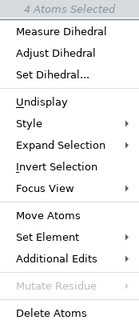
The items on the selection shortcut menu depend on the atoms you have selected. The complete list is given below.
| Menu Item | Action |
|---|---|
|
Measure item |
Measure the defined length, angle, or dihedral. The item depends on the number of atoms selected. |
|
Adjust item |
Adjust the defined length, angle, or dihedral. The item depends on the number of atoms selected. Displays the relevant Adjust banner. |
|
Set item |
Set the defined length, angle, or dihedral, and create an associated measurement, or update it. The item depends on the number of atoms selected. Displays a small pane that displays the current value and allows you to set it to a value. ESC cancels the setting and removes the measurement if it did not already exist. Clicking the check mark or pressing Enter applies the setting. |
|
Add Bond |
Add a bond between the two selected atoms. Only shown for two atoms that are not bonded to each other. |
|
Switch to Bond Menu |
Switch to the Bond shortcut menu. Only shown for two atoms that are bonded to each other. |
|
Undisplay |
Undisplay the selected atoms. |
|
Style |
Open a Style toolbox to set the style for the selected atoms. |
|
Expand Selection |
Expand the selection to include other atoms. Opens a submenu that includes:
|
|
Invert Selection |
Select the unselected atoms and deselect the selected atoms. |
|
Fit to Workspace |
Fit the selection to the Workspace and reset the center of rotation. Not available for single-atom selections. |
|
Clip |
Clip the display to the selected atoms (moves the Adjusting the Clipping). Not available for single-atom selections. |
|
Center View on Selection |
Center the view on the selected atoms. This item is on the Focus View submenu when the selection has 2-4 atoms. |
|
Focus View |
Submenu for view-related items when 2-4 atoms are selected. Contains the Fit to Workspace, Clip, and Center View on Selection items. |
|
Center Cell on Atom |
Center the cell for a periodic system on the selected atom. This item is on the 1 Atom Selected submenu only for the Materials profile. |
|
Move Atoms |
Move the selected atoms. Displays the Move Atoms banner. |
|
Set Element |
Change the selected atoms to atoms of the element chosen from the submenu. The submenu contains a palette of common elements, and a "..." button for selecting other elements from a periodic table. |
|
Additional Edits |
Perform other editing actions:
|
|
Create New Entry by |
Create a new project entry from the selection, with two options on the submenu:
Opens a banner, in which you can provide a title for the entry or delete the entry. Only available when more than 4 atoms are selected. |
|
Mutate Residue |
Change the protein residues contained in the selection to the type chosen from the submenu. Only available if the selection contains protein atoms. |
|
Select Rotamers |
Open the Rotamers Dialog Box to select one of the standard rotamers for the selected residues. Available when residues are selected. For a single residue, displays the Select Rotamer banner. |
|
Scan Torsions |
Scan the selected bond for torsions in a non-protein molecule. The scan is performed, and the Rapid Torsion Scan Panel opens with the results. Only available when 2 atoms are selected. |
|
Delete Atoms |
Delete the selected atoms. |
|
Paste Fragment |
Replace the current atom with the fragment copied to the clipboard. Only available when one atom is selected and a fragment has been copied to the clipboard (Edit → Copy). |
|
Add Fragment Again |
Replace the current atom with the last-used fragment from the 3D Builder. Only available when one atom is selected and a fragment has been previously added in the current session and it can be added to the current atom. |
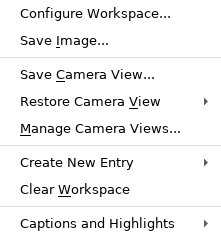
Workspace Shortcut Menu
The items on the menu depend on whether the Workspace is tiled or not. Right-click in an empty area of the Workspace to open this shortcut menu. This menu is also displayed if you right-click on an atom in a locked entry (which cannot be selected and therefore does not show the Selection shortcut menu). Items on this menu can also be found on the Workspace and View main menus.
| Menu Item | Action |
|---|---|
|
Apply This Zoom to All Tiles |
Apply the zoom value from the current tile to all tiles. Only available in tile mode when clicking in a tile. |
|
Apply This View to All Tiles |
Apply the view (rotation, translation, zoom) from the current tile to all tiles. Only available in tile mode when clicking in a tile. |
|
Reset This Tile |
Reset the view of the current tile to its initial value. Only available in tile mode when clicking in a tile. |
|
Change Tile Locations |
Rearrange the tiles, by dragging them to new positions. Only available in tile mode. |
|
Specify Columns |
Specify the number of tiles per column. Opens a menu from which you can choose a number or Auto. Sets the number of rows to Auto so the tiling can expand horizontally. Only available in tile mode. |
|
Specify Rows |
Specify the number of tiles per row. Opens a menu from which you can choose a number or Auto. Sets the number of columns to Auto so the tiling can expand horizontally. Only available in tile mode. |
|
Configure Workspace |
Open the Workspace Configuration toolbox. |
|
Save Image |
Open the Save Image panel to save an image of the Workspace in TIFF, JPEG, or PNG format. |
|
Save Camera View |
Save the current view of the Workspace (orientation, location, and zoom). |
|
Restore Camera View |
Restore the last saved view of the Workspace (orientation, location, and zoom). |
|
Manage Camera Views |
Open the Manage Views Panel to work with the saved Workspace views. |
|
Create New Entry |
Create an empty entry, or duplicate the entries that are in the Workspace. |
|
Clear Workspace |
Remove all entries and objects from the Workspace. |
|
Captions and Highlights |
Add or delete captions, manage highlights. |
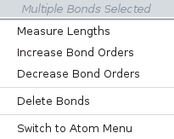
Bond Shortcut Menu
The items on the selected bonds shortcut menu depend on how many bonds are selected. Right-click on a bond to open this shortcut menu.

| Menu Item | Action |
|---|---|
|
Rotate Dihedral |
Rotate around the selected bond. Available if the action can be performed. Only available for a single bond. |
|
Scan Torsions |
Scan the selected bond for torsions in a non-protein molecule. The scan is performed, and the Rapid Torsion Scan Panel opens with the results. Only available when 1 bond is selected. |
|
Measure Length |
Measure the bond length and display it. The measurement is added to the list in the Measurements panel. |
|
Adjust Length |
Adjust the bond length of this bond. Only available for a single bond. |
|
Set Length |
Set the bond length of this bond, and create a measurement for it. Only available for a single bond. |
|
Increase Bond Order |
Increase the bond order by one. |
|
Decrease Bond Order |
Decrease the bond order by one. |
|
Delete Bond |
Delete all bonds between the atoms in the selection. |
|
Center View on Selection |
Center the view on the selected atoms (the bond). Only available for one bond. |
|
Add Fragment Again |
Add the last-used fragment from the 3D Builder to the current bond. Only available when a bond is selected and a fragment has been previously added in the current session and it can be added to the current bond. |
|
Switch to Atom Menu |
Switch to the selection menu for two atoms. |
Surface Shortcut Menu
Right-click on a surface to open this shortcut menu. The pointer icon changes to a surface-like patch when it is over a surface and not over an atom, indicating that you can select the surface.
| Menu Item | Action |
|---|---|
| Display Options | Set options for the display of the surface. Opens the Surface Display Options Dialog Box. |
| Hide | Hide the surface. You can display it again from the S button in the Entry List (or Project Table), or from the Surface Manager Panel. |
| Delete | Delete the surface. |
| Manage Surfaces | Open the Surface Manager Panel to perform a range of surface-related tasks. |
Measurement Shortcut Menu
Right-click on a measurement value to open this shortcut menu. The pointer icon indicates when it is over a measurement. See Making Measurements in the Workspace for more information. Ring measurements only have the Move Measures, Reset Position, and Delete items.
| Menu Item | Action |
|---|---|
| Move Measures | Move measurement labels. Enters a mode in which you can drag measurement labels to a new position. A banner is displayed in which you can cancel or keep the changes and exit the mode. |
| Adjust measure | Adjust the parameter measured (Distance, Angle, Dihedral) by dragging in the Workspace. This is the same as Adjust mode, where the positions of the atoms are changed. |
| Set measure | Set the value of the parameter measured in a text box. The positions of the atoms are changed by this action. |
| Calculate Property | Create an entry property for the selected entries that contains the measurement value for these entries. |
| Reset Position | Reset the position of the measurement label to the default position. |
| Delete | Delete the measurement. |
Ring Centroid Shortcut Menu
Right-click on a ring centroid to open this shortcut menu. Ring centroids are only present when you have measured a ring angle or a ring distance.
| Menu Item | Action |
|---|---|
| Measure Ring Distances | Measure the distance from the ring centroid to another ring. Opens the Measure banner in the appropriate mode, enabling you to pick the second ring or an atom. |
| Measure Ring Angles | Measure the angle between the ring whose centroid you clicked on and another ring. Opens the Measure banner in the appropriate mode, enabling you to pick the second ring. |
| Delete | Delete the centroid and any associated measurements. |
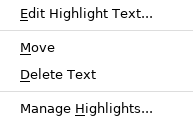
Highlight Text Shortcut Menu
| Menu Item | Action |
|---|---|
| Edit Highlight Text | Edit the text for the highlight. Opens the Edit Highlight Text dialog box. You can also double-click on the text to edit it. |
| Move | Allows you to drag the text to the desired location. |
| Delete Text | Delete the highlight text. |
| Manage Highlights | Opens the Manage Highlights Panel, with the highlight selected in the list. |
Sequence Viewer Shortcut Menu
| Menu Item | Action |
|---|---|
|
Hide |
Hide the sequence viewer. To redisplay it, use the View menu. |
|
Color Scheme |
Color the sequence with the scheme selected from the submenu. The choices are: None, Color by Chain, Alpha Carbon, Residue Charge, Residue Position, Residue Type, Residue Property, Secondary Structure, Template ID, and Color Breaks. |
|
Font Size |
Set the font size for the sequence viewer. Choose Small, Medium, Large, or Huge from the submenu. The selection for this option is saved across sessions for both the Workspace Sequence Viewer and the Multiple Sequence Viewer. |
|
View SSA |
Show or hide the secondary structure assignment for the sequence. |
|
Show Displayed Residues Only |
Show only the residues that are displayed in the Workspace. |
|
Align by Residue Number |
Align the sequences in the sequence viewer by residue number. (Does not affect the alignment of the structures.) This command enables gaps to be displayed in the sequence viewer. |
|
Exclude Entry |
Exclude the entry containing this chain from the Workspace. The chain is removed from the sequence viewer. If the entry contains multiple chains, all the chains in the entry are removed from the sequence viewer. |
|
Wrap Sequences |
Wrap the sequence display so that long sequences are displayed across multiple lines with vertical scrolling rather than on a single line with horizontal scrolling. The selection for this option is saved across sessions for both the Workspace Sequence Viewer and the Multiple Sequence Viewer. |
|
Legend |
Open the Sequence Viewer Legend dialog box, which explains the sequence color schemes. |
|
Save Image |
Open the Save Sequence Viewer Image file selector, in which you can select an image format and save an image of the sequence viewer to a file. |
|
Export Sequences |
Export the sequences in the Sequence Viewer to a FASTA file. Opens a file selector to specify the location and the file name. |
|
Help |
Display the Sequence Viewer help topic. |
Sequence Viewer Selection Shortcut Menu
| Menu Item | Action |
|---|---|
|
Invert Selection |
Select the unselected atoms and deselect the selected atoms. |
|
Representation |
Set the molecular representation to wire frame, ball and stick, CPK, tube, or thin tube. |
|
Color Scheme |
Apply the color scheme from the submenu to the selected atoms. If this menu is opened from the sequence viewer, there is an extra color scheme, Proximity. If you choose this item, the residues within a given distance of the selected residues are colored orange, and the selected residues are colored red. All others are colored gray. The distance is specified in the Sequence viewer settings section of the Preferences Panel. |
|
Display |
Submenu for displaying extra atoms. Display the entire molecule or residue containing the selected atoms. This action is useful if part of the molecule or residue was previously undisplayed. Display residues with atoms within a chosen distance of the selected atoms. |
|
Undisplay |
Undisplay the selected atoms. |
|
Delete |
Delete the selected atoms. |
|
Insert Gap |
Insert a gap in the sequence to the left of the first selected residue. Opens a dialog box in which you can specify the size if the gap, in residues. |
|
Mutate Residue |
Change the residues that contain the selected atoms (or the selected residues) to the type chosen from the submenu. |
|
Rotamers |
Open the Rotamers Dialog Box to select one of the standard rotamers for the selected residues. |
|
Exclude Entries |
Exclude the entries that contain the selected atoms from the Workspace. |
|
Select Project Entries |
Select the entries that contain the selected atoms in the Project Table. The submenu allows you to choose whether to add the entries to the current Project Table selection, or to replace the selection. The Project Table and Entry List scroll to the last of these entries. |
|
Fit to Workspace |
Fit the displayed structure to the Workspace and reset the center of rotation. |
|
Help |
Open this help topic. |
Sequence Viewer Residue Menu
| Menu Item | Action |
|---|---|
|
Expand Selection |
Opens a submenu with options to expand the selection: Between Gaps, Align Columns, From Reference Sequence, and To Full Chain. |
|
Invert Selection |
Select the unselected residues and deselect the previously selected residues. |
|
Search for Matches |
Selects all matching residues in the Workspace. |
|
Display |
Display the entire molecule or residue containing the selected atoms. This action is useful if part of the molecule or residue was previously undisplayed. |
|
Display Only |
Displays only the currently selected atoms. |
|
Undisplay |
Undisplay the selected atoms. |
| Opens a submenu with color options for a highlight to be applied to the selected atoms or residues. | |
|
Remove Highlights |
Removes the color highlights applied to the selected atoms or residues. |
|
Mutate Residue |
Change the residues that contain the selected atoms (or the selected residues) to the type chosen from the submenu. |
|
Opens the standard increments, template-based, antibody CDRs. |
|
|
Delete |
Delete the selected atoms. |
|
Delete Gaps Only |
Delete only the gaps from the selected sequence. |
|
Insert Gaps |
Insert a gap in the sequence to the left of the first selected residue. Opens a submenu in which you can specify the size of the gap, in residues. |
|
Copy as Text |
Copy the selected residues. These can be pasted wherever needed, e.g. when editing a sequence. |
|
Fit to Selection |
Zoom the Maestro Workspace to fit the selected residues in view. |
Sequence Viewer Gap Menu
| Menu Item | Action |
|---|---|
|
Expand Selection |
Opens a submenu with options to expand the selection: Along Gaps, Along Columns, From Reference Sequence, and To Full Chain. |
|
Deselect All Gaps |
Undisplay the selected gaps. |
|
Invert Selection |
Select the unselected residues and deselect the previously selected residues. |
|
Delete |
Deletes the selected gap. |
|
Delete Gaps Only |
Deletes all of the currently selected gaps. |
|
Insert Gaps |
Insert a gap in the sequence to the left of the first selected gap. Opens a submenu in which you can specify the size of the gap, in residues. |
Workspace Sequence Viewer Menu
| Menu Item | Action |
|---|---|
|
Show Annotations |
On by default, select to toggle the visibility of annotations. |
|
Show Colors |
On by default, select to toggle the visibility of color-coding blocks on residues. |
|
Set Colors |
Opens the Color Sequences Pane, with identical functionality to the reference, consensus, sequence coloring, color by, color carbons, transfer color, apply coloring. |
|
Choose Annotations |
Opens a submenu with a list of annotations to toggle, including additional submenus with options to select from Residue Propensity types and various Antibody Numbering Schemes. |
| Configure View |
Opens a submenu with options to toggle Wrap Sequences and Split Chains. Selections for these options are saved across sessions for both the Workspace Sequence Viewer and the Multiple Sequence Viewer. |
|
Font Size |
Select a font size for text for sequences and annotations, with options of font sizes ranging from 8 to 16. |
|
Collapse |
Opens a submenu with options to collapse annotations for either Selected, Unselected, or All sequences. |
|
Expand |
Opens a submenu with options to expand annotations for either Selected, Unselected, or All sequences. |
|
Clear All Annotations |
Select to remove all applied annotations in the Workspace Sequence Viewer. |
|
Quick Align All |
Opens a submenu with options to align selected sequences (via By Residue Number) to the reference sequence, or to Delete All Gaps in the selected sequences. |
|
Use Multiple Sequence Viewer |
Opens the Multiple Sequence Viewer/Editor Panel. |
|
Show Hidden Sequences |
Reveals all hidden sequences. |
|
Export Sequences |
Export the sequences in the Sequence Viewer to a FASTA (.fasta), CLUSTAL (.aln), Comma Separated Values (.csv), or Sequence + Data (.seqd) file. |
|
Save Image |
Opens the Save Sequence Image file selector, in which you can select an image format and save an image of the sequence viewer to a file. |
|
Help... |
Dispay the Sequence Viewer help topic. |
- Additional Resources