Coarse-Grained Mapping Panel
Map atoms to coarse-grained particles given an all-atom system.
To display this panel: click the Tasks button and browse to Materials → Classical Mechanics → Coarse Grain Models → Coarse-Grained Mapping
The following licenses are required to use this panel: MS Maestro, MS CG
- Using
- Features
- Additional Resources
Using the Coarse-Grained Mapping Panel
The Coarse-Grained Mapping Panel maps atoms to coarse-grained particles given one or more all-atom systems. The mapping can be fully manual, fully automated (using dissipative particle dynamics (DPD) or Martini modeling), or a mixture of manually and automatically defined particles depending on the options specified.
Particles are defined in terms of SMARTS patterns, and can consist of molecule fragments, a single molecule, or multiple molecules.
The Coarse-Grained Force Field Builder Panel maps atoms to coarse-grained particles and builds coarse-grained force fields on a single system at a time interactively in the Workspace. The Coarse-Grained Mapping Panel described here allows the mapping of multiple systems at once and submits them to a job, but does not build force fields.
The output coarse-grained structure can then be used in the Coarse-Grained Force Field Builder Panel to build a force field or the Coarse-Grained Force Field Assignment Panel to set up a system for simulation with the MD Multistage Workflow Panel.
Coarse-Grained Mapping Panel Features
- Use structures from option menu
- Open Project Table button
- File name text box and Browse button
- Mapper Settings tab
- Use automated CG mapping option
- Coarse-graining type option
- Target particle size N atoms text box
- SMARTS tools
- Pre-defined SMARTS tools
- Add SMARTS Group button
- Import SMARTS from file button
- Allow unique bonds option
- Remove existing SMARTS group information from structures before searching option
- Allow atoms to belong to multiple SMARTS groups option
- Use particle names from FF option and menu
- Treat small ions implicitly option
- Allow particles to belong to multiple repeating units option
- Add antifreeze water molecules option
- Stabilize ring conformations option
- Add protein restraints option
- Mapped Structures tab
- Job toolbar
- Status bar
- Use structures from option menu
-
Choose the structure source for mapping.
- Project Table (n selected entries)—Use the entries that are currently selected in the Project Table or Entry List. The number of entries selected is shown on the menu item.
- Workspace (n included entries)—Use the entries that are currently included in the Workspace, treated as separate structures. The number of entries in the Workspace is shown on the menu item.
- File—Use the specified file. When this option is selected, the File name text box and Browse button are displayed.
- Project Table (n selected entries)—Use the entries that are currently selected in the Project Table or Entry List. The number of entries selected is shown on the menu item.
- Open Project Table button
-
Open the Project Table panel, so you can

- File name text box and Browse button
-
Enter the file name in this text box, or click Browse and navigate to the file. The name of the file you selected is displayed in the text box.
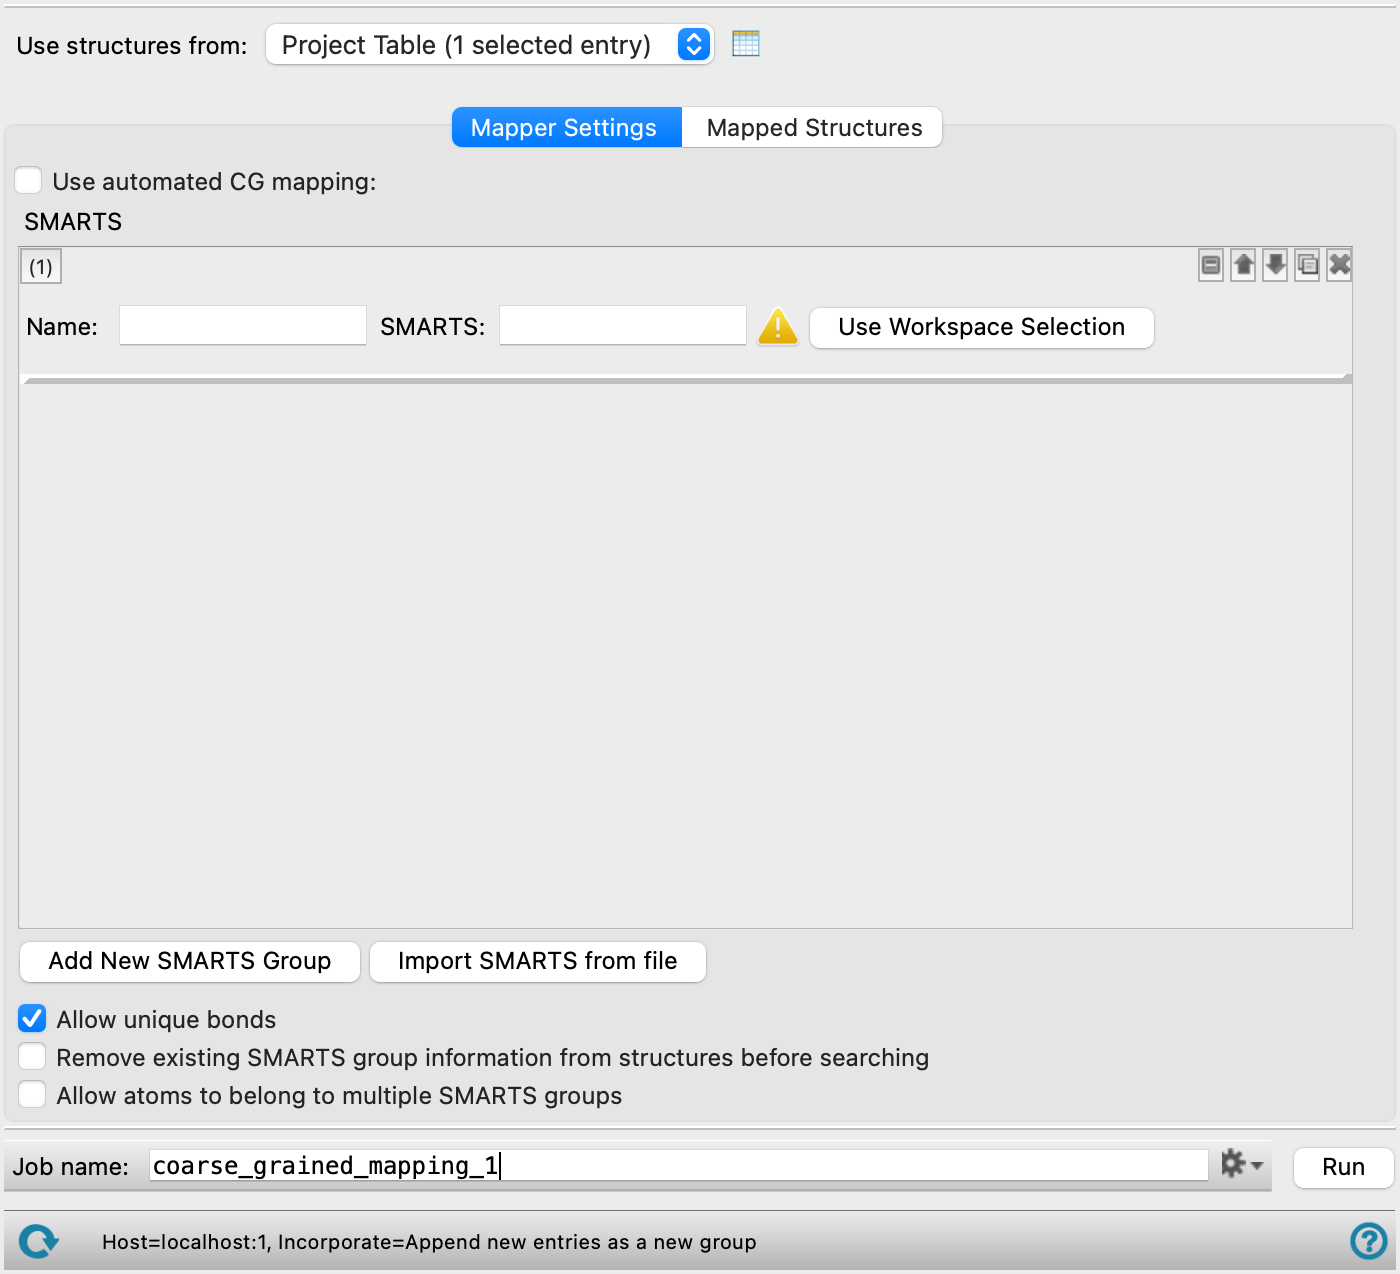
- Mapper Settings tab
-
Map atoms to particles, using SMARTS patterns. This can be done manually or by using automated coarse-grained mapping. Particles can be composed of a group of atoms within a molecule, or they can be composed of multiple entire molecules, e. g. a cluster of water molecules.
The calculation maps atoms to particles and constructs a coarse-grained system from the all-atom system.
When the Use automated CG mapping option is not selected, each particle must be defined by SMARTS patterns. Each manually specified particle is defined with a set of common tools; you can add a new set of tools for each particle you want to define. These tools are described below. In general, it is suggested to use automated CG mapping whenever possible and supplement this with predefined SMARTS patterns when necessary.
The order in which you define the particles matters: particles with more specific SMARTS patterns must be defined before particles with less specific patterns (i,e, be higher up in the list of particle mappings). For example, if one particle maps to CCO and another maps to CC, you must define the CCO particle first, otherwise the matches to CC will also match CCO and no particles will be found for CCO. If this is not the case, you can use the management buttons to move the particle definitions up or down the list so that they are in the desired order.
- Use automated CG mapping option
-
Select this option to map atoms to particles automatically given an all-atom system and a target coarse-grained particle size. If selected, the mapping can be fully automated or can be a mixture of manually and automatically defined particles depending on the options specified.
-
When the Use automated CG mapping option is selected and the Target particle size is twice (or more) the number of heavy atoms in a given molecule, then multiple of those molecules are mapped to one particle automatically.
- Coarse-graining type option
-
Specify the coarse-graining mapping method. The options are dissipative particle dynamics (DPD) or Martini modeling.
- Target particle size N atoms text box
-
Specify the target number of heavy atoms per coarse-grained particle to use when mapping an atomistic structure to a coarse-grained structure. The panel attempts to map particles with the target number of atoms while honoring the chemistry of the all-atom structure. Some particles may have more or less atoms than the specified target. The specified target is set to 4 for the Martini Coarse-graining type and is noneditable. Only present and available when the Coarse-graining type is set to DPD and Use automated CG mapping is selected.
- SMARTS tools
- Pre-defined SMARTS tools
-
These tools are used to map a group of atoms to a particle.
- SMARTS tool set management buttons
-
These buttons perform display and ordering operations on the SMARTS tool set. They allow for easy duplication and rearrangement of SMARTS tool sets.


Show or hide the contents of the SMARTS tool set. When hidden, only the SMARTS tool set number, label (if any) and these buttons are displayed. This is useful when you have a number of SMARTS tool sets and want to compare two separate SMARTS tool sets, for example. 

Move the SMARTS tool set up or down one place in the list. 
Duplicate the SMARTS tool set. This is useful for creating similar SMARTS tool sets with variations on the settings. 
Delete the SMARTS tool set. - Name text box
-
Specify a name for the particle. The same name can be applied to multiple SMARTS patterns.
- SMARTS text box and
-
Enter the SMARTS pattern for the atoms in the particle in the text box, or select the atoms in the Workspace for the SMARTS pattern and click
- Add SMARTS Group button
-
Add a set of tools for defining a particle, below the existing sets.
- Import SMARTS from file button
-
Load SMARTS patterns from a previous mapping job using the Coarse-Grained Mapping panel. The SMARTS patterns can be found in the job directory with the extension
_smarts.txt. Click to open the Import SMARTS from file dialog box, where you can navigate to the file. The name of the file you selected is displayed in the text box. - Allow unique bonds option
-
If different types of all-atom bonds map to the same type of coarse-grained bond, this option ensures that distinct coarse-grained bonds are generated for each type of all-atom bond, i.e. a bond parameter is introduced for each unique bond type. Setting this option increases the number of fitting parameters.
- Remove existing SMARTS group information from structures before searching option
-
Delete any existing SMARTS group information on the input structures. Only present when Use automated CG mapping is not selected.
- Allow atoms to belong to multiple SMARTS groups option
-
Allow multiple SMARTS groups to share atoms. Only present when Use automated CG mapping is not selected.
- Use particle names from FF option and menu
-
Use the particle names found in the selected force field file for particles with a matching SMARTS pattern. Select an existing coarse-grained force field that is stored in your user resources directory. Only present when Use automated CG mapping is selected.
- Treat small ions implicitly option
-
Small ions, defined as charged molecules with number of heavy atoms less than or equal to the Target mapping size divided by two, are treated implicitly. Coarse-grained particles are not mapped for small ions. Only present when the Coarse-graining type is set to DPD and Use automated CG mapping is selected.
- Allow particles to belong to multiple repeating units option
-
Allow particles on two adjacent repeating units to share atoms. Only present when the Coarse-graining type is set to DPD and Use automated CG mapping is selected.
- Add antifreeze water molecules option
-
Replace 10% of water molecules, (W), with antifreeze molecules, (WF). Only present when the Coarse-graining type is set to Martini. WF particles are identical to W particles, except that they interact with W particles differently, which can reduce the risk for Martini water freezing.
- Stabilize ring conformations option
-
Add diagonal bonds to rings of 4 particles. This is useful for stabilizing the conformation of rigid and planar rings. Only present when the Coarse-graining type is set to Martini and Use automated CG mapping is selected.
- Add protein restraints option
-
Automatically apply harmonic restraints to protein backbones. Only present when the Coarse-graining type is set to Martini and Use automated CG mapping is selected.
- Mapped Structures tab
-
Load and display the mapped coarse-grained structure in the Workspace. Set visualization parameters and view and edit restraints on the system in this tab.
- Load Mapped Structures Directory button
-
Load the directory corresponding to the mapped structures which must be the output from a job run from the Coarse-Grained Mapping Panel. Click to open the Load Directory dialog box, where you can navigate to the file. The name of the folder you selected is displayed.
- Show section
-
Visualize Unique Molecules or Systems as the coarse-grained structure or the mapping superimposed on the all-atom structure. The Structure option menu shows multiple systems or multiple individual molecules if available. Systems are only available for input atomistic systems with periodic boundary conditions.
- Particle Types tab
-
This tab contains the Particles section, consisting of particle names for each molecule or system, number of occurrences of particles, and their corresponding colors in the Workspace.
- Restraints tab
-
View, add, edit, and remove restraints between particles in the coarse-grained system.
- Select Restraints From Atoms button
-
Click this button to highlight restraints in the Restraints table and display them in the Workspace for restraints in the group of atoms selected in the Workspace. Both atoms in a given restraint must be part of the Workspace selection to be highlighted in the table.
- Edit Selected Restraints button
-
Click this button to edit the highlighted restraints in the Restraints table. The Distance and Force Constant can be edited.
- Delete Selected Restraints button
-
Click this button to remove the selected restraints from the system.
- Save Restraints button
-
Click this button to update the restraints in the system after making a change to the Restraints table. The text of this button is green when a change that requires saving the restraints is made.
- Restraints table
-
Restraints between atoms in the system are listed here in a table and are noneditable. Click any atom in the table to highlight it in yellow and display the associated restraint in the Workspace. The columns in the table are described below:
-
-
Atom—Labels for the two atoms that make up the bond.
-
Distance—The restraint distance, in Å.
-
Force Constant—The force constant for the restraint, in kcal/mol/Å2.
-
- Add Restraint section
-
Define the atoms, distance, and force constant to use for new restraints.
- Add button
-
Click to add a row to the Restraints table with the parameters defined in the Add Restraint section.
- Restraint Atoms text box and Pick option
-
Select two atoms to restrain. The Workspace zooms in on the picked atoms.
- Distance text box
-
Specify the distance for the restraint, in Å.
- Force Constant text box
-
Specify the force constant for the restraint, in kcal/mol/Å2.
- Export mapped structures to Project Table button
-
Save the atomistic and coarse-grained mapped structures as entries to the Entry List by clicking the Project Table button.
- Export mapped structures to CGFF Builder button
-
Click the CGFF Builder button to open the Coarse-Grained Force Field Builder Panel with the coarse-grained structure corresponding to the loaded all-atom input for building a force field. Only available when Systems is selected from the Show section.
- Job toolbar
-
Manage job submission and settings. See Job Toolbar for a description of this toolbar.
The Job Settings button opens the Coarse-Grained Mapping - Job Settings Dialog Box, where you can make settings for running the job.
- Status bar
-
 to reset the panel to its default settings and clear any data from the panel.
If you can submit a job from the panel, the status bar displays information about the current job settings and status for the panel. The settings include the job name, task name and task settings (if any), number of subjobs (if any) and the host name and job incorporation setting. The job status can include messages about job start, job completion and incorporation.
The status bar also contains the Help button
 , which opens an option menu with choices to open the help topic for the panel (Documentation), launch Maestro Assistant, or if available, choose from an option menu of Tutorials. If the panel is used by one or more tutorials, hover over the Tutorials option to display a list of tutorials. Choosing a tutorial opens the tutorial topic.