Complex Bilayer Builder Panel
Build single or multi-component lipid membranes with or without an embedded membrane protein.
To display this panel: click the Tasks button and browse to Materials → Structure Builders → Complex Bilayer Builder
The following licenses are required to use this panel: MS Complex Bilayer Builder, Desmond
- Using
- Features
- Additional Resources
Using the Complex Bilayer Builder Panel
This panel is used to build a cell that contains a lipid bilayer immersed in water. The lipid bilayer can be single or multi-component, symmetric or asymmetric, and with or without a membrane protein.
When inserting a membrane protein, note that the protein must be prepared properly before use in this workflow, meaning it should not have any missing hydrogen atoms, incorrect bond order assignments, charge states, or orientations of various groups. The protein can be prepared using the Protein Preparation Workflow Panel. It is recommended, but not necessary, for the protein structure to contain positioning information for the placement in a membrane from experiment. Proteins with such information can be found at the Orientations of Proteins in Membranes (OPM) database. The position of the protein between the lipid leaflets can be set and fine-tuned using the Adjust Protein Position button. If a protein structure is not provided, the system is a pure lipid bilayer.
The lipid bilayer is assembled by packing the appropriate number of lipid molecules in a defined ratio and embedding the protein if specified. The system is then relaxed by a protocol consisting of several stages of short and restrained molecular dynamics (MD) simulations amounting to under 1 ns, where the restraints are slowly released from stage to stage, where the restraints are slowly released from stage to stage. An additional relaxation can be performed by providing a MSJ file; the MD simulation in the provided MSJ is performed after the built-in relaxation attempt, regardless of if it fails or succeeds. Alternatively, the system can be equilibrated using the MD Multistage Workflow Panel. Further equilibration following the short, built-in relaxation protocol is necessary before further analyses. It is recommended to equilibrate the lipid membrane in the NPγT ensemble with zero surface tension. Alternatively, the thermodynamically equivalent NPT ensemble with semi-isotropic pressure coupling can be used but could take longer to equilibrate.
The output all-atom lipid bilayer can be visualized in the Workspace and further analyzed using the Membrane Analysis Panel to calculate the area per lipid and bilayer thickness, among other relevant properties, over the course of an MD trajectory.
To write out the input file and a script for running the job from the command line, click the arrow next to the Settings button  and choose Write.
Please cite the PackMol references [27, 28] in any publication that contains results from the use of this panel.
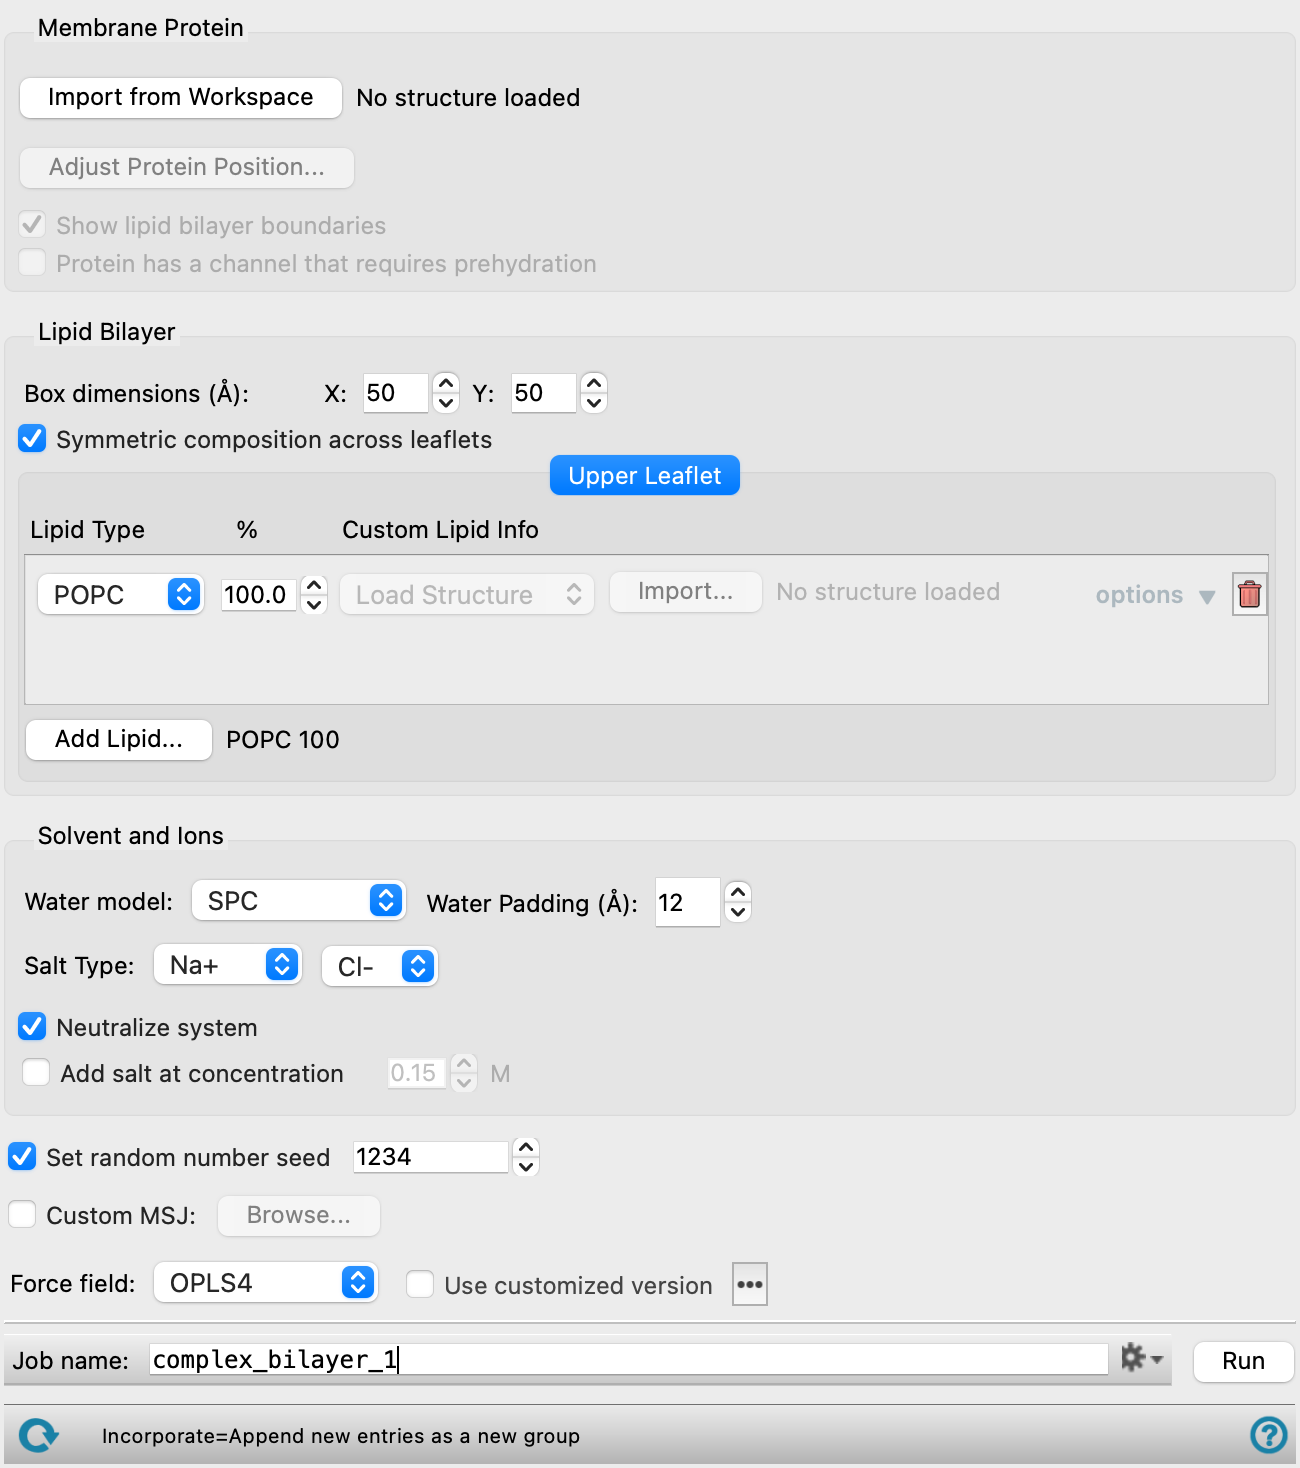
Complex Bilayer Builder Panel Features
- Membrane Protein section
- Lipid Bilayer section
- Solvent and Ions section
- Set random number seed option and text box
- Custom MSJ option
- Browse button
- Force field option menu
- Job toolbar
- Status bar
- Membrane Protein section
-
Optionally define a membrane protein to insert into the lipid bilayer using the options in this section. If a protein structure is not provided, the system is a pure lipid bilayer.
The protein must be prepared properly before use in this workflow, meaning it should not have any missing hydrogen atoms, incorrect bond order assignments, charge states, or orientations of various groups. This can be done using the Protein Preparation Workflow Panel.
It is recommended, but not necessary, for the protein structure to contain positioning information for the placement in a membrane from experiment. Proteins with such information can be found at the Orientations of Proteins in Membranes (OPM) database. The position of the protein between the lipid leaflets can be set and changed using the Adjust Protein Position button.
- Import from Workspace button
-
Use the structure from the Workspace for the membrane protein. The structure is copied into the workflow, to be added to the output structure. The Workspace must contain at least, a single protein. Any other molecules present in the Workspace protein structure will be included in the built system, so make sure they are structures you want included (e.g., relevant crystallographic waters, a ligand in its binding site, etc.). The entry name and the presence or absence of OPM data is shown to the right of the button.
- Center Protein button
-
Center the protein within the lipid bilayer boundaries. Only present when OPM data is not found for the loaded membrane protein.
- Adjust Protein Position button
-
Move the membrane protein selected in the Workspace through translation or rotation. Opens the Adjust Protein Position dialog box. Ensure the entire protein is selected in the Workspace before adjusting its position. If no atoms are selected, all atoms in the Workspace are translated or rotated.
- Show lipid bilayer boundaries option
-
Display the lipid bilayer boundaries in the Maestro Workspace according to the options set in the Lipid Bilayer section.
- Protein has a channel that requires prehydration option
-
Choose to add water molecules to the protein channels using a Grand Canonical Monte Carlo method before equilibration.
- Lipid Bilayer section
-
Define the lipid bilayer using the parameters in this section. You can specify a single lipid type for a homogenous leaflet or multiple lipid types and their corresponding percentages to create a mixed leaflet. In addition to a symmetric composition of both leaflets, you can have an asymmetric composition with differences in both the types and ratio of the lipids in the upper and lower leaflet of the bilayer.
- Box dimensions text boxes
-
Specify the length of the box in x and y dimensions in which to build the lipid bilayer.
- Symmetric composition across leaflets option
-
Select this option to build a symmetric lipid bilayer. To specify unique compositions for the upper and lower leaflet, deselect this option.
- Upper Leaflet tab
-
Specify the lipid information for the upper leaflet in this tab.
- Lower Leaflet tab
-
Specify the lipid information for the upper leaflet in this tab. Only present when the Symmetric composition across leaflets option is not selected.
- Lipid definition controls
-
Define one or more lipids for the leaflet using the options below.
- Lipid Type option menu
-
Select to import a custom lipid or select a predefined membrane lipid molecule from the option menu. CHL, DMPC, DPPC, POPC, and POPE lipids are available.
- Percentage text box
-
Specify the percentage composition for this lipid type. The percentages must add up to 100% across all specified lipids in each leaflet.
- Custom Lipid Info option menu
-
Choose between importing the custom lipid structure from the Workspace or entering the corresponding SMILES string. Only available when the Lipid Type is set to custom.
- Options link
-
Click to specify additional options for the custom lipid preparation. Only available when the Lipid Type is set to custom.
- Name text box
-
Specify a name for the custom lipid structure.
- Set double bond stereochemistry options
-
Choose to set the stereochemistry for double bonds in the custom lipid. The choices are Cis and Trans.
- Set chiral center stereochemistry options
-
Choose to set the stereochemistry for chiral centers in the custom lipid. The choices are R and S.
- Include non-phospholipids option
-
Select this option to include the custom lipid even if it is not a phospholipid. Only custom lipids that are phospholipids can be renumbered according to international IUPAC conventions, where glycerol backbone carbons are named using stereospecific numbering (sn). While this option increases the flexibility of the panel, it’s important to know what kind of custom structures you are using. In most scenarios, this option should remain checked.
- Delete icon
-
Remove the lipid from the leaflet composition.
- Add Lipid button
-
Add a set of lipid definition controls for a new lipid. The new controls are placed at the bottom of the list. The current leaflet composition is shown to the right of the button.
- Solvent and Ions section
-
Define parameters for the water solvent and ions for neutralization and ionic strength to use in the lipid bilayer.
- Water model option menu
-
Choose the water model for the simulations. The models are SPC, SPCE, TIP3P, TIP4P, TIP4P2005, TIP4PEW, TIP5P, TIP4PD.
- Water padding text box
-
Specify the thickness of the water layer above and below the lipid membrane. Sufficient water padding prevents self-interactions of the lipid bilayer due to periodic boundary conditions.
- Salt Type option menus
-
Specify the cation and anion for a salt from the provided menu.
- Neutralize system option
-
Choose to neutralize the charge of the system.
- Add salt at concentration option and text box
-
Choose to add salt and specify its concentration in Molar. This can be helpful to mimic physiological conditions.
- Set random number seed option and text box
-
Select this option to specify a random seed to be used in the simulations. Specifying the seed allows you to reproduce the results, unless other factors affect them. If this option is not selected, a seed is chosen at random.
- Custom MSJ option
-
Optionally, provide a MSJ file to use in relaxing the system.The MD simulation in the provided MSJ is performed after the built-in relaxation attempt in the workflow, regardless of if it fails or succeeds. Further equilibration following the short, built-in relaxation protocol is necessary before further analyses and this option allows you to do this within the same panel. Alternatively, use the MD Multistage Workflow Panel to further equilibrate the system.
- Browse button
-
Load a MSJ file to use for relaxation of the system. Opens the Browse for Custom MSJ File dialog box, where you can navigate to the file. Only available when the Custom MSJ option is selected.
- Force field option menu
-
Choose the force field for the simulations.
- Use customized version option
-
Use your customized version of the OPLS4 force field, rather than the standard version in the distribution.
If the customized version is missing or invalid, the text of this option turns orange and an orange warning icon is displayed to the right, with a tooltip about the problem.
- Parameter set button
-
Select the set of custom parameters for the OPLS4 force field. Opens the Set Custom Parameters Location Dialog Box.
- Job toolbar
-
Manage job submission and settings. See Job Toolbar for a description of this toolbar.
The Job Settings button opens the Complex Bilayer Builder - Job Settings Dialog Box, where you can make settings for running the job.
- Status bar
-
 to reset the panel to its default settings and clear any data from the panel.
If you can submit a job from the panel, the status bar displays information about the current job settings and status for the panel. The settings include the job name, task name and task settings (if any), number of subjobs (if any) and the host name and job incorporation setting. The job status can include messages about job start, job completion and incorporation.
The status bar also contains the Help button
 , which opens an option menu with choices to open the help topic for the panel (Documentation), launch Maestro Assistant, or if available, choose from an option menu of Tutorials. If the panel is used by one or more tutorials, hover over the Tutorials option to display a list of tutorials. Choosing a tutorial opens the tutorial topic.