Effective Screening Medium Calculations Panel
Run a periodic DFT calculation on a slab, with a continuum dielectric medium on either side of the slab. The medium can either represent the vacuum or a pair of electrodes of opposite polarity, or it can represent the vacuum on one side and an electrode on the other side.
To open this panel, click the Tasks button and browse to Materials → Quantum Mechanics → Quantum ESPRESSO → Effective Screening Medium Calculations.
The following licenses are required to use this panel: MS Maestro, Quantum Espresso Interface
- Using
- Features
- Additional Resources
Using the Effective Screening Medium Calculations Panel
The same conditions apply to running ESM calculations as to regular 3D periodic DFT calculations: see Using the Quantum ESPRESSO Calculations Panel for details.
The slab surfaces are assumed to be perpendicular to the z axis, so the structure must be aligned in this way. If you build a structure with the Build Slabs and Interfaces Panel, the slabs are constructed so that the surfaces are perpendicular to the z axis. You can also add molecules to the slab using the Disordered System Builder Panel.
A plot of the charge density and the electrostatic potential from an ESM calculation along the z axis can be displayed by loading results into the ESM: Charge/Potential Profile panel.
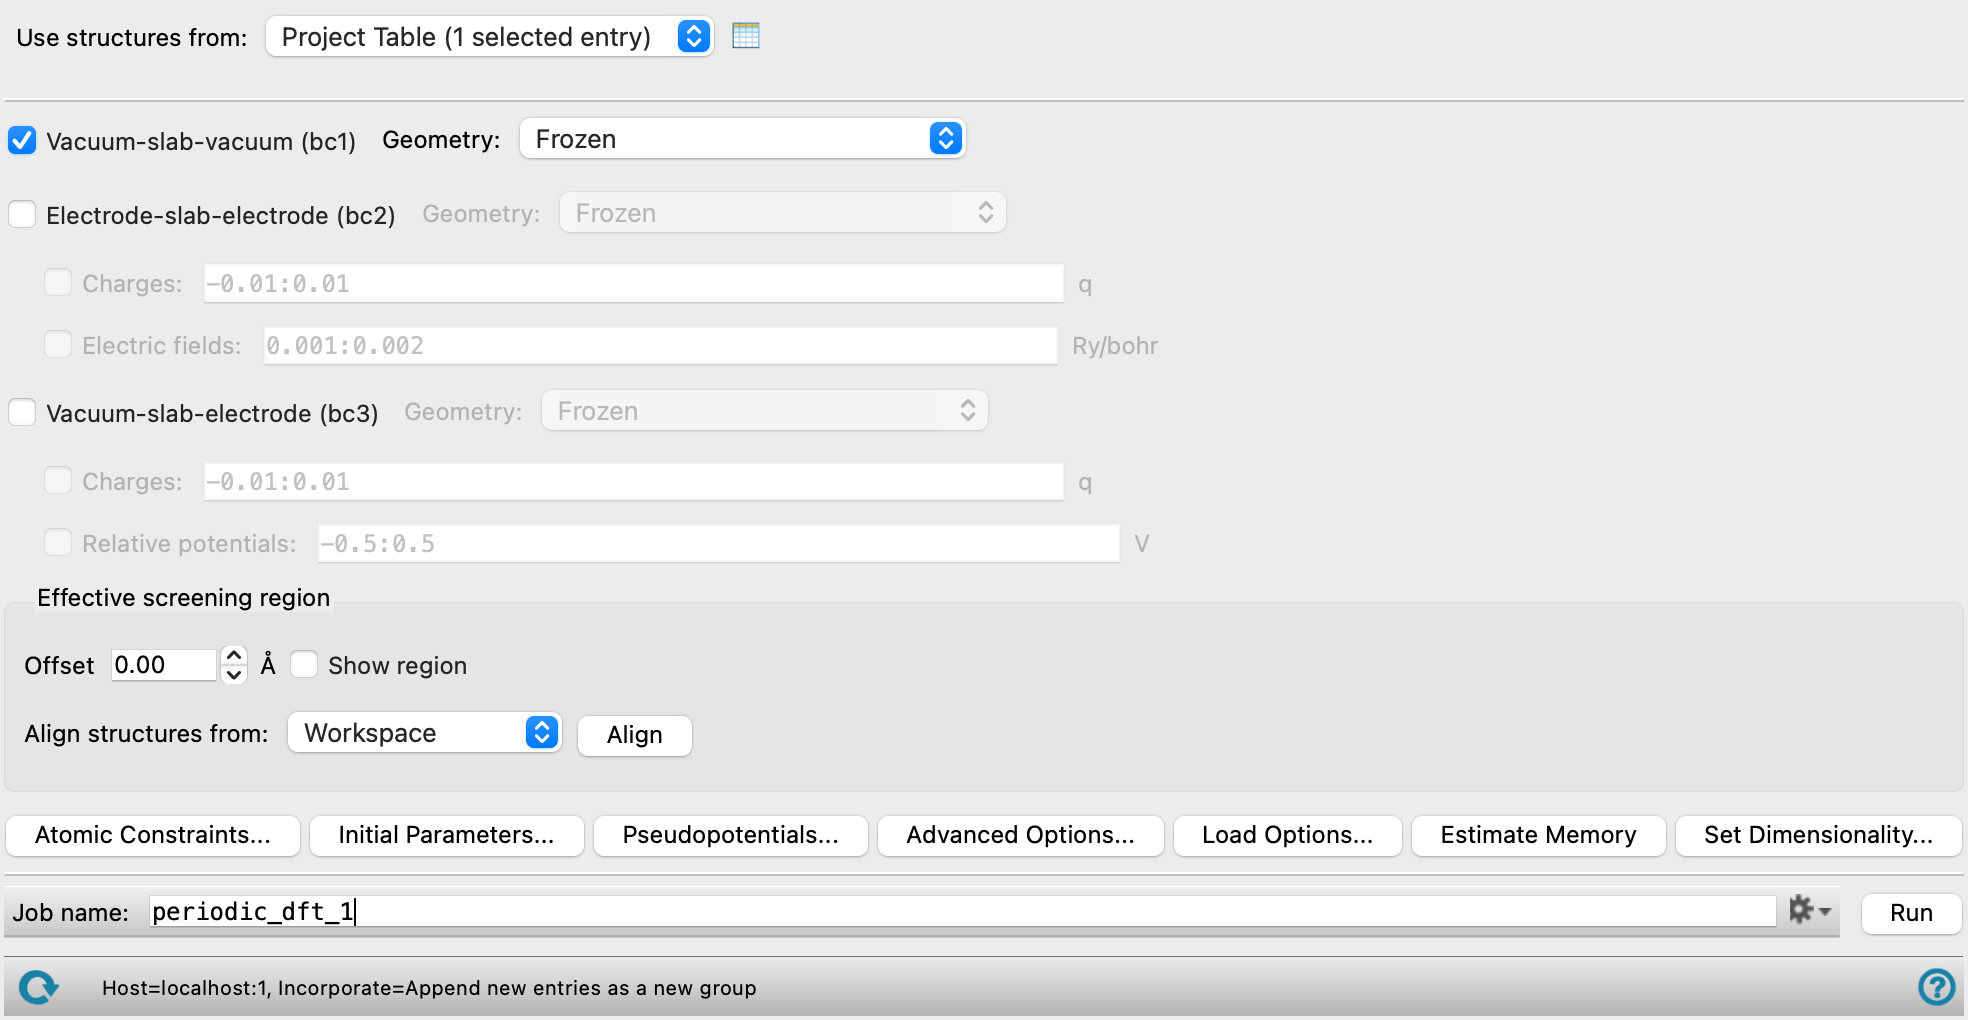
Effective Screening Medium Calculations Panel Features
- Use structures from option menu
- Open Project Table button
- File name text box and Browse button
- Geometry option menu
- Vacuum-slab-vacuum (bc1) option
- Electrode-slab-electrode (bc2) option
- Vacuum-slab-electrode (bc3) option
- Effective screening region section
- Atomic Constraints button
- Initial Parameters button
- Pseudopotentials button
- Advanced Options button
- Load Options button
- Estimate Memory button
- Set Dimensionality button
- Job toolbar
- Status bar
- Use structures from option menu
-
Choose the structure source for the slabs. Multiple slabs can be specified and the calculations can be run in parallel.
- Project Table (n selected entries)—Use the entries that are currently selected in the Project Table or Entry List. The number of entries selected is shown on the menu item.
- Workspace (n included entries)—Use the entries that are currently included in the Workspace, treated as separate structures. The number of entries in the Workspace is shown on the menu item.
- File—Use the specified file. When this option is selected, the File name text box and Browse button are displayed.
- Project Table (n selected entries)—Use the entries that are currently selected in the Project Table or Entry List. The number of entries selected is shown on the menu item.
- Open Project Table button
-
Open the Project Table panel, so you can

- File name text box and Browse button
-
Enter the file name in this text box, or click Browse and navigate to the file. The name of the file you selected is displayed in the text box.
- Geometry option menu
-
This option menu is common to all three system types, and allows you to choose an option for optimization of the geometry.
- Frozen—Do not optimize the geometry at all.
- Optimize atomic positions only—Optimize only the positions of the atoms, with the unit cell held fixed.
- Molecular dynamics—Run a Born-Oppenheimer molecular dynamics calculation, with the unit cell held fixed. The trajectory is imported into the project when the job finishes, and can be viewed in the Trajectory Player. To do this, click the T button for the project entry in the Entry List or the Project Table.
- Vacuum-slab-vacuum (bc1) option
-
Run a calculation on a slab in vacuum: the dielectric medium on either side of the slab is the vacuum.
- Electrode-slab-electrode (bc2) option
-
Run a calculation on a slab that is between two semi-infinite electrodes.
- Charges option and text box
-
Specify a colon-separated list of total charges to be used for the system, in terms of the elementary charge. A calculation is run for each value of the total charge; these calculations can be run in parallel. A compensating jellium background is inserted to remove divergences if the cell is not neutral. (Sets
tot_charge.) - Electric fields option and text box
-
Specify a colon-separated list of electric field strengths in Ry/bohr to be applied across the slab (between the electrodes). A calculation is run for each value of the electric field; these calculations can be run in parallel. (Sets
esm_efield.)
- Vacuum-slab-electrode (bc3) option
-
Run a calculation on a slab that is between a semi-infinite electrode and a vacuum.
- Charges option and text box
-
Specify a colon-separated list of total charges to be used for the system, in terms of the elementary charge. A calculation is run for each value of the total charge; these calculations can be run in parallel. A compensating jellium background is inserted to remove divergences if the cell is not neutral. (Sets
tot_charge.) - Relative potentials option and text box
-
Specify a colon-separated list of relative potentials in V to be applied These are the differences between the original Fermi energy and the target Fermi energy. A calculation is run for each value of the potential; these calculations can be run in parallel. (Sets
fcp_mu.)
- Effective screening region section
-
Set up and display the effective screening region.
- Offset text box
-
Set the position offset (in angstroms) of the start of the effective screening region, measured relative to the cell edge. (Sets
esm_w. The ESM region begins at z = ± [L_z/2 + esm_w] .) - Show region option
-
Show the edges of the effective screening region in the Workspace.
- Align structures from option menu and button
-
Translate a structure along the z axis so that the z component of the structure centroid is at z = 0. Choose a structure source from the option menu and click Align. The options are:
- Workspace—Align the entry that is currently included in the Workspace. Only one entry can be included in the Workspace. A new entry is created with the aligned structure and selected in the Entry List.
- Selected entries—Align all entries that are currently selected in the Entry List (and Project Table). New entries are created for each separate structure and selected in the Entry List.
- Atomic Constraints button
-
Set or remove Cartesian constraints for atoms in the system. Opens the Atomic Constraints Dialog Box, where you can choose the constraint type (X, Y, Z, or all three), and pick atoms in the Workspace or use the Workspace selection to apply the constraints to. You can delete selected or all constraints.
- Initial Parameters button
-
Set the initial magnetization (
starting_magnetization) value and Hubbard U (Hubbard_U) and J0 (Hubbard_J0) parameters for atoms in the system. Opens the Initial Parameters dialog box, where you can pick atoms in the Workspace and set the values. The initial magnetization for a specified atom can take values between −1 (all spins down) and +1 (all spins up); the value applies to the valence electrons of the atom or ion. Alternatively, you can set the spin values, which is the difference in the number of up and down spin valence electrons (Nα−Nβ), and is proportional to the initial magnetization. The Hubbard U and J0 parameters are only used if you turn on DFT+U calculations in the Quantum ESPRESSO Calculations - Advanced Options Dialog Box. These parameters are given in eV, and can be set for a restricted range of elements, which includes the d and f block elements and C, H, O, N, As, Ga, In.You can delete selected or all settings using the Delete and Delete All buttons.
-
Optionally set the Total magnetization(
tot_magnetization) and Total charge (tot_charge) values for the system. The total magnetization is defined as (majority spin charge − minority spin charge), so 0 represents a singlet, 1 represents a doublet, 2 represents a triplet, and so on. If the value is unspecified, the magnetization is determined during the SCF cycles. If you specify the total magnetization you should not specify initial magnetizations. - Pseudopotentials button
-
Select pseudopotentials for use in the calculations. Opens the Quantum ESPRESSO Calculations - Pseudopotentials Dialog Box. The set of recommended PBE ultrasoft pseudopotentials is distributed with the suite and available from the dialog box. See Installing and Configuring Quantum ESPRESSO for instructions on downloading other pseudopotential sets.
- Advanced Options button
-
Set options for the calculation: spin treatment, density functional, dispersion corrections, Brillouin zone partitioning, occupation, SCF and optimization accuracy
- Load Options button
-
Load option settings from a Quantum ESPRESSO config file (
.cfg). Opens a file selector so you can navigate to and select the config file. The settings replace those in the Quantum ESPRESSO Calculations - Advanced Options Dialog Box. - Estimate Memory button
-
Estimate the memory needed for the selected calculations on the first input structure. After clicking the button, an Info dialog appears with the information. The estimated memory given is for a single CPU. This allows you to assess whether you have sufficient computational resources for a desired calculation without having to first run the calculation.
- Set Dimensionality button
-
Specify whether the system is a slab or bulk material. Opens the Set Dimensionality Dialog Box.
- Job toolbar
-
Manage job submission and settings. See Job Toolbar for a description of this toolbar.
The Job Settings button opens the Effective Screening Medium Calculations - Job Settings Dialog Box, where you can make settings for running the job.
- Status bar
-
The status bar displays information about the current job settings and status for the panel. The settings includes the job name, task name and task settings (if any), number of subjobs (if any) and the host name and job incorporation setting. The job status can include messages about job start, job completion and incorporation.
Use the Reset button
 to reset the panel to its default settings and clear any data from the panel.
 The status bar also contains the Help button
 , which opens the help topic for the panel in your browser. If the panel is used by one or more tutorials, hovering over the Help button displays a
  button, which you can click to display a list of tutorials (or you can right-click the Help button instead). Choosing a tutorial opens the tutorial topic.