Sculpt Complex Panel
Build a complex from polydentate ligands and capping groups, by mapping the coordination sites on the complex to the attachment points on the ligands; or build multiple complexes in the same way from closely related ligands, using a single mapping. The complexes are minimized using a force field.
To open this panel: click the Tasks button and browse to Materials → Structure Builders → Sculpt Complex.
The following licenses are required to use this panel: MS Maestro, OPLS (optional), MS Force Field Applications (optional)
- Using
- Features
- Additional Resources
Using the Sculpt Complex Panel
This panel provides the means to build a coordination complex with one or more ligands that each coordinate through one or more single atoms (i.e. kappa-coordination of polydentate ligands, not eta-coordination). The maximum coordination number for the complex is 6.
If you want to use more than one ligand for a complex, the ligands must all be in a single project entry: if they are in separate entries you must create a single entry. You can do this by displaying the ligands (from different entries) in the Workspace and creating a project entry from the Workspace using Workspace → Create Project Entry or Ctrl+Shift+N (⇧⌘N). See Creating Entries from the Workspace for more information.
The formation of the complex is done by selecting each coordination site in turn and picking the ligand atom in the Workspace that you want to coordinate at that site. The ligands do not have to be in the right relative locations to form the complex, as the complex is minimized after it is formed. However, the geometry of the complex is likely to be better if the ligands are arranged in the relative positions they would occupy when coordinated to the metal.
If you want to build multiple complexes from related ligands, you can do so by selecting multiple entries in the Project Table, each of which must contain the ligands to use for a single complex. You can then include one of these entries in the Workspace to perform the assignment. The atom numbering of the ligands in the other entries must be the same for the atoms that coordinate to the metal. This will be the case, for example, if you create an entry with the ligands and then enumerate on specified attachment points using the Custom R-Group Enumeration Panel or the R-Group Creator Panel. One complex is created for each selected entry.
This tool can also be run from the command line - see sculpt_complex_gui.py Command Help.
Sculpt Complex Panel Features
- Use structures from option menu
-
Choose the structure source for the ligands. If you choose multiple project entries, they must have the same atom numbering for the atoms that coordinate to the metal.
- Project Table (n selected entries)—Use the entries that are currently selected in the Project Table or Entry List. The number of entries selected is shown on the menu item.
- Workspace (included entry)—Use the entry that is currently included in the Workspace. Only one entry must be included in the Workspace.
- Project Table (n selected entries)—Use the entries that are currently selected in the Project Table or Entry List. The number of entries selected is shown on the menu item.
- Open Project Table button
-
Open the Project Table panel, so you can

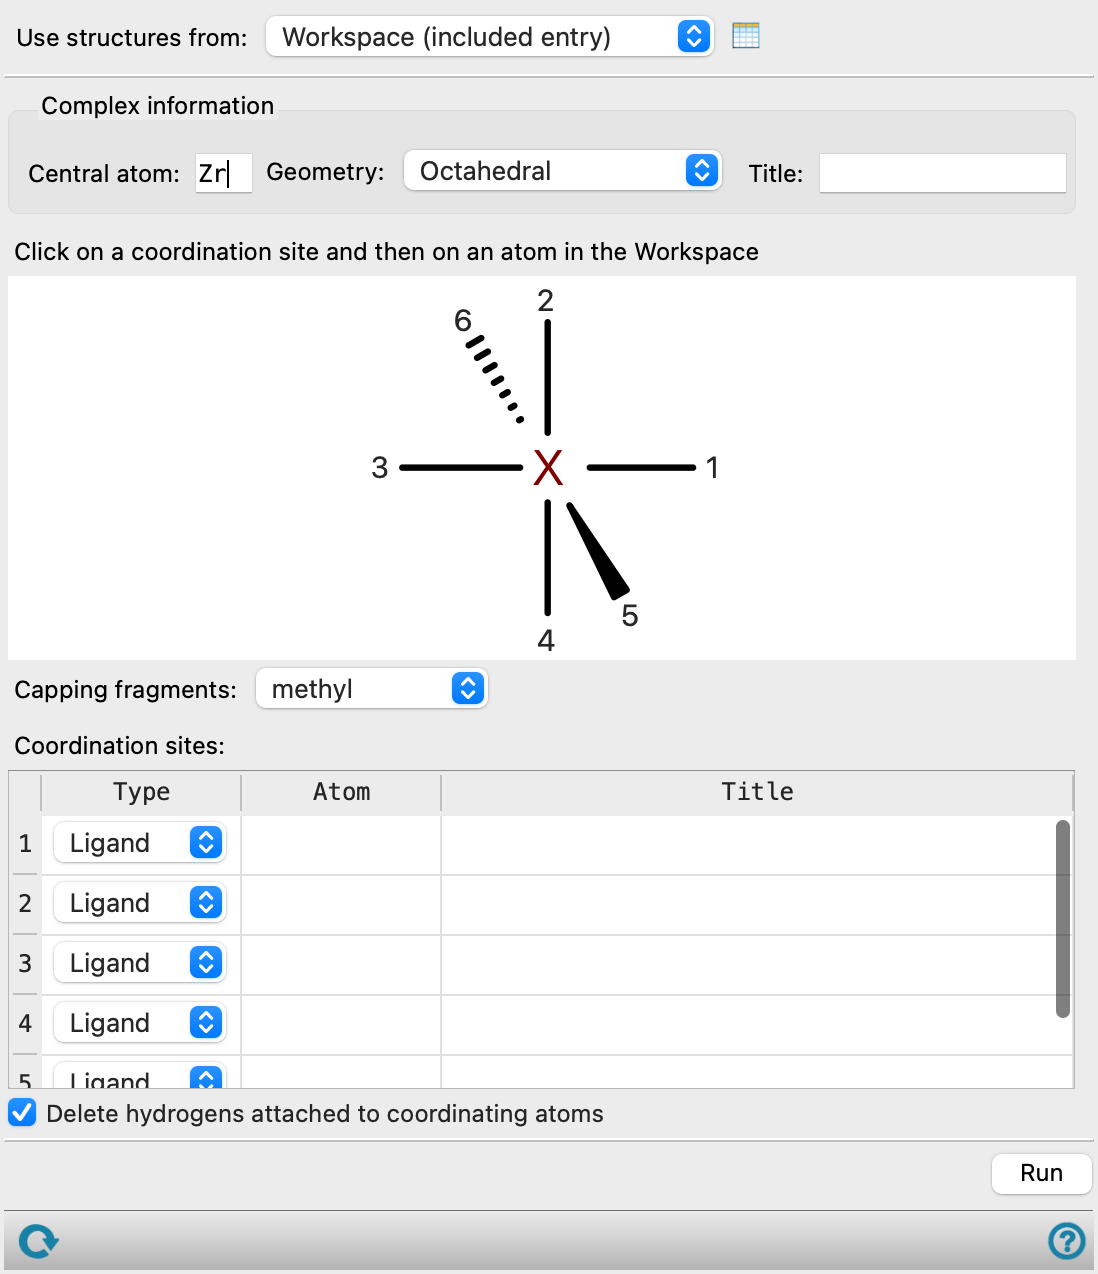
- Complex information section
-
Specify the metal atom, coordination geometry and title for the complex.
- Central atom text box
-
Enter the atomic symbol for the metal atom in this text box. You can only enter valid atomic symbols: all other text is disallowed.
- Geometry option menu
-
Choose the geometry of the complex. The available choices are: Octahedral, Trigonal bipyramidal, Square planar, Tetrahedral, Trigonal planar, and Linear.
- Title text box
-
Specify the title for the complex. This title is used as the entry title when a single complex is formed. For multiple entries, the title of the input entry is appended to the title specified here to form the entry title for the output complex.
- Coordination diagram
-
Use this diagram to map the coordination sites to the ligand donor atoms, by clicking on a coordination site, then clicking on the ligand atom in the Workspace. If you start by selecting site 1, site 2 is automatically selected after you pick a ligand atom in the Workspace. In this way, you can just pick the ligand atoms in the Workspace in order.
- Capping fragments option menu
-
Choose a capping fragment from this option menu. The capping fragment fills any vacant sites that are not occupied by ligand atoms. You can choose None to leave a site empty.
- Coordination sites table
-
This table gives information for each coordination site. The columns are described below:
-
Type—Designate the site as for a ligand atom or a capping group by choosing from the option menu.
-
Atom—Lists the atomic symbol and atom number of the ligand atom. You can select the cell and pick a Workspace atom to change the ligand atom. The cell is grayed out if Capped was chosen in the Type column.
-
Title—Lists the entry title for the ligand, or the title of the capping group from the Capping fragments menu.
-
- Delete hydrogens attached to coordinating atoms option
-
Delete a hydrogen atom from any coordinating atom that has one, to form a bond to the metal.
- Run button
-
Click this button to build the complex or complexes. A single complex may take several seconds to build. The new complexes are added as project entries and the first complex is displayed in the Workspace.
- Status bar
-
 to reset the panel to its default settings and clear any data from the panel.
If you can submit a job from the panel, the status bar displays information about the current job settings and status for the panel. The settings include the job name, task name and task settings (if any), number of subjobs (if any) and the host name and job incorporation setting. The job status can include messages about job start, job completion and incorporation.
The status bar also contains the Help button
 , which opens an option menu with choices to open the help topic for the panel (Documentation), launch Maestro Assistant, or if available, choose from an option menu of Tutorials. If the panel is used by one or more tutorials, hover over the Tutorials option to display a list of tutorials. Choosing a tutorial opens the tutorial topic.