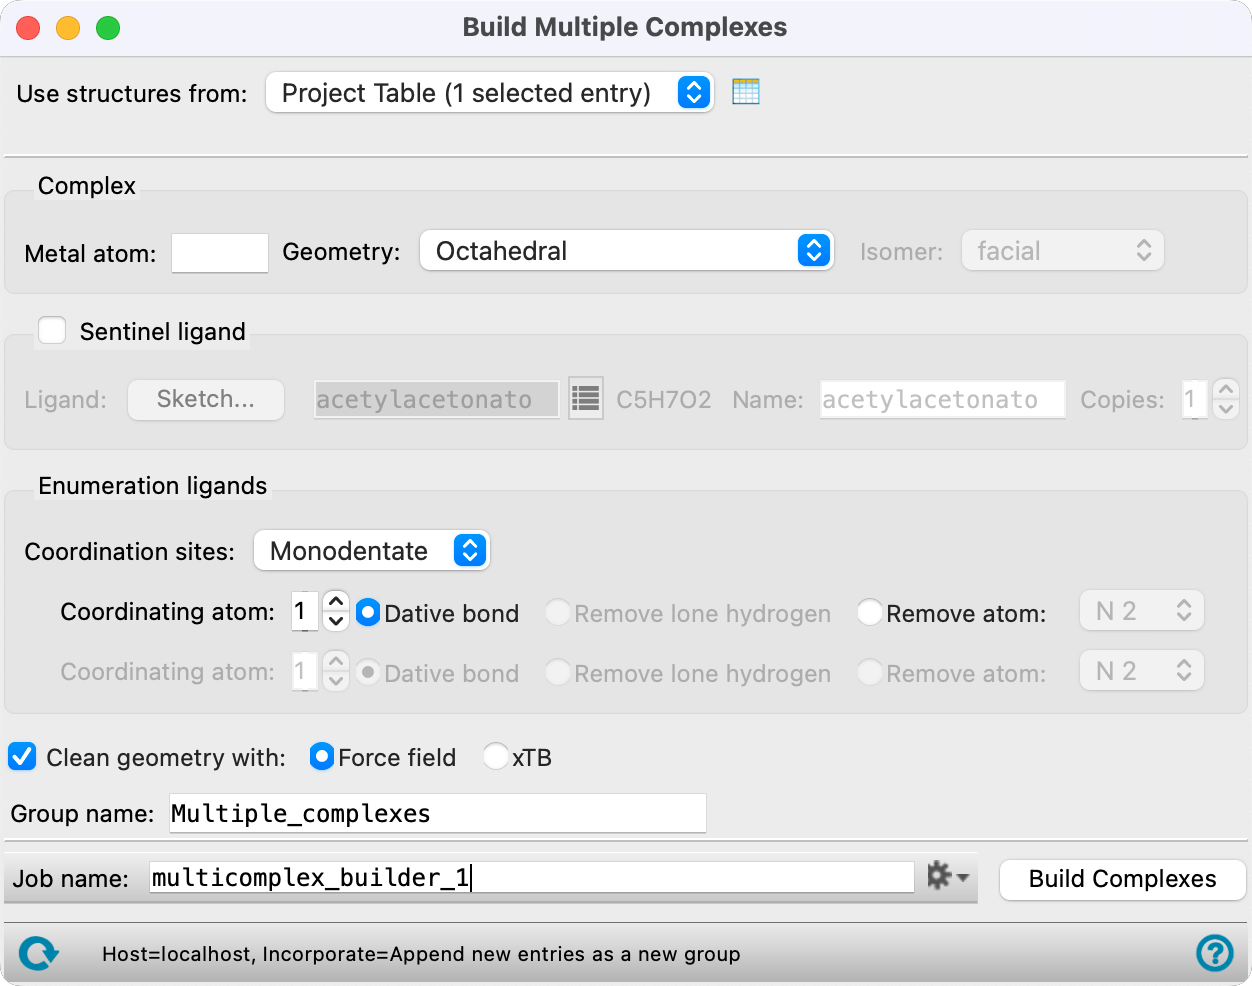
Build Multiple Complexes Panel
Build a set of organometallic complexes from a set of ligands. Each complex is composed of a metal, an optional "sentinel" ligand that remains the same in each complex, and enough copies of one other ligand to fill the coordination sites for the chosen complex geometry.
To open this panel, click the Tasks button and browse to Materials → Structure Builders → Multiple Complexes.
The following licenses are required to use this panel: MS Maestro
- Using
- Features
- Additional Resources
Using the Build Multiple Complexes Panel
This panel is intended for building a set of organometallic complexes from a set of ligands that are variations on a common core. The panel does not build the ligands, but uses ligand structures from the Project Table, the Workspace, or a file. Each complex contains only one of the ligands: thus, the number of complexes generated is equal to the number of ligands that you supply.
To build such a set of ligands, you can use the R-Group Creator Panel or the Custom R-Group Enumeration Panel; to create a set of elemental variations on ligand, you can use the Elemental Enumeration Panel. These panels allow you to choose a core structure, which is the one that is bound to the metal, select side chains on this core as attachment points for new functional groups, and replace the side chains with a set of fragments, to build a set of structures. You can also build a set of ligands manually with Maestro’s build tools.
An important requirement for building a set of complexes is that the numbering of the atoms is the same in each ligand for the atoms chosen to bind to the metal (the coordinating atoms). This means that if you build ligands in Maestro, you should start with a core molecule that coordinates to the metal, and then add groups to this core, for example by replacing hydrogens with other groups. To add a group without changing the atom numbers of the core, you have to start by changing the element of a terminal atom (such as H) that is attached to the core—for example, to C—and then use the builder to add to this atom. If you try to add fragments from the 3D Builder, the terminal atom is removed from the core as the first step in adding the fragment, which changes the atom numbering. Following this procedure should preserve the atom numbering in the core part of the ligand. Another approach is to build the core molecule, then remove and re-add the hydrogens. The core atoms are renumbered during this process, and the H atom numbers are all higher than the nonhydrogen ("heavy") atoms. Provided that you don't need to use the hydrogen atom numbers for building a complex, you can then replace hydrogen atoms from the 3D builder without changing the atom numbers of the heavy atoms.
The coordinating (ligating) atoms are specified by their atom number. Only one set of atom numbers can be supplied, so it must be the same in all ligands. To find out what the atom numbering is in your ligands, you can label one of the ligands in the Workspace. Include a ligand and make sure no atoms are selected, open the Style toolbox, then click the arrow next to Apply Labels and choose Element + Atom Number.
You can then use the numbers displayed on the atoms to specify the coordinating atom (monodentate ligand) or atoms (bidentate ligand). You can also spin through the list in the Coordinating Atom box to find an atom: the current atom in the text box is highlighted in the Workspace. Make sure you have no atoms selected, as the selection markers can hide the highlight.
When specifying the atom that is ligated, you can request the removal of atoms that are attached to the ligating atom: for example, if you have a secondary amine in a ring (such as in pyrrole), you might want to remove the attached hydrogen.
-
If there are no extra atoms to remove (as for cyano), select Dative bond.
-
If there is a single extra hydrogen (as in pyrrole), select Remove lone hydrogen.
-
If some other functional group is attached to the coordinating atom, select Remove atom, and choose the atom from the list, which shows the atomic symbol and the atom number. This option requires a structure in the Workspace, so that the atoms connected to the coordinating atom can be determined. The attached atom and all atoms in the side chain originating at the attached atom are removed when the complex is built.
For example, if the atom to remove is the C in a CONH2 group, the entire CONH2 group is removed. Likewise, if the atom is part of a phenyl group, the entire phenyl group is removed. If the atom to remove and the coordinating atom are part of the same ring system, no additional atoms are removed beyond the specified atom to remove.
If you have a ligand structure in the Workspace, the coordinating atom or atoms are marked in the Workspace with green markers, and the atoms to be removed are marked with red markers.
To specify the complex geometry and isomer, choose from the Geometry and Isomer option menus. The Isomer option menu is available if you have bidentate ligands and an octahedral or square planar complex. For octahedral complexes, you can choose to build a meridional or facial isomer. Both isomers are chiral, but only one of the stereoisomers is built. The facial stereoisomer is in the Λ form, the meridional stereoisomer is in the Δ form. (To convert to the other stereoisomer, select the complex in the Workspace, then right-click on an atom and choose Other Edits → Invert Chirality.) If the ligands are symmetric, there are only the two stereoisomers, which are built by choosing the facial or meridional isomer. For square planar complexes with asymmetric bidentate ligands, you can choose to build the cis or the trans isomer.
Tetrahedral complexes of asymmetric bidentate ligands have two stereoisomers, only one of which is built.
If you want to construct complexes with a common ligand, while enumerating other ligands, you can select Sentinel ligand, then specify the ligand to use as the common ("sentinel") ligand and the number of copies of this ligand to use. The ligand can be monodentate or bidentate. The remaining sites in the complex are filled with the "enumeration" ligands.
You can choose the sentinel ligand from the Ligand option menu, or sketch a new ligand by clicking Sketch and drawing it in the Ligand Sketcher. You must indicate which atoms are the ligating atoms, by adding a bond to them and labeling the terminal atom as R1 for the first ligating atom, and R2 for the second. Right-click on the atom and choose Set R Group → R1 or R2 to perform the labeling. When you have finished sketching the ligand, click Use This Structure to use it for this run only, or click Save New Template, to save it as a "template" ligand, which is added to the list of ligands on the Ligand option menu.
There is a limit of 16 atoms bonded to the metal. For haptic ligands, each atom in the haptic group is considered to be bonded to the metal, (e.g. 5 for Cp).
When you have built the complexes, you should consider cleaning them up with the Clean Up Complexes Panel, and then running a geometry optimization with Jaguar before proceeding with any calculations on the complexes. If the coordination number is greater than 6, the cleanup can make the geometry deviate significantly from the VSEPR geometry. You might also consider running a conformational search with the Organometallic Conformational Search Panel, which allows you to fix specified atoms (such as the coordinated atoms), and also run a Jaguar minimization on the results.
To write out the input file and a script for running the job from the command line, click the arrow next to the Settings button  and choose Write.
To build multiple complexes:
- Choose the source of the ligand structures, from the Use structures from option menu.
- Enter the atomic symbol of the metal in the Metal atom text box.
- Set the geometry of the complex and if necessary, the isomer.
- (Optional) Choose a sentinel ligand, and set the number of copies of this ligand.
- Choose the coordination sites: for monodentate or bidentate ligands.
- Enter the atom number in the ligand structure of the coordinating atom or atoms.
- Select an option for the group to remove from the ligand (if any).
- Click Build Complexes.
Build Multiple Complexes Panel Features
- Use structures from option menu
-
Choose the structure source for the ligands.
- Project Table (n selected entries)—Use the entries that are currently selected in the Project Table or Entry List. The number of entries selected is shown on the menu item.
- Workspace (n included entries)—Use the entries that are currently included in the Workspace, treated as separate structures. The number of entries in the Workspace is shown on the menu item.
- File—Use the specified file. When this option is selected, the File name text box and Browse button are displayed.
- Project Table (n selected entries)—Use the entries that are currently selected in the Project Table or Entry List. The number of entries selected is shown on the menu item.
- Open Project Table button
-
Open the Project Table panel, so you can

- File name text box and Browse button
-
Enter the file name in this text box, or click Browse and navigate to the file. The name of the file you selected is displayed in the text box.
- Complex section
-
In this section you specify details of the complex: the metal atom and the geometry.
- Metal atom text box
-
Enter the atomic symbol for the metal atom in this text box. Only valid atomic symbols are accepted.
- Geometry option menu
-
Specify the coordination geometry. The available choices are: Octahedral, Trigonal bipyramidal, Square planar, Tetrahedral, Trigonal planar, Linear, Pentagonal bipyramidal, Square antiprismatic, and Tricapped trigonal prismatic. When you choose Octahedral or Square planar, the Isomer option menu is activated.
- Isomer option menu
-
With asymmetric bidentate ligands, two geometric isomers are possible for octahedral complexes and square planar complexes.
For octahedral complexes, you can choose whether to build the facial isomer or the meridional isomer. Both isomers are chiral, but only one of the stereoisomers is built. The facial stereoisomer is in the Λ form, the meridional stereoisomer is in the Δ form. (If the ligands are symmetric, there are only the two stereoisomers, which are built by choosing the facial or meridional isomer.)
For square planar complexes, you can choose to build the cis isomer or the trans isomer.
- Sentinel ligand option and section
-
Select this option if you want to specify a ligand that is common to all complexes (the "sentinel" ligand), and specify the ligand with the controls in this section.
- Sketch button
-
Click this button to sketch the sentinel ligand. The Ligand Sketcher panel opens, with tools to sketch and save the ligand, either for this run only (Use This Structure) or as a template ligand (Save New Template) to be added to the Ligand option menu for future runs as well. For more information on sketching the ligand, see Using the Build Multiple Complexes Panel above and the 2D Workspace topic.
- ligand title text box
-
The title of the ligand is displayed in this text box. It is set to Custom by default
- ligand selection button
-
click this button to open a selection tool from which you can choose a sentinel ligand. The tool has the following features:
-
Search text box. Type the text you want to search for in the ligand name. The list of ligands is restricted to those containing the search text as you type.
-
ligand list. Choose a ligand from the list. The list is dynamically updated when you use the search or filter tools.
-
-
The list of ligands is obtained from a resource file, to which you can add using the Ligand Sketcher panel (click Sketch to open the panel; click Save New Template to save the sketched structure as a new template ligand).
- Name text box
-
Specify the name of the ligand. This text box is automatically filled in if you choose a ligand using the ligand selection button, but is blank for a custom ligand.
- Copies text box
-
Specify the number of copies of the sentinel ligand to be included in all complexes. You can use the arrow buttons or type in the number.
- Enumeration ligands section
-
In this section you specify the common characteristics of the ligands that are used to fill the coordination sites. The ligands must have a common substructure that is coordinated to the metal.
- Coordination sites option menu
-
Specify whether the coordination sites are to be filled with monodentate or bidentate ligands. If you choose Bidentate, the second row of controls below this option menu is activated, so you can select the second coordinating atom and specify its coordination behavior.
- Coordinating atom text box and options
-
Specify which of the atoms in each ligand is the coordinating atom in the text box, and select an option for how the ligand needs to be prepared for bonding to the metal. If you choose Monodentate from the Ligand is option menu, only the first row of controls is available; if you choose Bidentate, both rows are available.
The coordinating atom number is the atom number in the Maestro file. If you have a ligand structure in the Workspace, you can label it with the element and atom numbers by choosing Element + Atom Number from the Apply Labels button menu in the Style toolbox. The coordinating atom or atoms are marked in the Workspace with green markers, so you can also spin through the ligand atom numbers with the arrows to find the desired atom on the Workspace structure.
The ligands that you choose must all have the same atom numbers for the part of the structure that coordinates to the metal. The choice of ligands should therefore be a series of related ligands, such as generated in the Custom R-Group Enumeration Panel or the R-Group Creator Panel.
The options for coordination behavior allow you to specify how the ligand is prepared for coordination. If the coordinating atom on the ligand donates to the metal, select Dative bond. If the ligand has a hydrogen attached to the coordinating atom that is removed (i.e. it is an acid of some kind), select Remove lone hydrogen. If there is some other atom attached, select Remove atom and choose the atom number from the option menu. This option requires a structure in the Workspace, so that the atoms connected to the coordinating atom can be determined. This atom is removed along with all atoms in the side chain that originates with this atom. The atom to be removed is marked with a red marker on the structure in the Workspace (if present).
- Clean geometry with option
-
Optionally, perform a minimization on the complexes and specify the method to use for the minimization.
- Force field—Minimize the geometry of the complexes with force-field minimization.
- xTB —Minimize the geometry of the complexes with GFN2-xTB. GFN2-xTB is a fast, quantum mechanics-based method and may yield more accurate geometries for many complexes at little additional computational cost.
- Group name text box
-
Enter the name of the entry group in the project to place the complexes in.
- Build Complexes button
-
Build the complexes. When the complexes have been created, they are added to the Project Table in an entry group as entries named M(L)n, where M is the atomic symbol of the metal, L is the title of the ligand, and n is the number of ligands. A progress bar is displayed if the complexes take more than a few seconds to build.
- Job toolbar
-
Manage job submission and settings. See Job Toolbar for a description of this toolbar.
The Job Settings button opens the Build Multiple Complexes - Job Settings Dialog Box, where you can make settings for running the job.
- Status bar
-
 to reset the panel to its default settings and clear any data from the panel.
If you can submit a job from the panel, the status bar displays information about the current job settings and status for the panel. The settings include the job name, task name and task settings (if any), number of subjobs (if any) and the host name and job incorporation setting. The job status can include messages about job start, job completion and incorporation.
The status bar also contains the Help button
 , which opens an option menu with choices to open the help topic for the panel (Documentation), launch Maestro Assistant, or if available, choose from an option menu of Tutorials. If the panel is used by one or more tutorials, hover over the Tutorials option to display a list of tutorials. Choosing a tutorial opens the tutorial topic.