Single Complex Builder Panel
Build a single organometallic complex with one or two metal centers, with any geometry from 2-coordinate (linear) to 9-coordinate (tricapped trigonal prismatic).
To open this panel, click the Tasks button and browse to Materials → Structure Builders → Single Complex.
The following licenses are required to use this panel: MS Maestro
- Using
- Features
- Additional Resources
Using the Single Complex Builder Panel
There are three main steps to building an organometallic complex:
-
Choose the metal, coordination geometry, and nuclearity.
You can do this in the Define complex section. Type in the atomic symbol for the metal, choose the geometry from the Geometry option menu, and choose the nuclearity from the Nuclearity option menu.
-
Choose the ligands.
In this step, you decide how many different ligands you want to use, how many of each ligand to use, and select or sketch the ligands. Each ligand is represented by a row in the ligand table. Each row specifies the number of copies of the ligand, and allows you to select or sketch a ligand structure for this row. For example, for an ML3X3 complex, you would have two rows, one for ligand L and one for ligand X, and for each you would set the number of copies to 3.
There is also a limit of 16 atoms bonded to the metal. For haptic ligands, each atom in the haptic group is considered to be bonded to the metal, (e.g. 5 for Cp).
-
Choose the arrangement of ligands in the complex.
For octahedral complexes with bidentate ligands, you can automatically arrange them in a facial or meridional conformation, by choosing the isomer in the Define complex section. Both isomers are chiral, but only one of the stereoisomers is built. The facial stereoisomer is in the Λ form, the meridional stereoisomer is in the Δ form. The geometry is applied when you save the structure. To convert to the other stereoisomer, select the complex in the Workspace, then right-click on an atom and choose Other Edits → Invert Chirality. (If the ligand is symmetric, there are only the two stereoisomers.)
For square planar complexes with two pairs of monodentate ligands, you can choose either the cis or the trans isomer in the Define complex section.
For any other type of monomeric complex, you must pick the sites on the metal atom for each ligating atom on each ligand, by clicking Choose Sites and using the diagram of the complex in the dialog box that opens to pick the sites for each ligand.
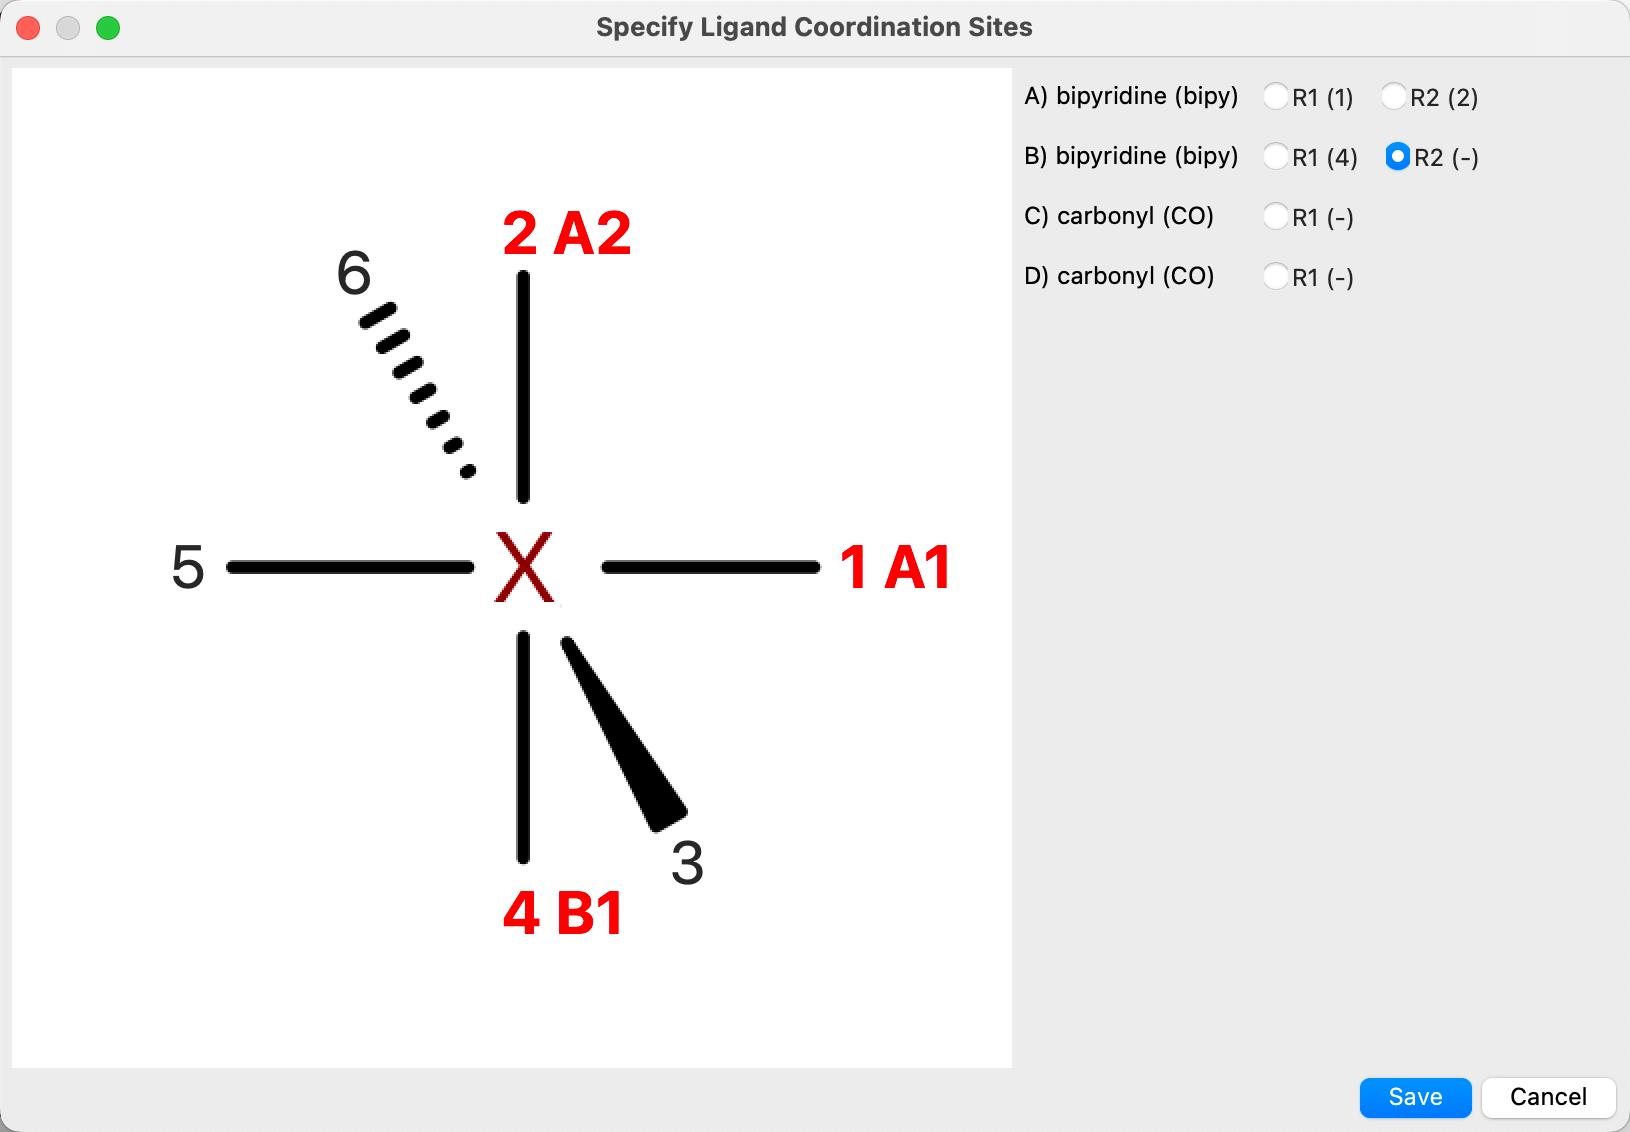
By default, the first ligating atom for the first ligand is selected from the list on the right when the dialog box opens. You can click on one of the available coordination sites in the diagram to assign the atom to a site. The site number is colored red and a label identifying the ligand (by a letter) and the ligating atom (by number) is displayed next to the site number. The “-” in parentheses next to the ligating atom label in the list is replaced with the assigned site number. The next ligating atom is automatically selected, so you can simply click on the sites in the desired order to assign them. You can also select a ligating atom manually to change its assignment.
Pausing the pointer over the ligand name shows its 2D structure in a tool tip.
When you have finished defining the complex, click one of the buttons in the Build and save complex section to save it, either to the Maestro project with Create or to a file, with Save to file.
If you want to sketch ligands, click the pencil icon, then draw the new ligand in the sketcher. You must indicate which atoms are the ligating atoms, by adding a bond to them and labeling the terminal atom as R1 for the first ligating atom, and R2 for the second. To label the atom, you can either use the R+ tool, or right-click on the atom and choose Replace with → New (or Existing) R-Group. You can create haptic (eta-coordinated) ligands by adding an R1 for one of the ligating atoms, then drawing bonds from the remaining ligating atoms to this R1 atom. Click Add to saved ligands to save the ligand structure you drew, and name the structure in the dialog box that is displayed. The custom ligands are stored in your Schrödinger user resources directory.
When you have built the complex, you should consider cleaning it up with the Clean Up Complexes Panel, and then running a geometry optimization with Jaguar before proceeding with any calculations on the complex. If the coordination number is greater than 6, the cleanup can make the geometry deviate significantly from the VSEPR geometry. You might also consider running a conformational search with the Organometallic Conformational Search Panel, which allows you to fix specified atoms (such as the coordinated atoms), and also run a Jaguar minimization on the results.
You can switch bonding styles for η-coordinated ligands from multiple zero-order bonds to a centroid bond: to open it, click the Tasks button and browse to Materials → Tools → Toggle Eta Bond Style.
A summary of the main tasks for building complexes and ligands is given below.
To build a complex:
- Enter the atomic symbol for the metal in the Metal text box.
- Choose the coordination geometry from the Geometry option menu.
- Select a ligand.
- (Optional) Modify the ligand structure if necessary to produce the ligand you want.
- Set the number of copies of the ligand molecule in the complex using the Copies cell. The count of occupied coordination sites is updated.
- If you want to add another ligand, click the Add Ligand icon and repeat Step – Step to set up each ligand.
- Click Choose Sites to specify coordination sites for monomeric complexes.
- Click on the sites in the diagram to assign the ligand coordinating atoms to sites, then click OK.
- Click Create or Save to file to save the complex.
To create a new custom ligand:
- Click the pencil icon.
- Sketch the structure in the sketcher.
- Label the ligating atom or atoms with R1 or R2.
- Click Add to saved ligands.
To delete a saved ligand:
- Click Manage saved ligands to open the Manage Saved Ligands dialog.
- Choose the ligand from the list.
- Click Delete.
To change the directory used for ligand templates:
- Click Manage saved ligands to open the Manage Saved Ligands dialog.
- Click Choose for Saved ligand directory.
- In the Choose Directory dialog box, select the directory and click Choose.
Single Complex Builder Panel Features
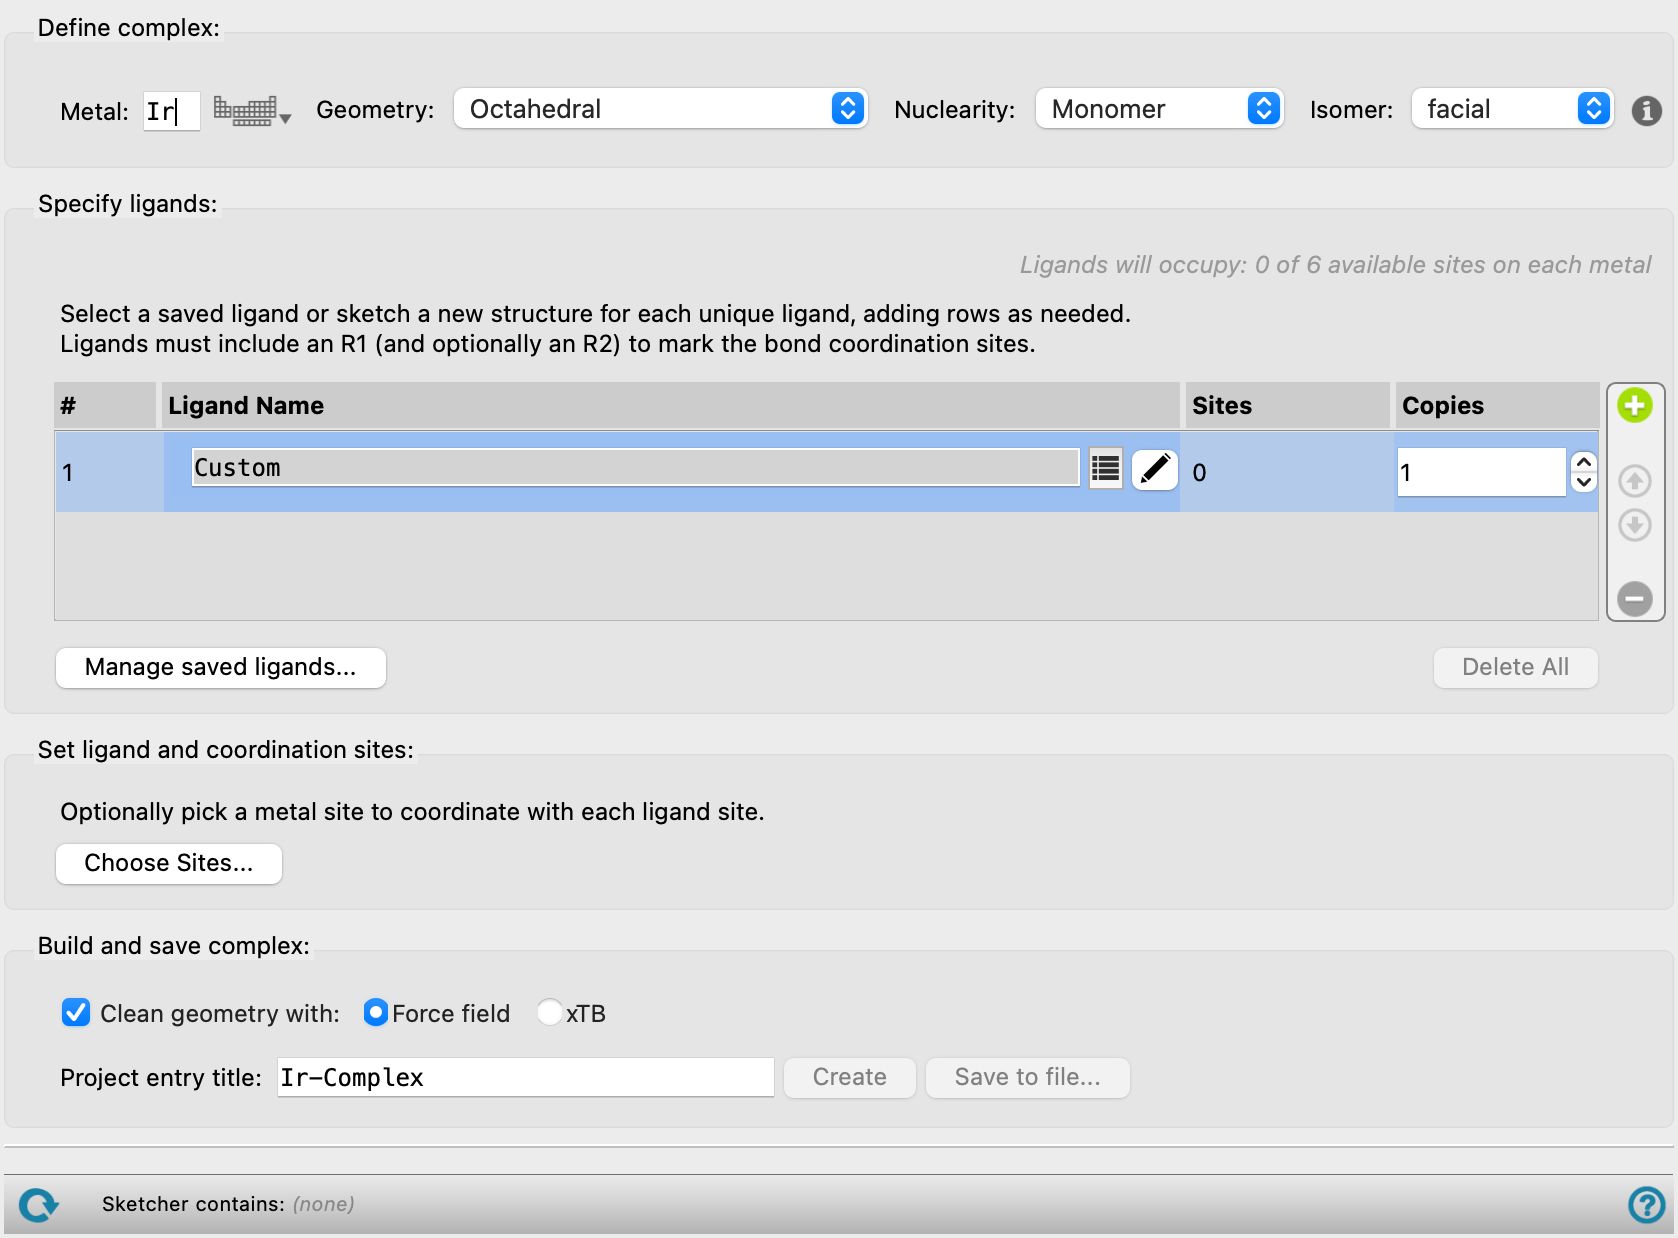
Define complex section
In this section, you provide information on the metal and the coordination geometry.
- Metal text box
-
Enter the atomic symbol for the metal atom(s) in this text box or click Periodic Table to choose an element in a periodic table. You can only enter valid atomic symbols: all other text is disallowed.
- Geometry option menu
-
Choose the geometry of the metal atom(s). The available choices are: Octahedral, Trigonal bipyramidal, Square planar, Tetrahedral, Trigonal planar, Linear, Pentagonal bipyramidal, Square antiprismatic, Tricapped trigonal prismatic, and Square pyramidal.
- Nuclearity option menu
-
Choose the nuclearity of the complex. The available choices are:
-
Monomer—A single metal center in the complex.
-
Dimer—Two metal centers in the complex which are directly bonded to one another.
-
Bridged dimer—Two metal centers which are bound by two copies of a bidentate bridging ligand, where a bidentate ligand is defined as a ligand donating two electron pairs.
-
- Isomer option menu
-
For octahedral complexes, this option menu allows you to specify whether the complex is facial or meridional. This choice is only available if you use three copies of a bidentate ligand, or three copies of two monodentate ligands. For asymmetric bidentate ligands, the facial isomer is the Λ stereoisomer, the meridional isomer is the Δ stereoisomer. If the ligands are symmetric, there are only the two stereoisomers, which are built by choosing the facial or meridional isomer.
For square planar complexes consisting of two pairs of monodentate ligands (i.e. MA2B2), you can choose to build either the cis or the trans isomer from this option menu.
Only available when Monomer is selected in the Nuclearity option menu.
Specify ligands section
In this section, you specify how many different ligands you want to use and how many of each ligand to use. The number of occupied coordination sites is shown at the top of the section. Each ligand is represented by a row, and each row specifies the number of copies of the ligand, and has a button to load or sketch a ligand. For example, for an ML3X3 complex, you would add two rows, one for ligand L and one for ligand X, and for each you would set the number of copies to 3.
- Ligands will occupy text
-
This text area shows the number of coordination sites that are occupied by the ligands specified in the Ligand table.
- Ligand table
-
Specify the types of ligands, how many different ligands, and how many of each ligand to use. By default, one ligand row is displayed. Click on a row to toggle between display and editing mode for the row. Specification of only one ligand is available for terminal and bridging ligands.
-
-
#—The row number. Noneditable.
-
Ligand Name— Select a saved ligand or sketch/edit a ligand. Hover on any name to see the 2D structure. Only available when Monomer is selected in the Nuclearity option menu.
Bridging Ligand Name— Select a saved bidentate ligand or sketch/edit a bidentate ligand to use to connect the two metal atoms in the bridged dimer. Two copies of this ligand are used to form the dimer and the remaining metal coordination sites are filled with terminal ligands. Hover on any name to see the 2D structure. Only available when Bridged dimer is selected in the Nuclearity option menu.
Terminal Ligand Name— Select a saved ligand or sketch/edit a ligand. Hover on any name to see the 2D structure. Only available when Dimer or Bridged dimer is selected in the Nuclearity option menu.
-
ligand title text box—displays the title of the ligand. It is set to Custom by default. The title is filled in when you select a ligand with the ligand selection button.
-
ligand selection button—click this button to open a selection tool from which you can choose a ligand. The tool has the following features:
-
Search text box. Type the text you want to search for in the ligand name. The list of ligands is restricted to those containing the search text as you type.
-
Filter button. This button shows a list of check boxes for applying filters on ligand categories. Each selected filter category is applied to the list of ligands (AND logic) from the list on this menu.
-
ligand list. Choose a ligand from the list. The list is dynamically updated when you use the search or filter tools.
-
-
Sites—Displays the number coordination sites used by the set ligand(s). Noneditable.
-
Copies—Specify the number of ligands per metal center with this structure. Changing the number of copies changes the information on occupation of the coordination sites if a ligand has been assigned to the row.
Click the pencil icon to open the Edit Ligand sketcher. See the 2D Sketcher Dialog Box topic for more information. The ligand sketcher allows you to modify a template structure for a ligand, Reload Ligand, Import from Workspace, or add your own structures. When you have created your ligand, you must draw in a bond from the ligating atom or atoms to a potential metal atom, and label the terminal atom on the bond with R1, or R2 for the second ligating atom of a bidentate ligand. For a bridging ligand where a single atom is coordinating to both metals, you must draw in the two bonds from the single ligating atom to the potential metal atoms, and label the terminal atoms on the two bonds with R1 and R2. To label the atom, you can either use the R+ tool, or right-click on the atom and choose Replace with → New (or Existing) R-Group. The labeled terminal atom is replaced by the metal when the complex is constructed. If the ligand forms a dative bond, you must still add a bond and label it, even if it violates the valence of the ligating atom. For haptic (eta-coordinated) ligands, sketch the ligand and add a labeled R1 atom to one of the ligating atoms as described above, then draw bonds from all the other ligating atoms to this R1 atom. Add this ligand to the saved ligand set by selecting the Add to saved ligands option and then clicking the Save button. The ligand is given a title following IUPAC naming conventions if the Propose name option is selected. If an IUPAC name is not available, Hill notation is suggested.
-
- Ligand row buttons
-
The table has a set of controls for the ligand rows.

Add
Click this button (green circle with plus) to add a ligand row.
Up
Move the selected row up.
Down
Move the selected row down.
Delete
Click this button (red circle with minus) to delete the selected ligand row.Only available when Monomer is selected in the Nuclearity option menu.
- Manage saved ligands button
-
Manage user-defined ligands. Opens the Manage Saved Ligands dialog, in which you can select user-defined ligands from a menu to rename, delete, or set the directory in which to store them. The current directory is displayed at the bottom of the dialog.
- Delete All button
-
Remove all ligands from the table.
Set ligand and coordination sites section
- Choose Sites button
-
Specify the coordination sites for the ligands explicitly, by selecting each site on a diagram of the complex. Opens a dialog box, in which all copies of the ligand are listed with their attachment points. Clicking on a site in the diagram associates the site with the selected attachment point. By default the first attachment point is selected, and the selection moves to the next point (top down, left-right order) when the association is made. Not available for coordination numbers greater than 6.
-
Only available when Monomer is selected in the Nuclearity option menu.
Build and save complex section
Use these buttons to build and save the structure in the Maestro project or in a Maestro file. The structure is converted to 3D before saving.
- Clean geometry with option
-
Optionally, perform a minimization on the complexes and specify the method to use for the minimization. The methods are the same as those used in the Clean Up Complexes Panel:
- Force field—Clean up the geometry of the complexes with a force-field minimization.
- xTB —Minimize the geometry of the complexes with GFN2-xTB. GFN2-xTB is a fast, quantum mechanics-based method and may yield more accurate geometries for many complexes at little additional computational cost.
If you choose not to clean up the geometry when the complex is built, you can use the Clean Up Complexes Panel later to minimize the complexes.
- Project entry title text box
-
Specify the title for the complex. This title is used as the entry title when the complex is saved to a file or added to the Project Table.
- Create button
-
Create an entry in the current project for the complex.
- Save to File button
-
Write the structure of the complex to a Maestro file. A file selector opens, in which you can navigate to a location and name the file.
Status bar
 to reset the panel to its default settings and clear any data from the panel.
If you can submit a job from the panel, the status bar displays information about the current job settings and status for the panel. The settings include the job name, task name and task settings (if any), number of subjobs (if any) and the host name and job incorporation setting. The job status can include messages about job start, job completion and incorporation.
The status bar also contains the Help button  , which opens an option menu with choices to open the help topic for the panel (Documentation), launch Maestro Assistant, or if available, choose from an option menu of Tutorials. If the panel is used by one or more tutorials, hover over the Tutorials option to display a list of tutorials. Choosing a tutorial opens the tutorial topic.
The status bar also displays the name of the ligand for the row currently selected in the ligand table.