Charge Mobility Panel
Calculate charge mobility from the results of an electron coupling calculation by percolation theory or by a method based on energy disorder.
To open this panel: click the Tasks button and browse to Materials → Quantum Mechanics → Optoelectronics → Charge Mobility.
The following licenses are required to use this panel: MS Maestro
- Using
- Features
- Additional Resources
Using the Charge Mobility Panel
This panel can be used to post-process the results of an electron coupling calculation (which can be done with the Electron Coupling Panel). To use the panel, you must import the results of the electron coupling calculation into Maestro, and ensure that structures from entry group containing the results are selected. You can then set up and run the charge mobility calculation on the structures you selected, which takes only a few seconds.
The results of the calculations are one or two mobility values, depending on which of the two methods you chose: charge-type Mobility from Energy Disorder cm2/Vs, and charge-type Mobility from Percolation cm2/Vs, where charge-type can be Hole or Electron. In addition to these, the following Maestro properties are generated for the percolation method. The equations defining these quantities are given in Ref. 16; the definitions or the equation numbers in this paper are listed with the properties.
- charge-type Intermediate Mobility cm2/Vs—Equation 9
- charge-type Local p Value—The index of that dimer in the list of dimers ordered from highest local charge diffusivity (1) to lowest (N), divided by the total number of dimers (N)
- charge-type Local Diffusivity cm2/s—Equation 7
- charge-type Diffusivity cm2/s—Equation 8
- charge-type Delta D cm2/s—Equation 8 * Equation 6 - Equation 7
- charge-type Positive p—True if Local p Value > 0.30 and Delta D > 0; this means the dimer was included in the mobility calculation
If the percolation threshold method is selected, the output structure is the dimer structure with the lowest mobility that participates in the charge mobility pathway, thus it is the dimer that limits the mobility. If this method is not selected, the output structure is the first dimer in the input entry group.
Charge Mobility Panel Features
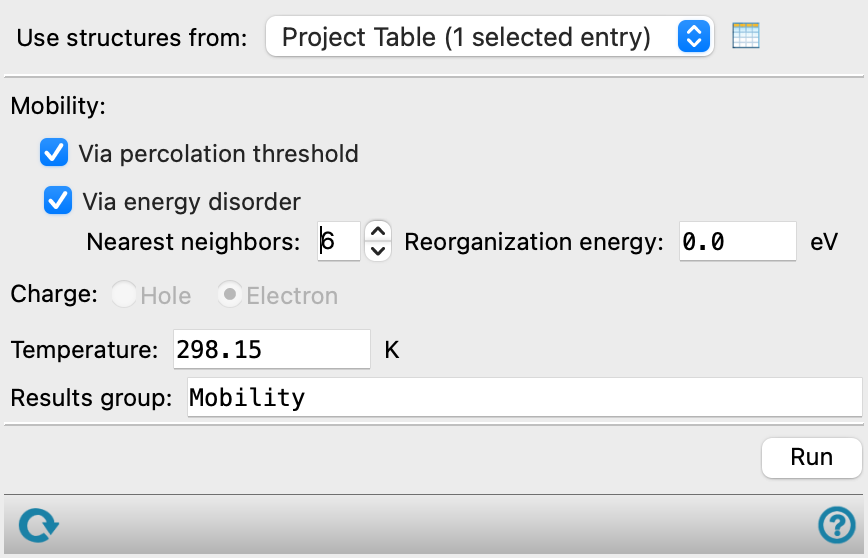
- Use structures from option menu
-
Choose the structure source for the mobility calculation. The structures must come from an Electron Coupling calculation.
- Project Table (n selected entries)—Use the entries that are currently selected in the Project Table or Entry List. The number of entries selected is shown on the menu item.
- Project Table (n selected entries)—Use the entries that are currently selected in the Project Table or Entry List. The number of entries selected is shown on the menu item.
- Open Project Table button
-
Open the Project Table panel, so you can

- Mobility options
-
Choose the methods used to calculate the mobility. You can choose one or both of the methods, listed below.
- Via percolation threshold option
-
Use the percolation threshold method of Evans et al [16]
- Via energy disorder option
-
Use the energy disorder method of Friederich et al [17]. This method requires the specification of the nearest neighbors and the reorganization energy for the hole or electron.[16]
- Nearest neighbors text box
-
Specify the number of nearest neighbors for the energy disorder calculation. This should be a best estimate of the actual number of neighbors for a molecule in the disordered system. It is used to scale the mobility value.
- Reorganization energy text box
-
Specify or change the reorganization energy for the hole or electron. See Optoelectronics Properties for a definition. The value is read in from the input structures, if available, and replaces the value in the text box. This is the value used in the electron coupling calculation, but you can change it after specifying the input structures.
- Charge options
-
Select the type of charge carrier to calculate the mobility for, from Hole or Electron.
- Temperature text box
-
Specify the temperature at which the mobility is calculated.
- Results group text box
-
Specify the name of the entry group that will be used to store the output structure.
- Run button
-
Run the calculation. The results are presented in an information dialog box, and added as Maestro properties to the output structure.
- Status bar
-
 to reset the panel to its default settings and clear any data from the panel.
If you can submit a job from the panel, the status bar displays information about the current job settings and status for the panel. The settings include the job name, task name and task settings (if any), number of subjobs (if any) and the host name and job incorporation setting. The job status can include messages about job start, job completion and incorporation.
The status bar also contains the Help button
 , which opens an option menu with choices to open the help topic for the panel (Documentation), launch Maestro Assistant, or if available, choose from an option menu of Tutorials. If the panel is used by one or more tutorials, hover over the Tutorials option to display a list of tutorials. Choosing a tutorial opens the tutorial topic.