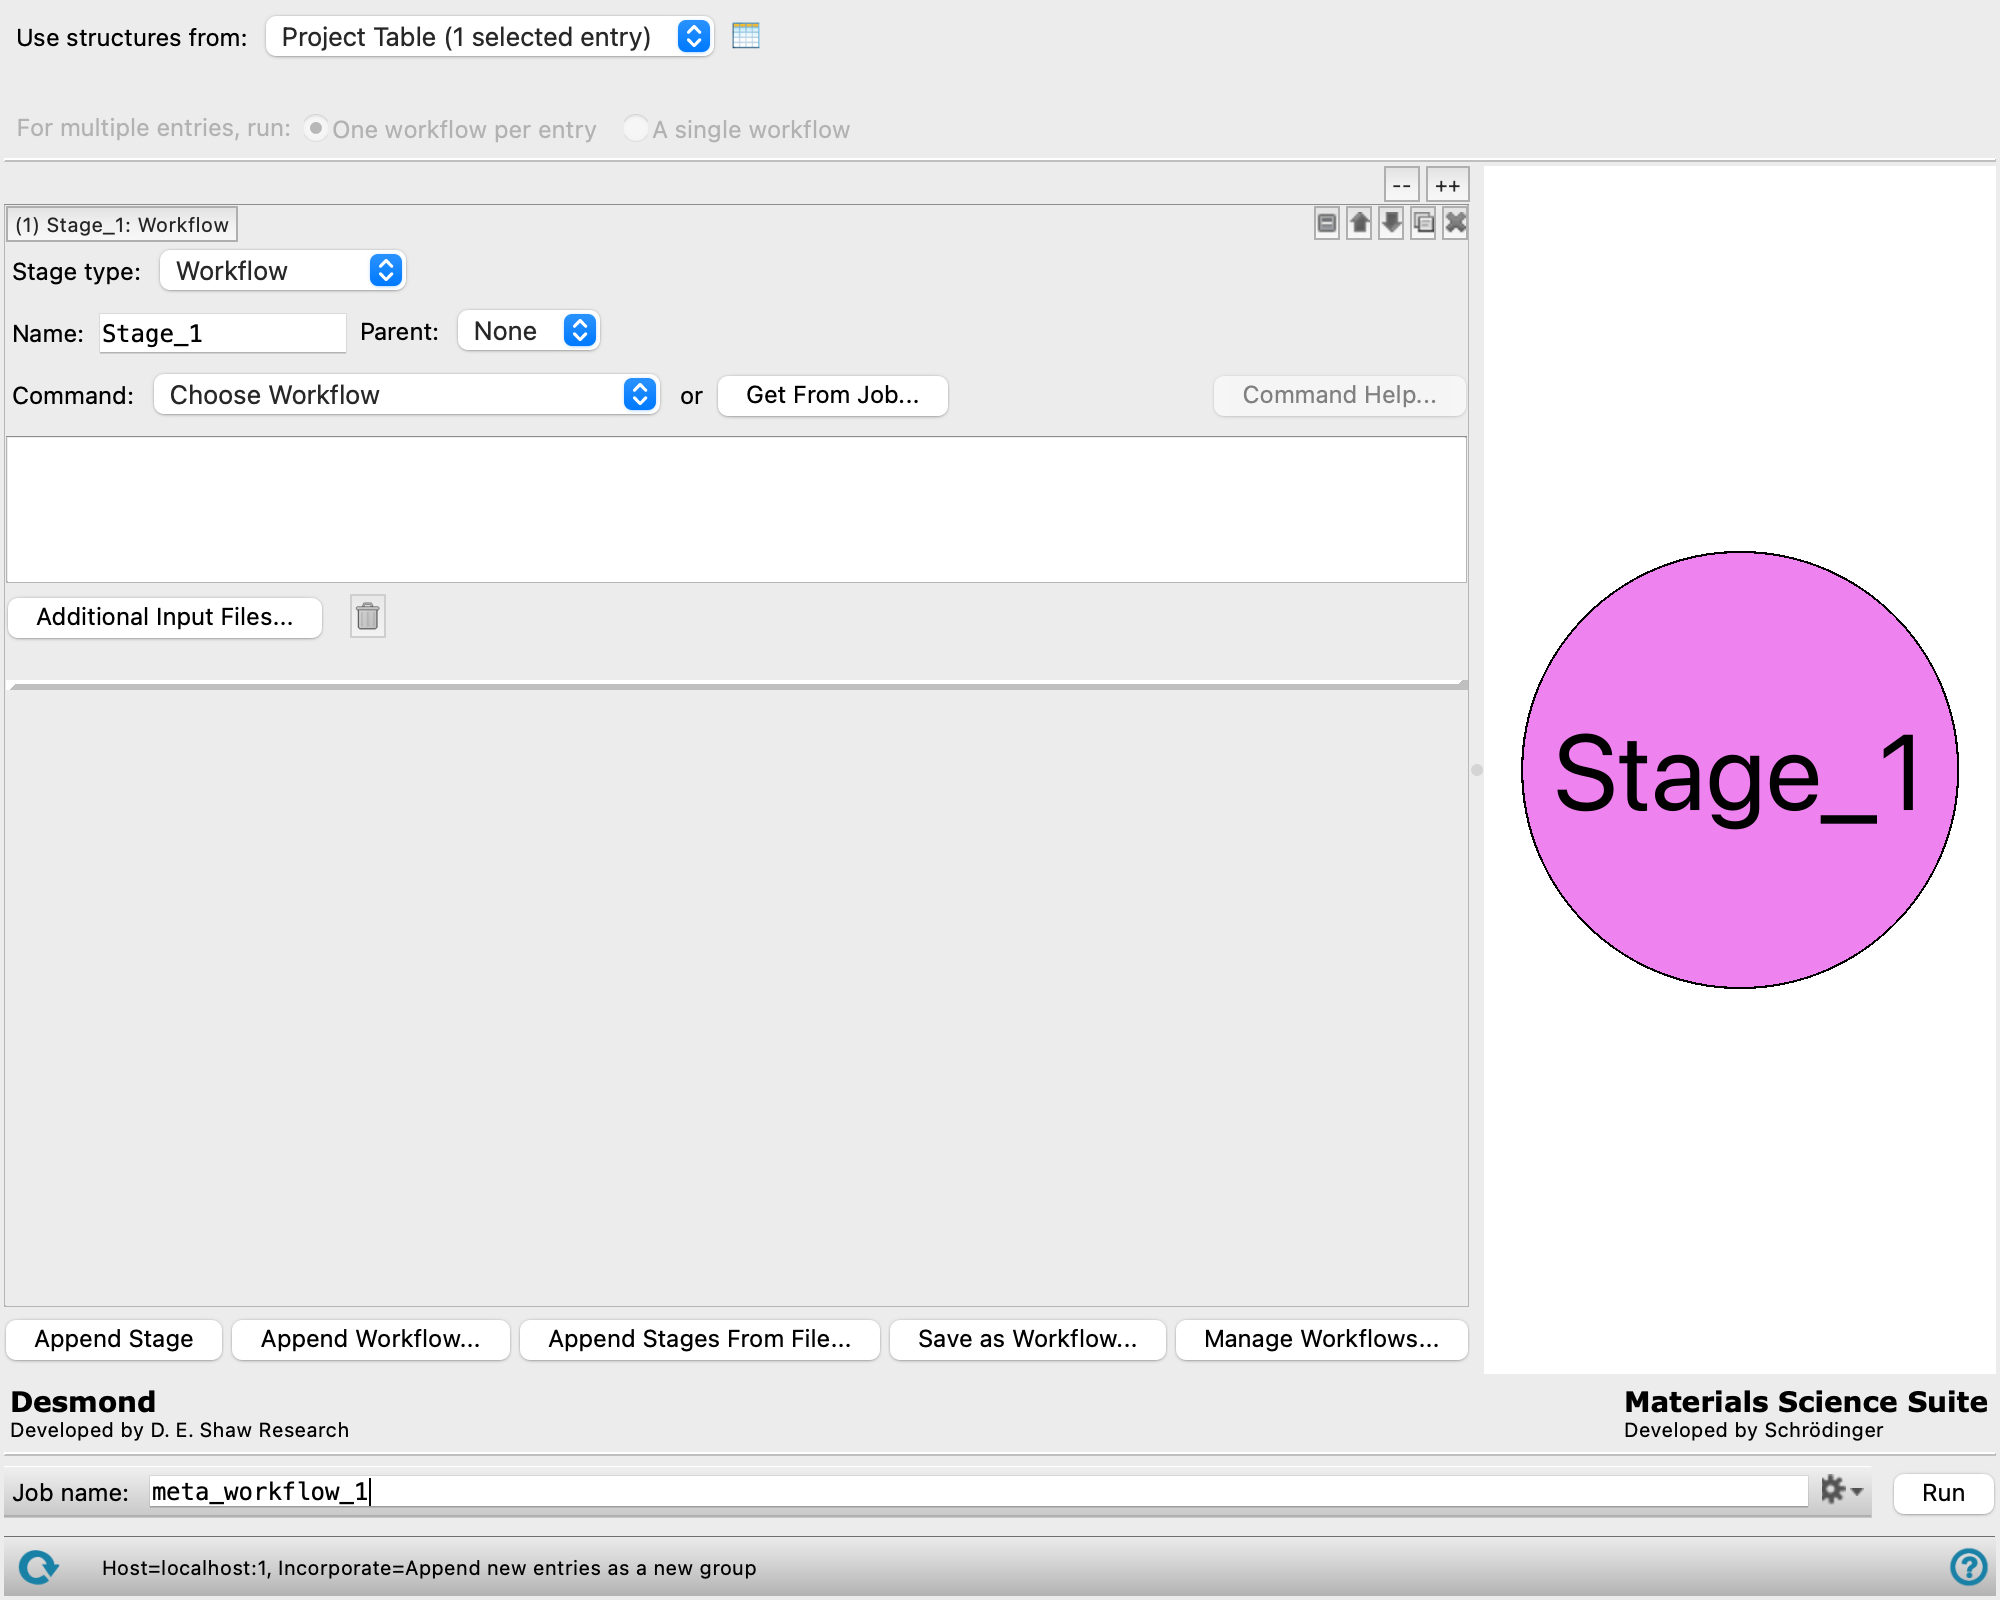
Meta Workflow Builder Panel
Set up workflows to combine multiple simulation tasks from a simulation protocol into one job.
To open this panel: click the Tasks button and browse to Materials → Tools → Meta Workflows → Meta Workflow Builder .
The following licenses are required to use this panel: MS Maestro, additional licenses are workflow dependent
- Using
- Features
- Additional Resources
Using the Meta Workflow Builder Panel
The Meta Workflow Builder panel allows you to automate multi-step protocols for various material science applications using a graphical user interface rather than through writing a script. You can combine built-in single stage workflows, molecular dynamics (MD) simulations, and custom tasks into a "meta" workflow. A graph-based representation of the workflow provides visualization for the stages and how they connect.
Meta workflows can be saved and applied to different systems from the Run Meta Workflow Panel.
There are five types of meta workflow stages to choose from:
-
Workflow stages allow you to add built-in single stage workflows. See Single Stage Workflows for a list of currently supported workflows.
-
Simulation stages allow you to choose from 7 types of MD simulation stages.
-
Molecular QM stages allow you to run quantum mechanics calculations with Jaguar.
-
Custom script stages allow you to incorporate a custom script, or run a single stage workflow which has not been added to the built-in list (e.g., Uncertainty Quantification)
-
Flow control stages allow you to launch duplicate workflows from distinct output structures, and later merge the workflow by recombining separate structures into one input.
When the panel opens, a single Workflow stage is shown. You can add stages in the following ways:
-
Click Append Stage to add a new Workflow stage at the end of the list.
-
Click Append Workflow to add a built-in single stage workflow or a stages from a previously saved meta workflow.
-
Click the Duplicate button
 at the top right of a stage to duplicate the stage, with all its settings. The new stage is placed below the source stage.
 -
Click the Append Stages from File button to add stages from a workflow
.wfwfile.
You can rearrange stages with the arrow buttons 
 at the top right of the stages. This makes it easy to duplicate an earlier stage then move it down into the desired location, and modify the settings.
If you want to see only some of the stages, you can show or hide the options with the show and hide buttons 
 . This is useful when you have a number of stages and want to compare two separated stages, for example. You can also show or hide a stage by clicking on the stage label, or clicking on the stage in the Workflow diagram. Show or hide all the stages with the expand all (++) and collapse all (--) buttons.
When the meta workflow job is run, each stage is submitted to the queueing system for execution in the proper sequence. Stages which have a parent stage or other required stages do not run until the parent or required stages have successfully completed. Stages which do not depend on results from another stage are simultaneously submitted to the queue and continue to run even if another stage has failed. Certain stages can be submitted to both CPU or GPU hosts, while other require a Linux GPU host. You can specify hosts for the meta workflow stages as well as the meta workflow driver from the Meta Workflow Builder - Job Settings Dialog Box
When the job finishes, the structures produced by all stages are incorporated into the project. All properties generated by a step are stored on the output structure for that step.
To write out the input file and a script for running the job from the command line, click the arrow next to the Settings button  and choose Write.
Meta Workflow Builder Panel Features
- Structure Source
- Use structures from option menu
- Open Project Table button
- File name text box and Browse button
- For multiple entries, run options
- Collapse/expand all buttons
- Stage Management
- Stage and Workflow Buttons
- Append Stage button
- Append Workflow button
- Append Stages From File button
- Save as Workflow button
- Manage Workflows button
- Workflow diagram
- Job toolbar
- Status bar
Structure Source
Choose the source of initial structures for the calculations and how to incorporate them in the workflow. The type of input structure required for a meta workflow depends on the initial stage of the workflow. For example, if the initial stage normally requires a fully prepared Desmond system in a standalone calculation, then the meta workflow requires a fully prepared Desmond system. Two single stage workflows, Disordered System Builder and Polymer Builder, can combine multiple input structures into a single output structure. For the Polymer Builder, head and tail atoms for each monomer can be assigned with the Mark Monomer Head and Tail Panel prior to using them in the meta workflow. SMILES files (.smi, .smi.gz, .smigz, or .cxsmiles) are accepted as input for the Meta Workflow using the File option. The format of the file is one SMILES per line, with each line optionally containing a second (space-delimited) column with the structure title.
- Use structures from option menu
-
Choose the structure source for the workflow.
- Project Table (n selected entries)—Use the entries that are currently selected in the Project Table or Entry List. The number of entries selected is shown on the menu item.
- Workspace (included entry)—Use the entry that is currently included in the Workspace. Only one entry must be included in the Workspace.
- File—Use the specified file. When this option is selected, the File name text box and Browse button are displayed.
- Project Table (n selected entries)—Use the entries that are currently selected in the Project Table or Entry List. The number of entries selected is shown on the menu item.
- Open Project Table button
-
Open the Project Table panel, so you can

- File name text box and Browse button
-
Enter the file name in this text box, or click Browse and navigate to the file. The name of the file you selected is displayed in the text box.
- For multiple entries, run options
-
You can choose to run separate meta workflows for each selected entry or run a single meta workflow on a selection of multiple structures.
Only available if multiple entries are selected in the Use structures from option menu.
-
One workflow per entry— For each selected entry, the meta workflow is independently run.
-
A single workflow—The selected entries are combined and run in a single workflow. This option is only possible if the first step of the meta workflow can combine multiple structures (e.g., Disordered Systems Builder, Polymer Builder). Otherwise, an error is thrown when you click Run.
-
Collapse/expand all buttons
These two buttons (labeled -- and ++) allow you to collapse all workflow stages or expand all workflow stages. When expanded, a scroll bar allows you to navigate the stages.
Stage Management
The left hand side of the panel has a list of workflow stages, which are executed in the sequence that they appear in this list. You can visualize the stages and how they connect in the workflow diagram.
- Stage label
-
The label indicates the stage number, stage name, and the type of the stage. It is updated if the stage type or name is changed, or the stage is moved. If the stage settings are hidden, the label gives a brief summary of the main stage parameters. Click the label to expand or collapse the individual stage. You can also expand individual stages by clicking on the stage in the Workflow diagram.
- stage management buttons
-
These buttons perform display and ordering operations on the stage. They allow for easy duplication and rearrangement of stages.
Show or hide the contents of the stage. When hidden, only the stage number, label (if any) and these buttons are displayed. This is useful when you have a number of stages and want to compare two separate stages, for example. Move the stage up or down one place in the list.
Duplicate the stage. This is useful for creating similar stages with variations on the settings. 
Delete the stage. - Stage type option menu
-
Select the type of simulation stage, from Workflow, Simulation, Molecular QM, Custom Script, or Flow control. When you select a stage type, the label is updated with the type, and the relevant settings are displayed below. Click on a stage type below to see the features for that option.
 Workflow options
- Name text box
-
Specify a name for the current stage. The stage name is appended to any file names and structure titles associated with that stage. The Name text box cannot be blank and different names must be specified for each stage. Stage names should be short, be able to be used in valid file names, and not have any white space. By default, the stage is given the name "
Stage_n", wherenis the nth stage to be added. If stages are added using the Append Workflow button, the predefined stage name is used. - Parent option menu
-
Select a parent stage. The option menu lists stages which are sequentially above the current stage. Each stage can only have one parent. The output structure or trajectory from the parent stage is used for the current stage. The current stage only starts after the parent stage is successfully finished.
-
Parent stages connect to the child stage by an arrow (→) in the Workflow diagram.
- Command options
-
Specify the command for the Workflow stage by using the option menu or Get From Job button. You can also type directly in the text box. Hover over text box or use the Command Help button to display more information about the script options.
If you are manually typing a command in the text box, replace any input file names with
$input(e.g.,my_job_name.maeto$input.mae) and path to input trajectory files with$trj. At run time,$inputis replaced by the job name of the stage, and$trjis replaced by the path to the output trajectory from the parent stage. Use$parent_outfilein a command to specify that the output structure file from the parent stage be copied directly into the job directory for this stage. At run time,$parent_outfileis replaced with the name of the output structure file from the parent stage.$parent_outfileis only supported for the free volume analysis Workflow stage.-asl mol.n 7should be changed to-asl "mol.n 7". The command is automatically formatted if using the- Command option menu
- Choose a default single stage workflow. The text box is populated with the command for running the stage.
- Get From Job button
- Populate the text box by reading the command from an existing driver log (
*-driver.log) or command shell file (.sh). Opens a file selector, in which you can navigate to and open the file..shfiles are produced and written to the job directory when a job is run, or by clicking the Job Settings button () from a panel and selecting Write. - Command Help button
- Opens the command help in a separate dialog box for the script in the text box.
- Text box
- Displays the command to be run for this stage.
- Additional Input Files button
- Opens a file selector, so that you can select additional input files needed to run the command beyond the structure input file. Examples include a second structure file such as needed by the
-substrateflag for the Disordered System Builder, or additional data files required for a custom script. The file is copied into the directory where that stage is run.
- Job Settings button
-
Opens a dialog box where you can specify the maximum number of subjobs that can be run at any one time for the current stage. The maximum number is limited by the number of processing units on the host you choose.
Only present for the Disordered System Builder, Polymer Builder, Elastic Constants, and Thermophysical Properties stages.
Simulation options
- Name text box
-
Specify a name for the current stage. The stage name is appended to any file names and structure titles associated with that stage. The Name text box cannot be blank and different names must be specified for each stage. Stage names should be short, be able to be used in valid file names, and not have any white space. By default, the stage is given the name "
Stage_n", wherenis the nth stage to be added. If stages are added using the Append Workflow button, the predefined stage name is used. - Parent option menu
-
Select a parent stage. The option menu lists stages which are sequentially above the current stage. Each stage can only have one parent. The output structure or trajectory from the parent stage is used for the current stage. The current stage only starts after the parent stage is successfully finished.
-
Parent stages connect to the child stage by an arrow (→) in the Workflow diagram.
- Simulation Type option menu
-
Select the type of simulation stage, from Molecular dynamics, Brownian Minimization, Materials relaxation, Compressive Relaxation, Semi-crystalline relaxation 1, Semi-crystalline relaxation 2, or Custom. When you select a simulation type, the relevant settings are displayed below.
-
Molecular dynamics—Specify a Molecular dynamics simulation. See Molecular dynamics and Brownian minimization simulation options.
-
Brownian minimization—The Brownian Minimization stage relaxes a system into a local energy minimum, using a Brownian motion simulation. See Molecular dynamics and Brownian minimization simulation options.
-
Materials relaxation—Robust protocol for materials science applications. Consists of a 20 ps NVT Brownian minimization at 10 K, a 20 ps NPT Brownian minimization at 100 K, then a 100 ps NPT MD stage at the specified temperature. See Relaxation options.
-
Compressive relaxation—Useful for compressing systems that are built to a low density, such as from the Disordered System Builder. It uses a high-pressure NPT stage (among other stages) to increase the density of the system. See Relaxation options.
-
Semi-crystalline relaxation 1—Custom protocol for semicrystalline polymer relaxation. This protocol should be used by default for semicrystalline polymers. It can fail on certain types of structures; if it does, use the Semicrystal relaxation 2 protocol. Consists of a 100 ps NVT Brownian minimization at 10 K with crystal atoms restrained, a 200 ps NPAT MD stage at 50 K and 1.01325 bar with crystal atoms restrained, a 200 ps NVT MD stage at 50 K without restraints, a 50 ps NPT-anisotropic MD stage at 50 K and 1.01325 bar without restraints, then a 5 ns NPT-anisotropic annealing stage from 50 K to the specified temperature at 1.01325 bar without restraints. See Relaxation options.
-
Semi-crystalline relaxation 2—Custom protocol for semicrystalline polymer relaxation, with more degrees of freedom. This protocol should only be used when the Semicrystal relaxation 1 fails, as it tends to produce a less crystalline system. Consists of a 100 ps NVT Brownian minimization at 10 K with crystal atoms restrained, a 200 ps NVT MD stage at 100 K with crystal atoms restrained, a 200 ps NVT MD stage at 50 K without restraints, a 50 ps NPT-anisotropic MD stage at 50 K and 1.01325 bar without restraints, then a 5 ns NPT-anisotropic annealing stage from 50 K to the specified temperature at 1.01325 bar without restraints. See Relaxation options.
-
Custom—Include a custom simulation stage. See Custom simulation options.
-
- Molecular dynamics and Brownian minimization simulation options
-
- Ensemble class option menu
-
Choose the ensemble class from this option menu. The following classes are available:
- NVE—constant particle number (N), volume (V) and energy (E). This class represents the microcanonical ensemble.
- NVT—constant particle number (N), volume (V) and temperature (T). This class represents the canonical ensemble.
- NPT—constant particle number (N), pressure (P) and temperature (T). This class is an isothermal-isobaric ensemble, the common experimental conditions.
-
- Simulation time text box
-
Specify the desired simulation time in ns.
- Time step text box
-
Specify the time step for the simulation in fs.
- Temperature text box
-
Specify the temperature to be used, in kelvin.
- Pressure text box
-
Specify the pressure to be used, in bar.
- Coupling type
-
Choose the coupling style from this option menu, from Isotropic and Anisotropic. Not available for the NVE and NVT ensemble classes.
- Set random number seed option and text box
-
Select this option to specify a random seed to be used in the simulations. Specifying the seed allows you to reproduce the results, unless other factors affect them. If this option is not selected, a seed is chosen at random.
- Trajectory recording interval text box
-
Set the recording interval for saving points on the trajectory, in ps. This is the amount of time between frames in the trajectory. The entered value is rounded to an integer multiple of the far time step size. The resultant number of records to be written is reported to the right.
- Average cell size over last % of frames option and text box
-
Constructs a new cell whose dimensions are averages over a specified portion of the end of the simulation. The percentage of the trajectory to use can be specified in the text box. This option is intended to create an average cell from the end of a stable NPT simulation where the cell volume is fluctuating by a few percent at most. As the fluctuations get bigger, it is more likely that a relaxation stage would be needed before using the cell for the next stage. This option is useful when a stable cell is needed for NVT simulations, where the cell size is stabilized in a preceding NPT simulation. The final cell size from an NPT simulation might not adequately represent the stable cell, but the average should. The fractional coordinates from the last frame are used to define the structure for the average cell.
- Perform analysis option
-
Select this option to perform analysis and generate the
.eaffile needed to use the MS MD Trajectory Analysis Panel for analysis of bulk properties. The properties selected for analysis are volume, density, cohesive energy, heat of vaporization, specific heat capacity, solubility parameter, and pressure tensor. There is a limit of 15000 molecules for the calculation of properties other than the volume, density, and specific heat capacity (for which there is no limit).
- Relaxation simulation options
-
- Temperature text box
- Specify the temperature at which the relaxation protocol is performed, in kelvin.
- Custom simulation options
-
- Load MSJ File button
-
Add a custom simulation stage from a previous simulation, by importing a multisim MSJ file (
.msj). Opens a file selector, in which you can navigate to and open the file. It is highly recommended that you import simulations that were initiated from the MD Multistage Workflow Panel as these simulations have settings that were customized for materials science applications.Any
.cfgfiles that are referenced in the MSJ file are automatically included. For MSJ files that contain multiple stages, the results (CMS and trajectory files) from the final stage is used as input for the next step.
Molecular QM options
- Name text box
-
Specify a name for the current stage. The stage name is appended to any file names and structure titles associated with that stage. The Name text box cannot be blank and different names must be specified for each stage. Stage names should be short, be able to be used in valid file names, and not have any white space. By default, the stage is given the name "
Stage_n", wherenis the nth stage to be added. If stages are added using the Append Workflow button, the predefined stage name is used. - Parent option menu
-
Select a parent stage. The option menu lists stages which are sequentially above the current stage. Each stage can only have one parent. The output structure or trajectory from the parent stage is used for the current stage. The current stage only starts after the parent stage is successfully finished.
-
Parent stages connect to the child stage by an arrow (→) in the Workflow diagram.
- Options button
-
Set Jaguar options for the stage. Machine learning force fields can be used in place of the quantum mechanics calculations. Opens the Jaguar Options - Dialog Box. This dialog box also allows you to specify additional Jaguar keywords. The solvent (if any), level of theory, and basis set are shown to the right of the button.
- Compute ESP charges for MD simulations option
-
Select this option to calculate the atomic electrostatic potential (ESP) charges as part of the QM calculation. The resulting charges are used in any following stages that apply or use a force field. Only available when the machine learning force field option is not selected in the Jaguar Options Dialog Box.
- Job Settings button
-
Opens a dialog box where you can specify the number of threads per subjob to use. The total number of processors requested is the product of the number of subjobs and the number of threads specified.
Custom script options
- Name text box
-
Specify a name for the current stage. The stage name is appended to any file names and structure titles associated with that stage. The Name text box cannot be blank and different names must be specified for each stage. Stage names should be short, be able to be used in valid file names, and not have any white space. By default, the stage is given the name "
Stage_n", wherenis the nth stage to be added. If stages are added using the Append Workflow button, the predefined stage name is used. - Parent option menu
-
Select a parent stage. The option menu lists stages which are sequentially above the current stage. Each stage can only have one parent. The output structure or trajectory from the parent stage is used for the current stage. The current stage only starts after the parent stage is successfully finished.
-
Parent stages connect to the child stage by an arrow (→) in the Workflow diagram.
- Required option menu
-
Select any required stages that must finish before the current stage starts. The option menu lists stages which are sequentially above the current stage. You can select one or more of the stages as a required stage. Unlike a parent stage, output from a required stage is not passed to the current stage on the command line. This option is useful when constructing a stage which consolidates the results from multiple stages of a workflow using a custom script. Required stages are connected to the current stage by a dotted line (---) in the Workflow diagram.
Required stages cannot be a stage running as part of duplicated workflows launched by a Multiple Structure Splitter Flow control stage or certain Workflow stages.
-
Only present for Custom script stage.
- Input option menu
-
Select the input source for the custom script, from Maestro (.maegz), Desmond system (.cms), or Other. If Maestro (.maegz) or Desmond system (.cms) is selected, the input file should contain a single structure. If Other is selected, the input source must be selected using the Select Input File button. You can only choose Other if the current stage has a parent Custom script stage or is itself a parent stage.
- Output option menu
-
Select the output file type produced by the custom script, from Maestro (.maegz) or Desmond system (.cms). The name of the output file created by the script must be the name of the input followed by "
-out.x" where x is the output file type. For example, if the input file is namedmyfile.maegz, the output file should be named eithermyfile-out.cmsormyfile-out.maegz. - Produces trajectory option
-
Select this option if the output of the custom script contains a trajectory file.
- Select Input File button
-
Indicate the location of the input file. Opens a file selector, in which you can navigate to and open the file. The input file is copied from this location into the job directory.
Only present when Other is selected from the Input option menu.
- Use job control option
-
Select this option to submit the stage via job control. You can only use this option if the script can interact correctly with job control. The script must a) implement the
get_job_spec_from_argsfunction in a way that tells job control to copy the script and input file to the remote host and b) ensure that job control copies back the output file from the remote host.If the option is not selected, the stage runs as a simple shell command on the Meta Workflow Driver host. (i.e., as if the script is run from the command line without a -HOST flag).
- Locate script button
-
Indicate the location of the custom python script (
.py). Opens a file selector, in which you can navigate to and open the file. The script is copied from this location into the job directory. - Command options
-
Specify the command for the custom script by using the Get From Job button or typing directly in the text box.
If you are manually typing a command in the text box, replace any input file names with
$input(e.g.,my_job_name.maeto$input.mae) and path to input trajectory files with$trj. At run time,$inputis replaced by the job name of the stage, and$trjis replaced by the path to the output trajectory from the parent stage. Use$parent_outfilein a command to specify that the output structure file from the parent stage be copied directly into the job directory for this stage. At run time,$parent_outfileis replaced with the name of the output structure file from the parent stage. Any argument that contains spaces should be wrapped in double quotation marks. For example,-asl mol.n 7should be changed to-asl "mol.n 7". The command is automatically formatted if using the Get From Job button.- Get From Job button
- Populate the text box by reading the command from an existing driver log (
*-driver.log) or command shell file (.sh). Opens a file selector, in which you can navigate to and open the file..shfiles are produced and written to the job directory when a job is run, or by clicking the Job Settings button () from a panel and selecting Write. - Text box
- Displays the command to be run for this stage.
- Additional Input Files button
- Opens a file selector, so that you can select additional input files needed to run the command beyond the structure input file. Examples include a second structure file such as needed by the
-substrateflag for the Disordered System Builder, or additional data files required for a custom script. The file is copied into the directory where that stage is run.
- Job Settings button
-
Opens a dialog box where you can specify the maximum number of subjobs to run simultaneously and the number of threads per subjob to use. The total number of processors requested is the product of these numbers, as each subjob runs with the specified number of threads.
Only present if the Use job control option is selected.
Flow control options
- Multiple Structure Splitter launches duplicate workflows for multiple entries
- Combine Steps combines multiple output structures into one input and merges duplicate workflows that have been launched by either Multiple Structures Splitter or certain built-in Workflow stages
-
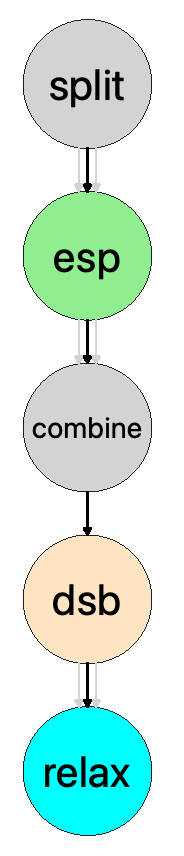
split: The Multiple Structure Splitter Flow control stage separates the 2 selected entries into 2 separate input files.
-
esp: A Molecular QM stage to compute ESP charges is specified. 2 separate jobs are launched using the 2 input files generated by the Multiple Structure Splitter.We refer to these as “duplicate” workflows.
-
combine: The Combine Steps Flow control stage combines the output from the previous stage into one input file containing the 2 structures and computed the ESP charges.
-
dsb: The Disordered System Builder workflow stage builds a system containing the 2 structures in the input file at the ratio specified by the
-compositionoption. An-ncells 5option is added to the command, which causes 5 replicate systems to be generated by the disordered system builder as 5 output structures. -
relax: The last step is a relaxation simulation stage. Since the previous step produced 5 distinct output structures, 5 relaxation jobs are launched with each of the structures. We refer to these as “duplicate” workflows.
- Name text box
-
Specify a name for the current stage. The stage name is appended to any file names and structure titles associated with that stage. The Name text box cannot be blank and different names must be specified for each stage. Stage names should be short, be able to be used in valid file names, and not have any white space. By default, the stage is given the name "
Stage_n", wherenis the nth stage to be added. If stages are added using the Append Workflow button, the predefined stage name is used. - Parent option menu
-
Select a parent stage. The option menu lists stages which are sequentially above the current stage. Each stage can only have one parent. The output structure or trajectory from the parent stage is used for the current stage. The current stage only starts after the parent stage is successfully finished.
-
Parent stages connect to the child stage by an arrow (→) in the Workflow diagram.
- Controller option menu
-
Select the action to perform for the structures of the previous stage.
-
Combine Steps—Merges multiple output structures from the preceding stage into one input. This input is used for the following steps of the workflow.
You should only use this option if a previous stage of the workflow has generated multiple output structures which are used to run duplicate workflows. This may be caused by a Multiple Structure Splitter Flow control stage or built-in workflows such as the Disordered System Builder, Polymer Builder, Extract Clusters, or Macromodel Conformational Search. Built-in stages which generate multiple output structures and launch duplicate workflows for those structures have the text “Multiple output structures will split child stages” shown at the bottom of the stage. In the Workflow diagram, this is indicated by multiple arrows (⇛) flowing from the stage.
Note that using this option merges the duplicate workflows, and only one copy of the following stage is run using the combined input file.
-
Multiple Structure Splitter—This option can be used as the first stage of a meta workflow to treat multiple selected entries as separate input structures. It can also be used following a custom script which produces multiple structures to run the workflow from each structure.
In the following steps of the workflow, instead of running one workflow with the multiple entries grouped into a single structure file, duplicate workflows are run using each entry as a unique input structure.
-
A flow control stage has two functionalities:
The following example walks through a possible workflow which contains both these functionalities as well as a built-in Workflow stage that launches duplicate workflows using an initial selection of 2 entries:
Stage and Workflow Buttons
These buttons allow you to add stages to the workflow, save the workflow, and manage existing workflows.
- Append Stage button
-
Add a stage to the end of the workflow. By default, the stage is a Workflow stage and the preceding stage is set as the Parent stage.
- Append Workflow button
-
Append stages from the saved workflows set. Opens the Load Workflow dialog box where you can select single stage workflows that are included by default, as well as any workflows you have previously saved.
- Append Stages From File button
-
Add stages by importing them from a workflow file (
.wfw) that is not in the default location. Opens a file selector, in which you can navigate to and open the file. All stages from the file are appended to the workflow. - Save as Workflow button
-
Save the current workflow in the standard location in your Schrödinger user resources directory. The Workflow Metadata dialog box opens, where you can enter the workflow Name and Description, any Tags, the associated Schrödinger Suite version, and the Creator of the workflow. The workflow is stored in a single plain text file with the extension
_workflow.wfw. You can access any saved workflows from the Load Workflow dialog box, Manage Workflows dialog box, and Run Meta Workflow Panel. - Manage Workflows button
-
Opens the Manage Workflows dialog box, which lists single stage workflows that are included by default and any workflows you have previously saved. You can delete saved workflows by selecting it from the list and clicking the Delete button. Deleted workflows are no longer available from the Load Workflow dialog box or Run Meta Workflow Panel.
Workflow diagram
-
The Workflow diagram provides a graphical representation of the meta workflow.
Each stage in the workflow is represented by a circle. The label inside each circle indicates the name of the stage. Parent and child stages are connected by arrow (→) from the parent stage to the child stage. If a stage produces multiple output structures which launch duplicate workflows, it is indicated by triple arrows. A stage which requires other stages are connected to them by a dotted line (---). A stage which generates multiple output structures and launches duplicate workflows on those structures is indicated by multiple arrows (⇛) flowing from the stage.
The colors of the circles indicate the type of stage:
- Tan (
■
)—The stage uses a structure builder. - Cyan (
■
)—The stage runs a molecular dynamics simulation. - Green (
■
)—The stage runs a quantum mechanics calculation. - Gold (
■
)—The stage uses a custom script. - Gray (
■
)—The stage is a Flow control stage. - Magenta (
■
)—Other. For example, a stage which involves trajectory analysis is magenta.
Click on a circle to expand the settings for that stage and collapses the other stages in the Stage Management section.
- Tan (
Job toolbar
Manage job submission and settings. See Job Toolbar for a description of this toolbar.
The Job Settings button opens the Meta Workflow Builder - Job Settings Dialog Box, where you can make settings for running the job.
Status bar
 to reset the panel to its default settings and clear any data from the panel.
If you can submit a job from the panel, the status bar displays information about the current job settings and status for the panel. The settings include the job name, task name and task settings (if any), number of subjobs (if any) and the host name and job incorporation setting. The job status can include messages about job start, job completion and incorporation.
The status bar also contains the Help button  , which opens an option menu with choices to open the help topic for the panel (Documentation), launch Maestro Assistant, or if available, choose from an option menu of Tutorials. If the panel is used by one or more tutorials, hover over the Tutorials option to display a list of tutorials. Choosing a tutorial opens the tutorial topic.